[Ebook Việt Hóa] New Plant Parent - Darryl Cheng
[Ebook Việt Hoá] New Plant Parent (Darryl Cheng) – Phần 01 – 07. Water (Nước)
Th2
- Nguồn: [Ebook] New Plant Parent: Develop Your Green Thumb and Care for Your House-Plant Family – Darryl Cheng
- Biên tập: Dũng Cá Xinh (Tháng 01/2022)
- Dịch: Team Codai.net
English
Water
Routine house-plant care revolves around watering. First-time plant parents struggle with simplistic instructions—“pour some water on the soil once a week” or “don’t overwater” are common examples—and often wonder if they’re doing the right thing. They may see a plant adjusting to its new home by dropping older leaves, and they’ll stress the plant more by watering too much or too little.
In this chapter, we’ll try to turn watering from a chore into the positive experience of interacting with a growing plant. In time, you’ll learn how much water each plant needs, based on its habits and the amount of light it gets, but first you’ll want to make sure that the water you’re giving it is reaching the roots. While frequency and amount of watering do play a key role in plant care, there’s a bigger picture when it comes to promoting happy roots, and that involves learning some basic watering and soil management practices.
Watering for Even Moisture
The goal of watering your plants is to ensure that soil is moistened correctly. The moisture should be as evenly distributed as possible—this is why soil structure is important. Roots will be happiest when you begin to get a feel for the conditions they’re living in, the fluctuating levels of moisture and dryness and the degree of compaction and airiness in the soil around them.
Three Practical Watering Methods
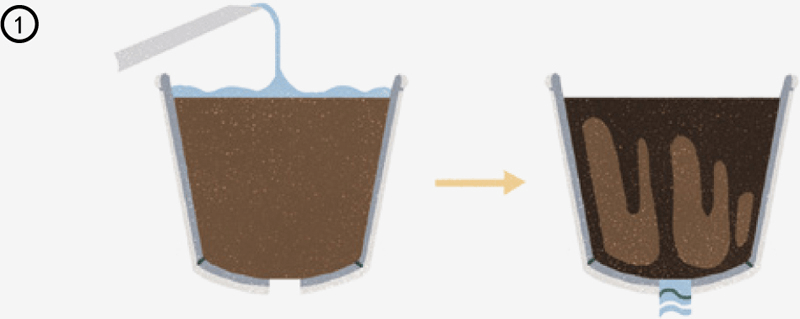
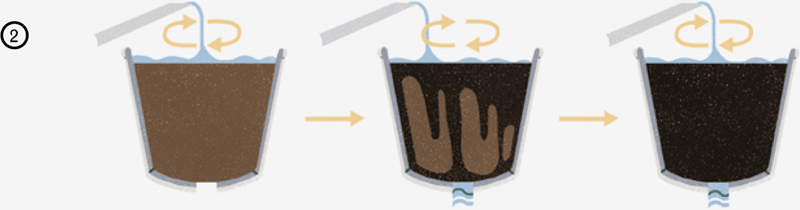
 1 Quick Pour
Pour enough water to moisten and penetrate the surface of the soil without causing an overflow at the bottom of the pot. I use this method on a thirsty plant (the kind that prefers evenly moist soil) as a way to hold the plant over until the next time I can do a thorough watering. Take a minute to aerate the soil, especially if the plant is very dry, to facilitate a more even distribution of moisture.
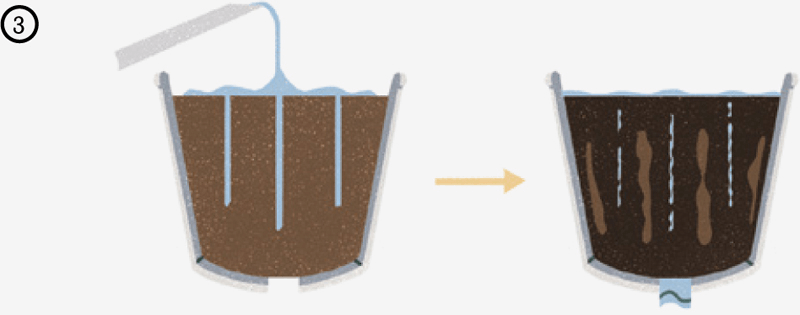
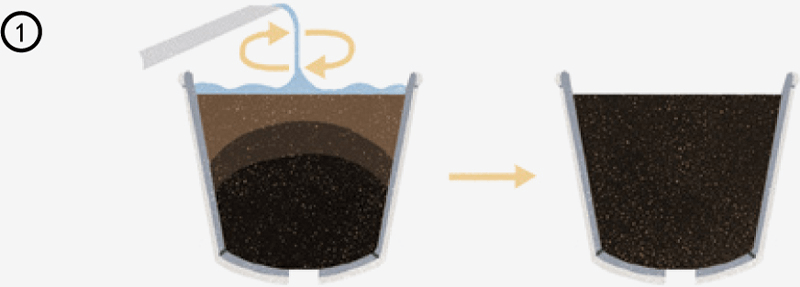
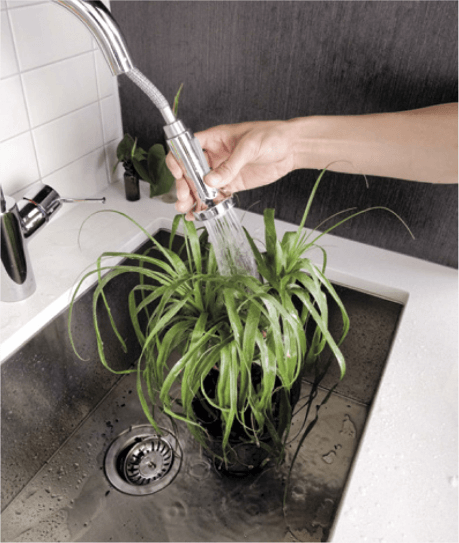
 2 Continuous Pour Through
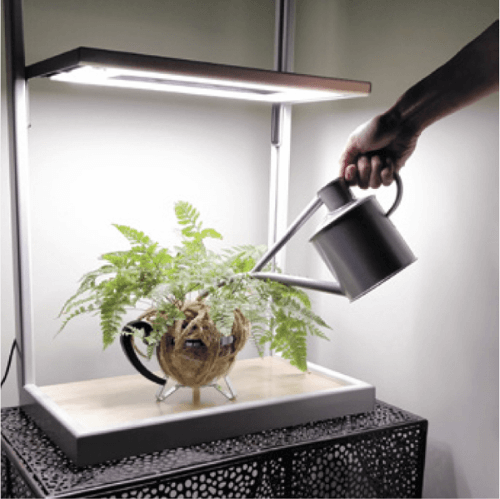
This is typically done over the sink. The method involves continually pouring water onto the top of the soil until water runs out through the drainage hole. This method is useful to wash salts that can be harmful out of the soil, but it also leeches away water-soluble nutrients. Every now and then, a plant enjoys a good soaking, and the plant parent can enjoy it too.
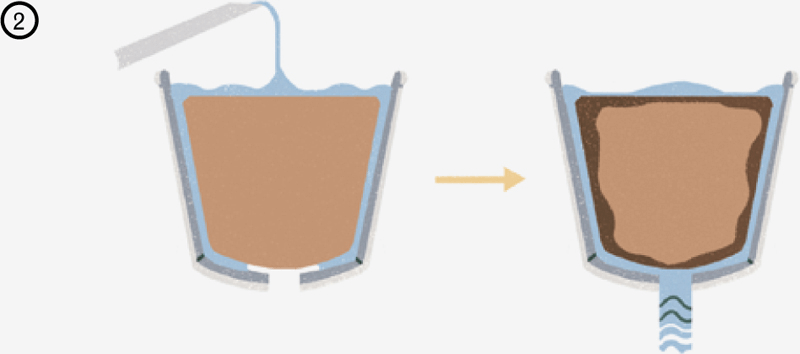
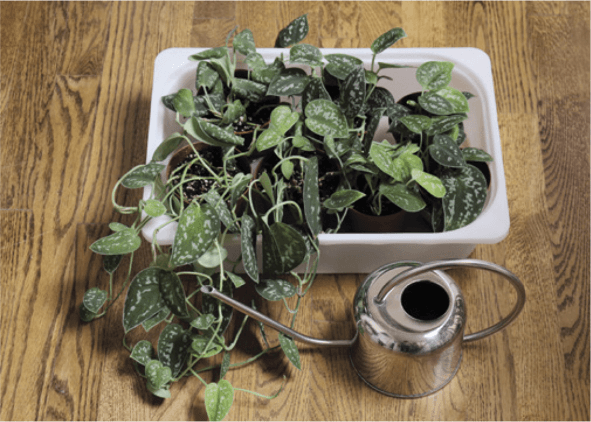
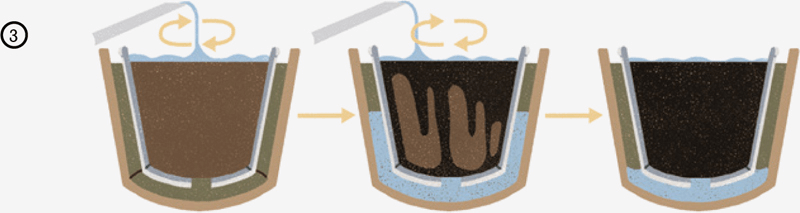 3 Pour Through with Soak Up
This is most easily accomplished when the plant is potted in a plastic nursery pot with drainage holes and sits inside a waterproof container or cachepot. You can also move several small plants to a low-walled plastic bin for watering. After a few hours, when the soil has soaked up as much water as possible, you discard the excess. This is a good method for bringing the soil to maximum saturation.
Which Method to Use?
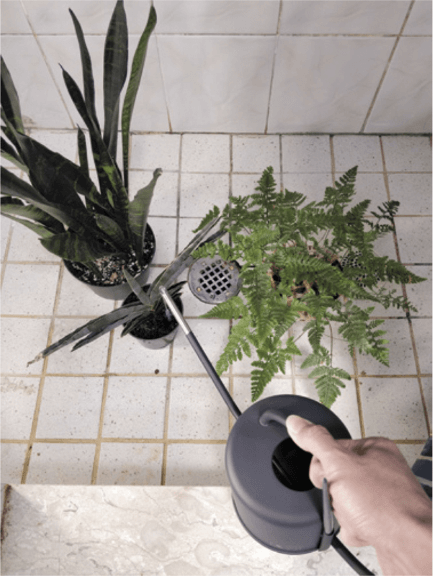
All of them! I randomly rotate my watering method and regularly aerate my soil to avoid any imbalances caused by any one of the methods. The quick pour may not reach dry pockets, but it’s the least time consuming. The other two methods take more time and space, but you should get accustomed to moving plants around to water them properly. You’ll also get used to the needs of different plants: A thirsty maiden-hair fern will only stay happy with consistently moist soil, which calls for a thorough soaking every time; a snake plant at a distance from the window will almost always have compacted soil, so you’ll be gently loosening the soil each time you water.
Soil Aeration—The Least Known and Most Helpful Plant Care Technique
When I first started to share my soil-aeration technique, someone commented, “I’ve successfully grown house plants for years and have never aerated the soil like this!” The truth is, air flows to the roots each time you water—just listen to the crackling as you pour. But as a plant is growing, its roots repeatedly absorb moisture from the surrounding soil, pulling the particles together into dry clumps. If you’re really on top of watering moisture-loving plants, the soil structure will never dry out, remaining acceptably loose with each watering. And when you repot the plant, the fresh soil will be nice and airy. The problems of compacted soil arise especially with plants that can tolerate dry soil. Even a good soaking might not moisten the dry clumps, and the plant is at risk of suffocating from lack of airflow. Getting into the habit of soil aeration will help you know each plant’s soil better—you can feel its consistency and better judge how compacted it has become.
Remember the illustrations on the nursery, the wild, and the home environments? Both the nursery and the wild have agents of soil aeration, grated work benches and insects respectively. You must be the agent of soil aeration for your plants at home. Out in nature, plant roots are accustomed to a dynamic rhizosphere; by comparison, living in a container inside your home will literally bore them to death.
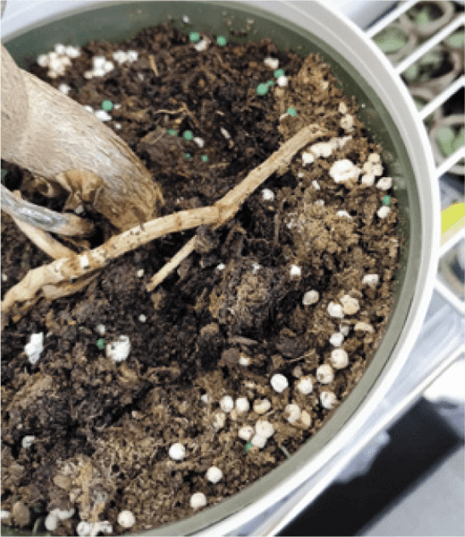
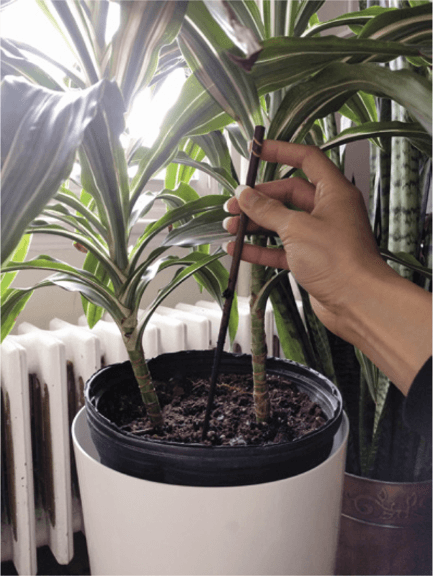
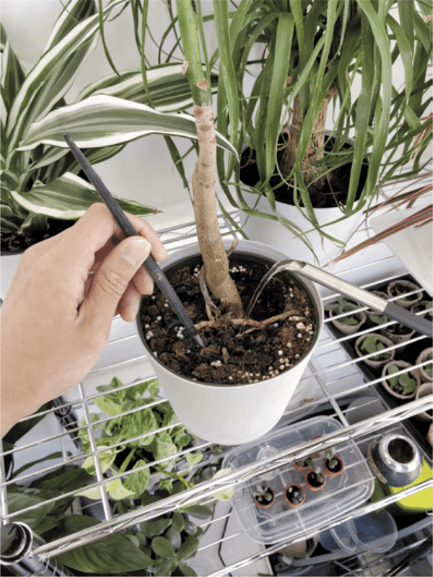
Using a chopstick or any other blunt poker, gently pierce the surface of the soil a short distance away from the main vine (a half inch or more). As you probe, feel the stiffness—withexperience, you will be able to tell if the soil is moist or dry. Wet soil will stick to the probe; lightly moist soil will be soft; dry soil will be brittle and possibly compacted. You are also trying to assess the degree of soil compaction to determine how much you need to loosen it. If you think of the soil as a cylindrical block, the purpose of aeration is to break that block into smaller pieces so that water and air can more easily penetrate. Perlite, vermiculite, and coarse sand can all passively aid in soil aeration, but by aerating the soil with a chopstick, you are effectively taking an active role in managing the soil’s structure, just as insects and worms do for plants in the wild.
A good rule of thumb for soil aerating is that plants that require evenly moist soil also enjoy well-aerated soil. Plants that prefer periods of dryness between watering can tolerate more compacted soils, but since you’re watering them less frequently, the likelihood of the soil becoming too compacted is higher. Ideally, you should aerate soils just prior to watering—this way, the action of the water trickling through the soil will help resettle the soil around any roots that are exposed to the air.
Be a bit careful when you poke plants that produce thick, tuberous roots or bulbs. You should avoid piercing these as you aerate, although they regenerate quickly. A short list of such plants: ZZ plant, oxalis, spider plant, asparagus fern, and tuberous begonia (obviously!).
Watering Challenges
Your pot has no drainage holes:
If you plant directly into an enclosed container, you need to adjust your watering strategy. First, do not put a layer of gravel at the bottom of the container. When water ends up in this layer of gravel, it has nowhere to go. Stale water in a space that gets no fresh air is a recipe for growing bacteria that causes root rot. So skip the drainage layer and ensure that your plant is getting enough light to grow actively and use up soil moisture. As for watering, take care that you do not pour in a volume of water greater than a third of the volume of the soil—think of the soil like a sponge that can only hold so much water; any more and the plant would be swimming in a muddy soup. You can reduce the volume to a quarter or even a fifth of the total soil volume for succulents and cacti. Let the soil soak it all in, and the roots will use up that water before rot has a chance to set in.
Your plant is big and heavy:
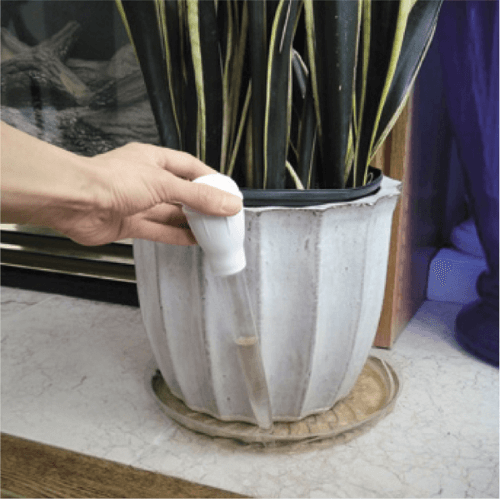
You can’t put a large plant in the sink, and you don’t want water ending up on the floor. The moment you see water draining into the saucer under the plant, stop watering. Keep a turkey baster to draw up the drainage water, as the water can overflow the saucer surprisingly quickly. If there is no drainage hole, then you’ll have to estimate the amount of water to add by volume. In either case, it will help to pour the water in slowly to ensure that the soil absorbs as much water as possible. When you pour quickly, the water tends to drain past the soil particles without moistening them.
The Watering Algorithm: Determining When to Water
Knowing when to water means knowing the amount of moisture a particular plant likes:
- Plant prefers evenly moist soil: The soil should be kept evenly moist at all times. The moment you see even the surface of the soil become dry, it’s time to water. Plants such as maidenhair fern, Fittonia (nerve plant), and peace lily enjoy evenly moist soil—mostly these are thin-leaved plants.
- Plant prefers partially dry soil: The soil should be allowed to dry down to an inch or two from the surface. Most foliage house plants are in this category.
- Plant prefers completely dry soil: The soil should be allowed to dry out completely before the next watering. All cacti, succulents, and thick-leaved house plants enjoy completely dry soil, because they store the water needed for photosynthesis in their bodies.
Remember: All watering techniques should be performed on plants that are actively growing. In daily light intensities below 100 foot-candles, even the most resilient “low light” plants will succumb to root rot!
The Pothos Test
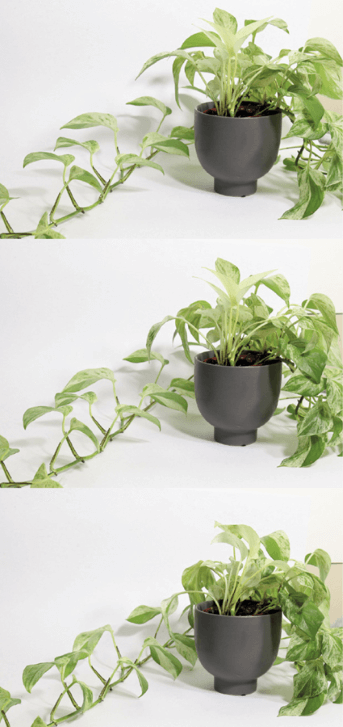
You want to water a house plant “whenever the plant needs it.” The obvious question then becomes, how do you know when the plant needs it? Try this with a perky pothos (see overleaf): Put the plant in a place where it is getting bright indirect light—say, more than 200 foot-candles at the daytime high. Note how bouncy the foliage is—this is a properly hydrated pothos. Use a chopstick and gently poke around the soil to get a feeling for this evenly moist soil. Now, let the plant grow there, and notice how the leaves will be less bouncy after several days. Feel the soil again with the chopstick—now the soil probably has some dry pockets. This is the point at which you should water, but for the sake of this experiment, don’t do it yet. In a day or two more, the leaves will show visible signs of wilting—they are droopy. Now probe the soil with the chop-stick: It’s probably rocky, stiff, and compacted. What happened over these few days? The soil moisture was continually being absorbed by the roots and transported to the leaves, where some of the water was combined with carbon dioxide to produce sugar. While this happened, the soil particles were being pulled toward the roots. As these soil particles were literally sucked dry, they clumped together into rocky masses. At this point, just pouring some water into the soil won’t saturate all the dry pockets that have formed. In the future, for this pothos, you will watch for that first sign of droopiness to know when to water. While this experimental method works well with pothos because of its hardiness, some plants are so sensitive to wilting that they will suffer permanent foliar damage if their soil is left dry for even a day—maidenhair fern, for example. In those cases, instead of observing the plant for signs of dry soil, you should just directly check the soil. On the other hand, many house plants—snake plants and ZZ plants are examples—will not wilt in completely dry soil, and if you really waited until they did, they would be half dead! For these plants, do not aim to keep the soil evenly moist. Give them a thorough watering (and aerating) when the soil becomes bone dry.
The Well-adjusted Plant
Now that we’ve looked at both light and water, we can begin to understand how they affect plant growth. The following illustrations will help you understand light, watering, and, most important, plant adjustment.
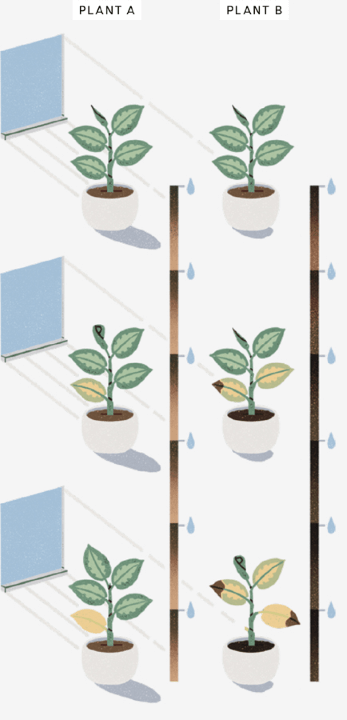
SITUATION
You bought two identical plants from the nursery and placed them in your home. One plant is closer to the window than the other, but you were instructed to water them once a week. Fortunately for Plant A, the soil became dry enough to need watering again within the week—the moist-to-dry cycle is roughly a week, so the plant stays happy. Notice in the last stage, the oldest leaf has become yellow—this is most likely the result of adjustment to lower light levels compared to the nursery.
Plant B has a different life; being slightly farther away from the window means it is getting much less light. But because you arbitrarily set Sunday as watering day, you continued to water this plant just like Plant A. Look how the soil isn’t drying to the same degree in the one-week time frame. When you water it, the soil just becomes more saturated, but that moisture doesn’t go into producing carbohydrates for the plant because that requires more light—there is some photosynthesis going on, but not much. Instead, water being pumped into the leaves from the roots just sits there until some cells rupture, causing the leaf tips to turn dark brown. If the situation persists, roots can become susceptible to rot, causing the whole plant to eventually die. This is overwatering—prolonged saturated soil in a low light environment.
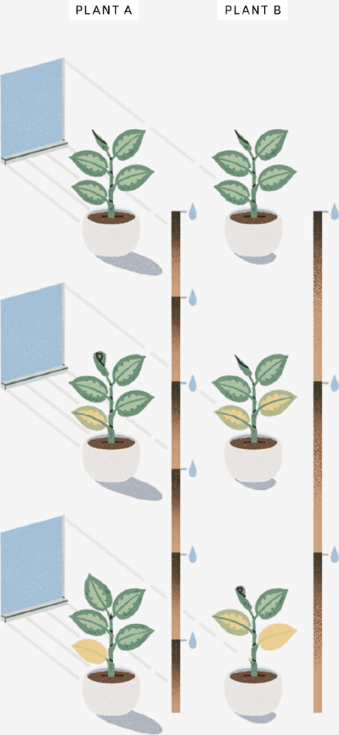
SITUATION
Now that you’ve learned how to observe the soil to decide when to water, you adjust the frequency of watering accordingly. Let’s say Plant A reaches the appropriate dryness in one week while Plant B, a bit farther from the window, reaches the same dryness in two weeks. Now you’re watering according to each plant’s moist-to-dry cycle and understanding that the light intensity difference is the reason why the intervals are different
As time passes, you wonder why Plant B seems to have lost more leaves than Plant A. This is the effect of the adjustment period. When you brought those plants home, fresh from the nursery, all that lush foliage was the result of many months (or maybe years) of experiencing ideal conditions for rapid growth. Now, in order to adapt to lower light levels, the plant must let go of older leaves as new ones develop. You wouldn’t waste your energy installing a lot of solar panels in a place that doesn’t get much sun, right? Many people would deem Plant B to be unhappy, but I see it as simply adjusting to make do with the conditions it has been given. The plant could go on living for many years with just two or three leaves at the top—this is simply how the plant has stabilized to its current conditions. This is why a fresh plant from the nursery always looks out of place if you put it in a windowless corner—it’ll have to downsize!
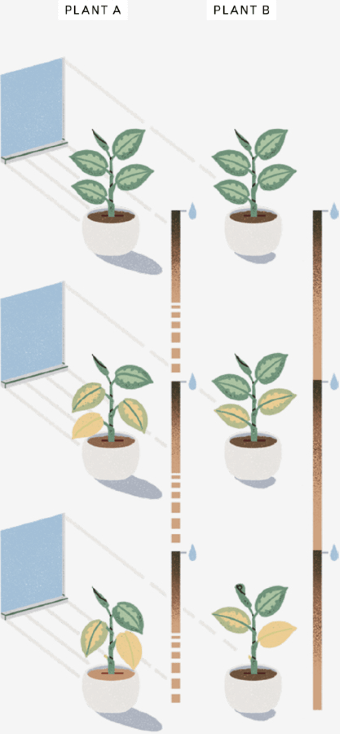
SITUATION
Let’s say you’re getting lazy and decide to water both plants at the frequency of Plant B, every two weeks. Because Plant A is photosynthesizing faster, its soil will dry out faster. When potting soil becomes very dry, it also becomes compacted and tight. The next time you water, some of the dry pockets may not rehydrate, causing the plant to wilt even after you’ve watered. If the cycle continues in this way, the compacted soil will not rehydrate until good soil structure has been restored. Letting the soil stay dry for too long also stunts plant growth.
LESSON
Managing the soil means understanding how water flows through the soil as you pour it. Understand that plants receiving a greater intensity of light will require soil remoistening more frequently. Compacted soil should be aerated before watering to facilitate a more even moisture distribution.
Many new plant parents mistake the effects of adjustment to a new home as the plant’s dying. A plant needs to let go of older foliage in favor of producing new foliage. Given enough time, the plant will reach an equilibrium point where foliage growth equals foliage loss—the plant is well adjusted—but this doesn’t mean it will stay looking the same forever. This is especially true of most tropical foliage plants, as they do not go into a true dormancy period, when all foliage dies back so that new foliage can grow in the next season from tubers or bulbs.
At this point, I hope you can understand why “don’t overwater” is not helpful advice. All it does is instill a fear of watering and an intolerance for the circle of life. If you ensure that your plant is getting the right kind of light, water it according to its moisture preferences, and manage its soil structure by occasionally aerating it to prevent soil compaction, it will be happy.
Add a healthy dose of acceptance that nature is about survival and not your aesthetic standards, and you will be on your way to an enjoyable plant parenthood journey.

Tiếng Việt
Nước
Chăm sóc cây trồng trong nhà thường xuyên xoay quanh việc tưới nước. Những cây cha mẹ lần đầu gặp khó khăn với những chỉ dẫn đơn giản—“đổ một ít nước lên đất mỗi tuần một lần” hoặc “đừng tưới quá nhiều nước” là những ví dụ phổ biến—và thường tự hỏi liệu họ có đang làm đúng hay không. Họ có thể thấy cây thích nghi với ngôi nhà mới của mình bằng cách rụng những chiếc lá già hơn và họ sẽ gây căng thẳng cho cây nhiều hơn khi tưới quá nhiều hoặc quá ít.
Trong chương này, chúng ta sẽ cố gắng biến việc tưới nước từ một công việc vặt thành trải nghiệm tích cực khi tương tác với cây đang phát triển. Theo thời gian, bạn sẽ biết mỗi loại cây cần bao nhiêu nước, dựa trên thói quen của nó và lượng ánh sáng mà nó nhận được, nhưng trước tiên, bạn sẽ muốn đảm bảo rằng lượng nước bạn cung cấp cho nó sẽ đến tận rễ. Mặc dù tần suất và lượng nước tưới đóng một vai trò quan trọng trong việc chăm sóc cây trồng, nhưng có một bức tranh lớn hơn khi nói đến việc thúc đẩy rễ khỏe mạnh và điều đó liên quan đến việc học một số phương pháp quản lý đất và tưới nước cơ bản.
Tưới nước cho độ ẩm đồng đều
Mục tiêu của việc tưới cây là đảm bảo đất được làm ẩm đúng cách. Độ ẩm phải được phân bổ đều nhất có thể—đây là lý do tại sao cấu trúc đất lại quan trọng. Rễ sẽ hạnh phúc nhất khi bạn bắt đầu cảm nhận được điều kiện mà chúng đang sống, mức độ dao động của độ ẩm và độ khô cũng như mức độ nén chặt và thoáng khí của đất xung quanh chúng.
Ba phương pháp tưới nước thiết thực
1 Tưới nhanh
Tưới đủ nước để làm ẩm và thấm qua bề mặt đất mà không gây tràn đáy chậu. Tôi sử dụng phương pháp này đối với cây khát nước (loại cây ưa đất ẩm đều) như một cách để giữ cây cho đến lần tưới tiếp theo. Dành một phút để sục khí cho đất, đặc biệt nếu cây rất khô, để tạo điều kiện phân phối độ ẩm đồng đều hơn.
2 Tưới liên tục
Điều này thường được thực hiện trên bồn rửa. Phương pháp này bao gồm việc liên tục tưới nước lên trên mặt đất cho đến khi nước chảy ra ngoài qua lỗ thoát nước. Phương pháp này rất hữu ích để rửa sạch muối có thể gây hại ra khỏi đất, nhưng nó cũng lấy đi các chất dinh dưỡng hòa tan trong nước. Thỉnh thoảng, một cây được ngâm nước tốt và cây mẹ cũng có thể được hưởng điều đó.
3 Tưới vào và hấp thụ
Điều này dễ dàng thực hiện nhất khi cây được trồng trong chậu ươm cây bằng nhựa có lỗ thoát nước và đặt bên trong thùng hoặc chậu không thấm nước. Bạn cũng có thể di chuyển một số cây nhỏ vào thùng nhựa có thành thấp để tưới nước. Sau vài giờ, khi đất đã ngấm càng nhiều nước càng tốt, bạn loại bỏ phần thừa. Đây là một phương pháp tốt để đưa đất đến trạng thái bão hòa tối đa.
Nên sử dụng phương pháp nào?
Tất cả! Tôi luân phiên phương pháp tưới nước của mình một cách ngẫu nhiên và thường xuyên sục khí cho đất để tránh bất kỳ sự mất cân bằng nào do bất kỳ phương pháp nào gây ra. Quá trình rót nhanh có thể không đến được các túi khô nhưng lại tốn ít thời gian nhất. Hai phương pháp còn lại tốn nhiều thời gian và không gian hơn, nhưng bạn nên làm quen với việc di chuyển cây xung quanh để tưới nước đúng cách. Bạn cũng sẽ quen với nhu cầu của các loại cây khác nhau: Một cây dương xỉ tóc thiếu nữ khát nước sẽ chỉ hài lòng với đất ẩm liên tục, đòi hỏi phải ngâm kỹ mỗi lần; một cây rắn ở khoảng cách xa cửa sổ hầu như sẽ luôn có đất nén chặt, vì vậy bạn sẽ nhẹ nhàng nới lỏng đất mỗi khi tưới nước.
Sục khí cho đất—Kỹ thuật chăm sóc cây trồng ít được biết đến nhất và hữu ích nhất
Khi tôi lần đầu tiên bắt đầu chia sẻ kỹ thuật sục khí vào đất của mình, có người đã nhận xét: “Tôi đã trồng cây trong nhà thành công trong nhiều năm và chưa bao giờ sục khí vào đất như thế này!” Sự thật là không khí sẽ đi vào rễ mỗi khi bạn tưới nước—chỉ cần lắng nghe tiếng răng rắc khi bạn tưới nước. Nhưng khi cây đang phát triển, rễ của nó liên tục hút ẩm từ đất xung quanh, kéo các hạt lại với nhau thành những cục khô. Nếu bạn thực sự quan tâm đến việc tưới nước cho những loại cây ưa ẩm, thì cấu trúc đất sẽ không bao giờ bị khô, vẫn giữ được độ tơi xốp chấp nhận được sau mỗi lần tưới. Và khi bạn thay chậu cho cây, đất tươi sẽ đẹp và thoáng. Các vấn đề về đất nén đặc biệt phát sinh với các loại cây có thể chịu được đất khô. Ngay cả việc ngâm nước tốt cũng có thể không làm ẩm các cục khô và cây có nguy cơ bị chết ngạt do thiếu luồng không khí. Tập thói quen sục khí cho đất sẽ giúp bạn hiểu rõ hơn về đất của từng loại cây—bạn có thể cảm nhận được độ đặc của nó và đánh giá chính xác hơn mức độ chặt của nó.
Bạn có nhớ những hình minh họa về môi trường nhà trẻ, môi trường hoang dã và gia đình không? Cả vườn ươm và hoang dã đều có tác nhân sục khí đất, băng ghế làm việc và côn trùng tương ứng. Bạn phải là tác nhân sục khí đất cho cây trồng của bạn ở nhà. Trong tự nhiên, rễ cây đã quen với một vùng rễ năng động; bằng cách so sánh, sống trong một thùng chứa bên trong nhà của bạn sẽ khiến họ chết theo đúng nghĩa đen.
Sử dụng một chiếc đũa hoặc bất kỳ que cùn nào khác, nhẹ nhàng chọc thủng bề mặt đất cách cây nho chính một khoảng ngắn (nửa inch trở lên). Khi bạn thăm dò, hãy cảm nhận độ cứng—với kinh nghiệm, bạn sẽ có thể biết đất ẩm hay khô. Đất ướt sẽ dính vào đầu dò; đất ẩm nhẹ sẽ mềm; đất khô sẽ giòn và có thể bị nén chặt. Bạn cũng đang cố gắng đánh giá mức độ nén chặt của đất để xác định mức độ nới lỏng của nó. Nếu ví đất như một khối hình trụ thì mục đích của sục khí là phá vỡ khối đó thành những mảnh nhỏ hơn để nước và không khí dễ dàng xâm nhập hơn. Đá trân châu, đá vơ-mi và cát thô đều có thể hỗ trợ sục khí cho đất một cách thụ động, nhưng bằng cách sục khí vào đất bằng một chiếc đũa, bạn đang đóng vai trò tích cực trong việc quản lý cấu trúc của đất một cách hiệu quả, giống như côn trùng và giun làm đối với thực vật trong tự nhiên.
Một nguyên tắc nhỏ để sục khí cho đất là những cây cần đất ẩm đều cũng thích đất thoáng khí. Những cây ưa thời gian khô ráo giữa các lần tưới có thể chịu được đất nén chặt hơn, nhưng vì bạn tưới chúng ít thường xuyên hơn nên khả năng đất trở nên quá nén sẽ cao hơn. Lý tưởng nhất là bạn nên sục khí cho đất ngay trước khi tưới—bằng cách này, tác động của nước chảy qua đất sẽ giúp tái định cư đất xung quanh bất kỳ rễ nào tiếp xúc với không khí.
Hãy cẩn thận một chút khi bạn chọc những cây có củ hoặc củ dày. Bạn nên tránh xỏ lỗ những thứ này khi sục khí, mặc dù chúng tái sinh nhanh chóng. Một danh sách ngắn các loài thực vật như vậy: cây Kim Tiền (ZZ plant), Chua Me Đất (Oxalis), Cỏ Lan Chi (Spider plant), Vân Phiến Trúc (Asparagus setaceus) và Thu Hải Đường (Tuberous Begonia) (hiển nhiên!).
Những thử thách khi tưới nước
Chậu của bạn không có lỗ thoát nước:
Nếu trồng trực tiếp vào thùng kín, bạn cần điều chỉnh chiến lược tưới nước. Đầu tiên, đừng đặt một lớp sỏi dưới đáy thùng. Khi nước kết thúc trong lớp sỏi này, nó sẽ không còn nơi nào để đi. Nước cũ trong một không gian không có không khí trong lành là công thức phát triển vi khuẩn gây thối rễ. Vì vậy, hãy bỏ qua lớp thoát nước và đảm bảo rằng cây của bạn nhận đủ ánh sáng để phát triển tích cực và sử dụng hết độ ẩm của đất. Đối với việc tưới nước, hãy chú ý rằng bạn không đổ một lượng nước lớn hơn một phần ba thể tích của đất—hãy nghĩ về đất giống như một miếng bọt biển chỉ có thể chứa rất nhiều nước; nữa và cái cây sẽ bơi trong một thứ súp đầy bùn. Bạn có thể giảm thể tích xuống một phần tư hoặc thậm chí một phần năm tổng thể tích đất đối với các loài xương rồng và xương rồng. Hãy để đất ngấm hết nước và rễ cây sẽ sử dụng hết lượng nước đó trước khi thối rữa có cơ hội xâm nhập.
Chậu của bạn vừa to vừa nặng:
Bạn không thể đặt một cái cây lớn vào bồn rửa và bạn không muốn nước đổ ra sàn. Ngay khi bạn thấy nước chảy vào đĩa dưới gốc cây, hãy ngừng tưới nước. Giữ một cái lót gà tây để hút nước thoát ra, vì nước có thể tràn ra đĩa một cách nhanh chóng một cách đáng ngạc nhiên. Nếu không có lỗ thoát nước, bạn sẽ phải ước tính lượng nước cần thêm theo thể tích. Trong cả hai trường hợp, sẽ giúp đổ nước từ từ vào để đảm bảo rằng đất hấp thụ càng nhiều nước càng tốt. Khi bạn đổ nhanh, nước có xu hướng chảy qua các hạt đất mà không làm ẩm chúng.
Thuật toán tưới nước: Xác định thời điểm tưới nước
Biết khi nào cần tưới nước có nghĩa là biết lượng ẩm mà một loại cây cụ thể thích:
- Cây ưa đất ẩm đều: Đất phải luôn được giữ ẩm đều. Khoảnh khắc bạn thấy thậm chí bề mặt của đất trở nên khô, đó là lúc để tưới nước. Các loại cây như Dương Xỉ Tóc Thần Vệ Nữ (Maidenhair Fern), cây May Mắn (Fittonia) và cây Lan Ý (Peace Lily) thích đất ẩm đều—hầu hết đây là những cây có lá mỏng.
- Cây ưa đất khô một phần: Nên để đất khô cách bề mặt khoảng một hoặc hai inch. Hầu hết các loại cây trồng trong nhà tán lá đều thuộc loại này.
- Cây ưa đất khô hoàn toàn: Nên để đất khô hoàn toàn trước khi tưới lần tiếp theo. Tất cả các loại xương rồng, mọng nước và cây lá dày trong nhà đều thích đất khô hoàn toàn, vì chúng dự trữ nước cần thiết cho quá trình quang hợp trong cơ thể.
Hãy nhớ rằng: Tất cả các kỹ thuật tưới nước nên được thực hiện trên những cây đang phát triển tích cực. Ở cường độ ánh sáng hàng ngày dưới 100 foot-candle, ngay cả những cây “sáng yếu” kiên cường nhất cũng sẽ bị thối rễ!
Thử nghiệm cây Trầu bà
Bạn muốn tưới cây trong nhà “bất cứ khi nào cây cần”. Sau đó, câu hỏi rõ ràng trở thành, làm thế nào để bạn biết khi nào cây cần nó? Hãy thử điều này với một ổ gà vui tươi (xem trang sau): Đặt cây ở nơi có ánh sáng gián tiếp sáng—chẳng hạn, cao hơn 200 foot-candle vào ban ngày. Lưu ý độ nảy của tán lá—đây là một ổ gà được tưới nước đúng cách. Dùng đũa chọc nhẹ xung quanh đất để cảm nhận độ ẩm đều của đất. Bây giờ, hãy để cây phát triển ở đó và để ý xem lá sẽ kém nảy hơn sau vài ngày như thế nào. Dùng đũa sờ đất một lần nữa—lúc này đất có thể có một số túi khô. Đây là điểm mà bạn nên tưới nước, nhưng vì lợi ích của thí nghiệm này, đừng làm điều đó vội. Trong một hoặc hai ngày nữa, những chiếc lá sẽ có dấu hiệu héo đi—chúng rủ xuống. Bây giờ hãy thăm dò đất bằng chiếc đũa: Nó có thể là đá, cứng và nén chặt. Điều gì đã xảy ra trong vài ngày này? Độ ẩm của đất liên tục được rễ hấp thụ và vận chuyển đến lá, nơi một phần nước được kết hợp với khí CO2 để tạo ra đường. Trong khi điều này xảy ra, các hạt đất bị kéo về phía rễ. Khi những hạt đất này bị hút khô theo đúng nghĩa đen, chúng kết tụ lại với nhau thành những khối đá. Tại thời điểm này, chỉ đổ một ít nước vào đất sẽ không làm bão hòa tất cả các túi khô đã hình thành. Trong tương lai, đối với ổ gà này, bạn sẽ để ý dấu hiệu ủ rũ đầu tiên để biết khi nào cần tưới nước. Mặc dù phương pháp thử nghiệm này hoạt động tốt với ổ gà vì độ cứng của nó, nhưng một số cây rất nhạy cảm với bệnh héo rũ đến mức chúng sẽ bị tổn thương lá vĩnh viễn nếu đất của chúng bị khô dù chỉ một ngày — ví dụ như cây dương xỉ tóc mai. Trong những trường hợp đó, thay vì quan sát cây để tìm dấu hiệu của đất khô, bạn chỉ nên trực tiếp kiểm tra đất. Mặt khác, nhiều loại cây trồng trong nhà — ví dụ như cây Lưỡi Hổ (Snake plant) và cây Kim Tiền (ZZ plant) — sẽ không bị héo trong đất khô hoàn toàn và nếu bạn thực sự đợi cho đến khi chúng héo, chúng sẽ chết một nửa! Đối với những cây này, không nhằm mục đích giữ cho đất ẩm đều. Tưới nước kỹ (và sục khí) cho chúng khi đất trở nên khô xương.
Cây được điều chỉnh tốt
Bây giờ chúng ta đã xem xét cả ánh sáng và nước, chúng ta có thể bắt đầu hiểu chúng ảnh hưởng đến sự phát triển của thực vật như thế nào. Những minh họa sau đây sẽ giúp bạn hiểu về ánh sáng, tưới nước và quan trọng nhất là điều chỉnh cây trồng.
TÌNH HUỐNG
Bạn đã mua hai cây giống hệt nhau từ vườn ươm và đặt chúng trong nhà của bạn. Một cây gần cửa sổ hơn cây kia, nhưng bạn được hướng dẫn tưới nước cho chúng mỗi tuần một lần. May mắn thay cho Nhà máy A, đất trở nên đủ khô để cần tưới lại trong tuần—chu kỳ từ ẩm đến khô kéo dài khoảng một tuần, vì vậy cây vẫn tươi tốt. Lưu ý ở giai đoạn cuối, chiếc lá già nhất đã chuyển sang màu vàng – đây rất có thể là kết quả của việc điều chỉnh mức độ ánh sáng thấp hơn so với trong vườn ươm.
Thực vật B có một cuộc sống khác; cách xa cửa sổ hơn một chút có nghĩa là nó nhận được ít ánh sáng hơn nhiều. Nhưng vì bạn tự ý đặt Chủ nhật là ngày tưới nước nên bạn đã tiếp tục tưới cây này giống như Cây A. Hãy xem đất không bị khô ở cùng mức độ trong khung thời gian một tuần. Khi bạn tưới nước, đất sẽ trở nên bão hòa hơn, nhưng độ ẩm đó không tạo ra carbohydrate cho cây vì điều đó cần nhiều ánh sáng hơn—có một số quá trình quang hợp đang diễn ra, nhưng không nhiều. Thay vào đó, nước được bơm vào lá từ rễ chỉ nằm ở đó cho đến khi một số tế bào vỡ ra, khiến đầu lá chuyển sang màu nâu sẫm. Nếu tình trạng này kéo dài, rễ có thể dễ bị thối, khiến toàn bộ cây bị chết. Đây là tình trạng ngập nước—đất bão hòa kéo dài trong môi trường thiếu ánh sáng.
TÌNH HUỐNG
Bây giờ bạn đã học cách quan sát đất để quyết định thời điểm tưới nước, bạn điều chỉnh tần suất tưới cho phù hợp. Giả sử Nhà máy A đạt đến độ khô thích hợp trong một tuần trong khi Nhà máy B, xa cửa sổ hơn một chút, đạt đến độ khô tương tự sau hai tuần. Bây giờ bạn đang tưới nước theo chu kỳ từ ẩm đến khô của từng loại cây và hiểu rằng sự khác biệt về cường độ ánh sáng là lý do tại sao các khoảng thời gian lại khác nhau
Thời gian trôi qua, bạn thắc mắc tại sao Cây B có vẻ rụng nhiều lá hơn Cây A. Đây là ảnh hưởng của giai đoạn điều chỉnh. Khi bạn mang những cây đó về nhà, tươi từ vườn ươm, tất cả những tán lá tươi tốt đó là kết quả của nhiều tháng (hoặc có thể nhiều năm) trải qua những điều kiện lý tưởng để phát triển nhanh chóng. Giờ đây, để thích nghi với mức độ ánh sáng thấp hơn, cây phải rụng những chiếc lá già hơn khi những chiếc lá mới phát triển. Bạn sẽ không lãng phí năng lượng của mình khi lắp đặt nhiều tấm pin mặt trời ở một nơi không có nhiều ánh nắng mặt trời, phải không? Nhiều người sẽ cho rằng Nhà máy B không hạnh phúc, nhưng tôi thấy nó chỉ đơn giản là điều chỉnh để làm theo những điều kiện mà nó đã được đưa ra. Cây có thể tiếp tục sống trong nhiều năm chỉ với hai hoặc ba lá trên ngọn—đây đơn giản là cách cây ổn định với điều kiện hiện tại. Đây là lý do tại sao một cây tươi từ vườn ươm luôn có vẻ lạc lõng nếu bạn đặt nó ở một góc không có cửa sổ—nó sẽ phải thu nhỏ lại!
TÌNH HUỐNG
Giả sử bạn đang trở nên lười biếng và quyết định tưới nước cho cả hai cây với tần suất của Cây B, hai tuần một lần. Vì cây A quang hợp nhanh hơn nên đất của nó sẽ khô nhanh hơn. Khi bầu đất trở nên rất khô, nó cũng trở nên nén chặt và chặt chẽ. Lần tới khi bạn tưới nước, một số túi khô có thể không được bù nước, khiến cây bị héo ngay cả khi bạn đã tưới nước. Nếu chu kỳ tiếp tục theo cách này, đất nén sẽ không được bù nước cho đến khi cấu trúc đất tốt được phục hồi. Để đất khô quá lâu cũng làm cây chậm phát triển.
BÀI HỌC
Quản lý đất có nghĩa là hiểu cách nước chảy qua đất khi bạn đổ đất. Hiểu rằng thực vật nhận được cường độ ánh sáng cao hơn sẽ yêu cầu làm ẩm lại đất thường xuyên hơn. Đất nén nên được sục khí trước khi tưới nước để tạo điều kiện phân phối độ ẩm đồng đều hơn.
Nhiều bậc cha mẹ thực vật mới nhầm lẫn tác động của việc thích nghi với một ngôi nhà mới khi cây đang chết dần. Một cây cần buông bỏ những tán lá già hơn để tạo ra những tán lá mới. Nếu có đủ thời gian, cây sẽ đạt đến điểm cân bằng tại đó sự phát triển của tán lá bằng với sự rụng lá—cây được điều chỉnh tốt—nhưng điều này không có nghĩa là nó sẽ giữ nguyên hình dạng mãi mãi. Điều này đặc biệt đúng với hầu hết các loại cây lá nhiệt đới, vì chúng không đi vào thời kỳ ngủ đông thực sự, khi tất cả các tán lá chết đi để những tán lá mới có thể phát triển trong mùa tiếp theo từ củ hoặc củ.
Tại thời điểm này, tôi hy vọng bạn có thể hiểu tại sao “đừng ngập nước” không phải là lời khuyên hữu ích. Tất cả những gì nó làm là gieo rắc nỗi sợ hãi về nước và không khoan dung với vòng đời. Nếu bạn đảm bảo rằng cây của bạn nhận được loại ánh sáng phù hợp, tưới nước theo sở thích về độ ẩm của cây và quản lý cấu trúc đất của cây bằng cách thỉnh thoảng sục khí để tránh đất bị nén chặt, thì cây sẽ rất vui.
Thêm một liều lượng lành mạnh để chấp nhận rằng tự nhiên là về sự sống còn chứ không phải tiêu chuẩn thẩm mỹ của bạn, và bạn sẽ tiếp tục hành trình là người chăm sóc cây cối thú vị.