[Ebook Việt hóa] The Houseplant Handbook: Basic Growing Techniques and a Directory of 300 Everyday Houseplants
[Ebook Việt Hoá] 300 Everyday Houseplants: Increasing Houseplants (Tăng số lượng cây cảnh trong nhà)
Th2
- Nguồn: [Ebook] The Houseplant Handbook: Basic Growing Techniques and a Directory of 300 Everyday Houseplants – David Squire
- Biên tập: Dũng Cá Xinh (Tháng 02/2022)
- Dịch: Team Codai.net
English
Increasing Houseplants (Tăng số lượng cây cảnh trong nhà)
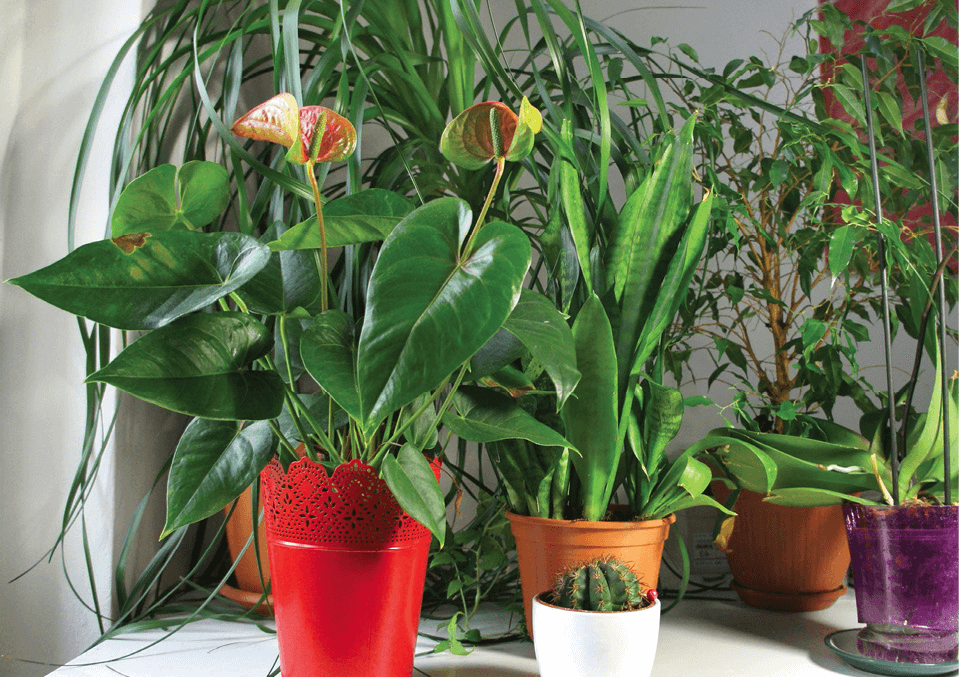
There are several easy ways to increase your houseplants and, for a few of them, very little equipment is needed. Some methods produce many new plants, while in others just one new plant is created, such as when air layering a Ficus elastica (Rubber Plant).
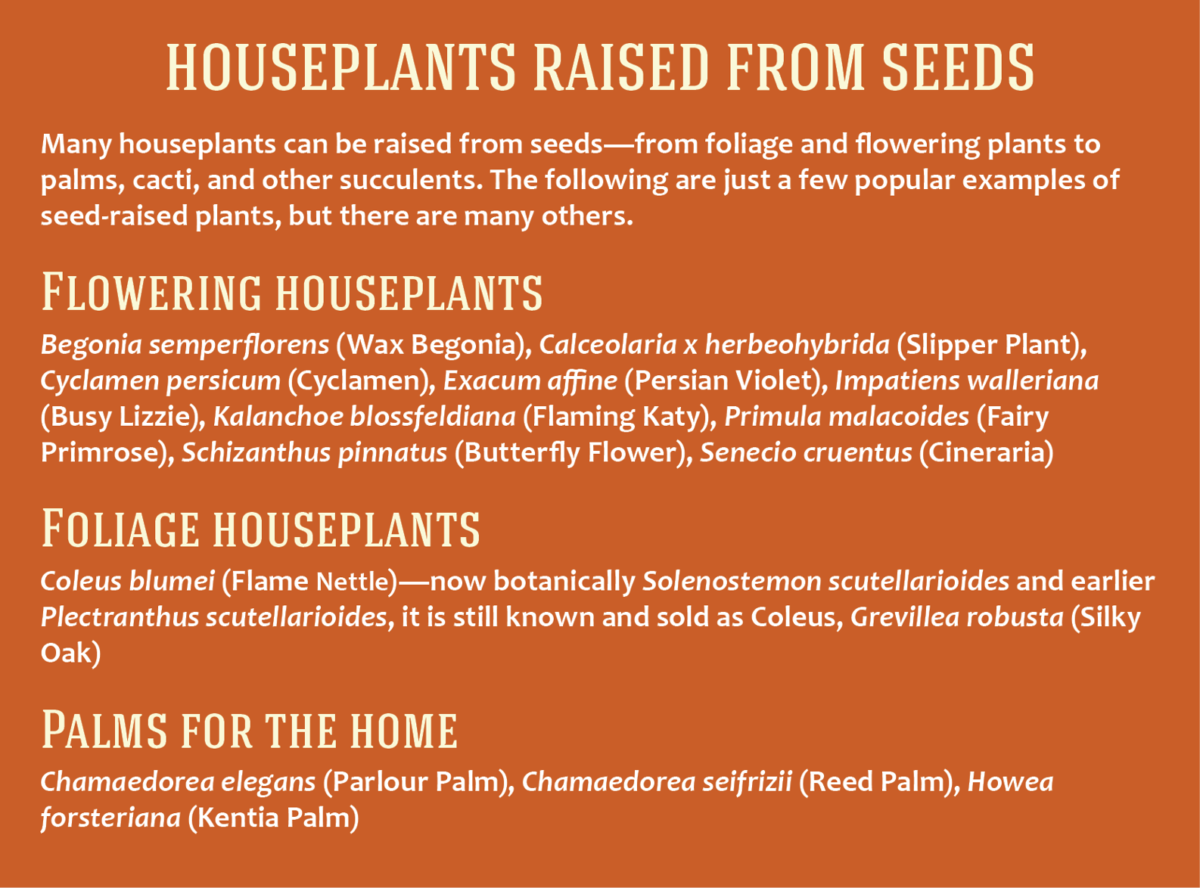
Sowing Seeds
Many houseplants can be increased from seeds. If you want several plants of the same type, this is a relatively inexpensive method. Bear in mind, though, that equipment such as seed trays, pots, and compost are needed, as well as a greenhouse, sunroom, or conservatory where gentle warmth can be provided.

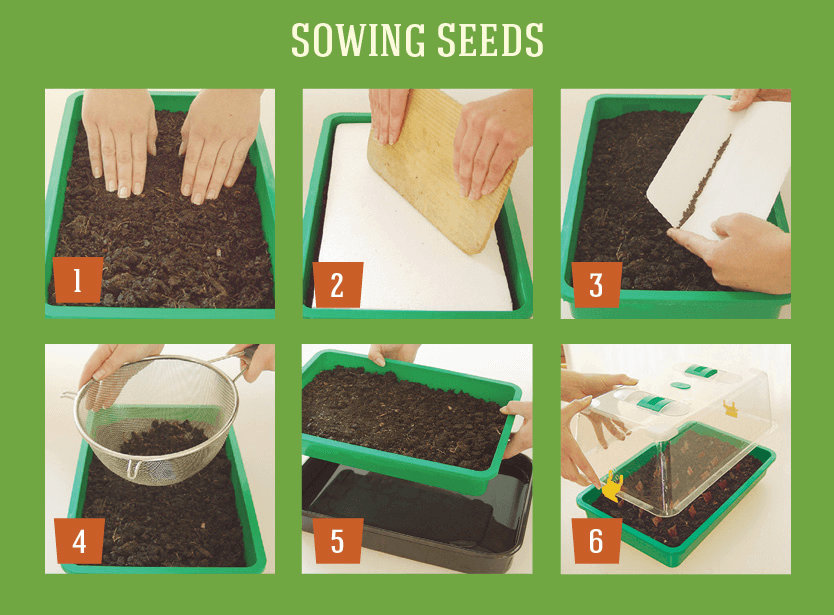
Step-by-Step: Sowing Seeds
- If only a few seeds are to be sown, use a small, shallow pot, but a plastic seed tray is better for larger numbers. Fill it with seed compost and use your fingers to pack it, especially around the edges.
- Place more compost in the seed tray and use a straight-edged piece of wood to level it with the rim. Then, use a flat-surfaced piece of wood to pack the compost to ½in (12mm) below the rim so the seeds can be lightly covered and watered without water spilling out.
- Tip a few seeds into a piece of light-colored, stiff paper folded into a V-shape. Then gently tap its end to distribute seeds evenly over the surface, but not within ½in (12mm) of the edges.
- Use a flat-based horticultural sieve to cover the seeds in seed compost to about three times their thickness. Alternatively, use a culinary sieve.
- Shallowly fill a bowl with clean water and stand the seed tray in it until moisture seeps to the surface. Remove and allow excess water to drain.
- Cover the seed tray with a clear plastic lid to prevent the compost’s surface from drying out and to help maintain a somewhat warm temperature. Wipe the inside of the cover every day to remove condensation. Remove it entirely when seedlings germinate and small seed leaves can be seen.

Taking Cuttings
Many houseplants can be increased from cuttings. There are several different types of cuttings, but most important is that they should be healthy and free from pests and diseases.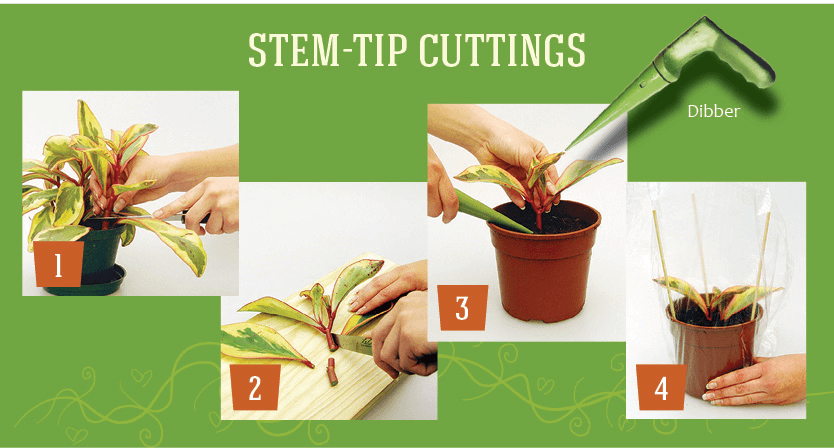
Step-by-Step: Stem-Tip Cuttings
Each cutting is formed of a piece of stem, several leaves, and a terminal shoot. They are usually 3–4in (7.5–10cm) long and, if possible, taken from the outer parts of a mother plant, where they have received good light and are growing healthily and robustly.
- Use a sharp knife to sever a healthy shoot close to the parent plant (do not leave a short stub).
- Also use a sharp, clean knife to prepare the cutting, slicing just below a leaf-joint. Then cut off the lower leaves.
- Fill a small pot with equal parts moist peat and sharp sand and pack it to ½in (12mm) below the rim. Use a small dibber to form a hole into which the stem can be inserted about 1in (25mm) deep. Pack the compost around the stem and lightly water from above.
- Insert 3–4 short split canes into the compost and cover with a plastic bag. Use an elastic band to secure the bag around the pot. When shoots develop, remove the bag. Later, when growing robustly, transfer the rooted cutting to another pot.
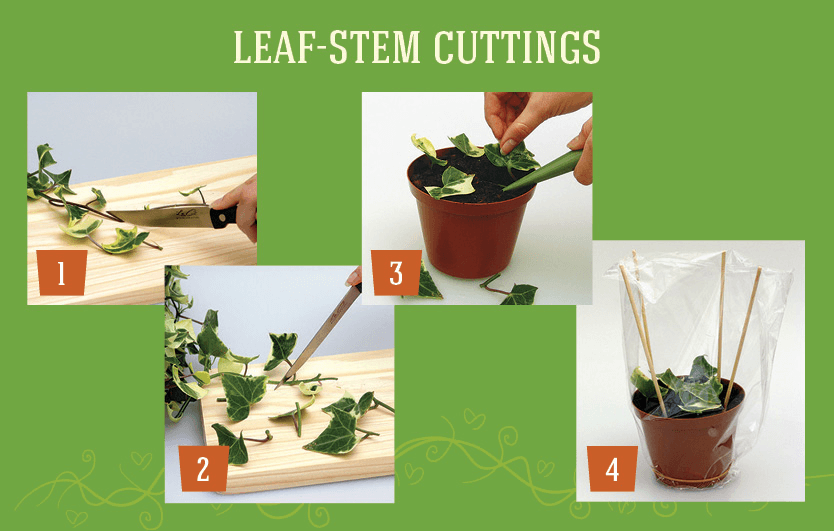
Step-by-Step: Leaf-Stem Cuttings
Leaf-stem cuttings resemble stem-tip cuttings, but without the tip. This is an excellent way to increase plants with long, trailing stems that have leaves at regular intervals. Examples include both variegated and all-green forms of Hedera helix (Common Ivy).
- Select a long, healthy stem from a mother plant and sever it just above a leaf. Do not use old, hard stems.
- Cut the stem to form several cuttings; cut just above a leaf so that each cutting is formed of a leaf and piece of stem about 1 ½in (36mm) long. The stem part can be shortened if it is too long.
- Fill a pot with equal parts moist peat and sharp sand and pack to ½in (12mm) below the rim. Use a dibber to insert 3–4 cuttings in each pot, each ¾—1in (18–25mm) deep, spaced out but not less than ½in (12mm) from the pot’s side. Pack compost around their bases and gently water from above.
- Insert 3–4 short split canes into the compost and cover with a plastic bag secured around the pot with an elastic band. When shoots develop, remove the bag. Cuttings can be separated and repotted individually, but to produce a display more quickly just repot the entire pot of cuttings into another pot.

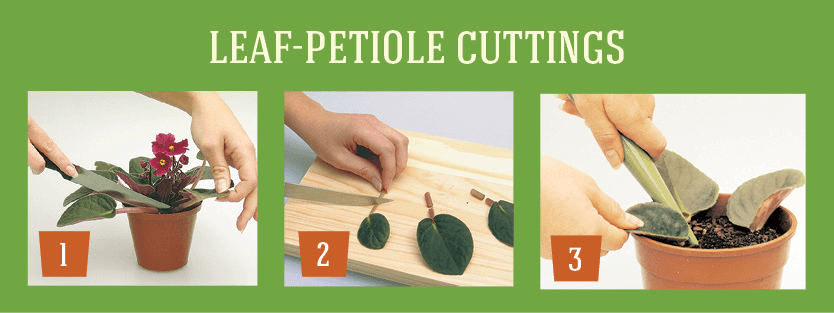
Step-by-Step: Leaf-Petiole Cuttings
Often used to increase Saintpaulia ionantha (African Violet), this involves cuttings formed of a leaf and a small stalk (petiole).
- Form each cutting by severing the stem of a healthy leaf at the base of a mother plant, but avoid leaving short spurs or stems.
- Use a sharp knife to trim back stems to about 1 ½in (36mm) long.
- Fill a small pot with equal parts moist peat and sharp sand; pack to ½in (12mm) below the rim. Dip the end of each cutting in hormone rooting powder and use a small dibber to insert it so the base of the leaf is just above the compost. Pack compost around the stem and lightly water from above. Several cuttings can be inserted in each pot and transferred to individual pots when they develop small shoots.
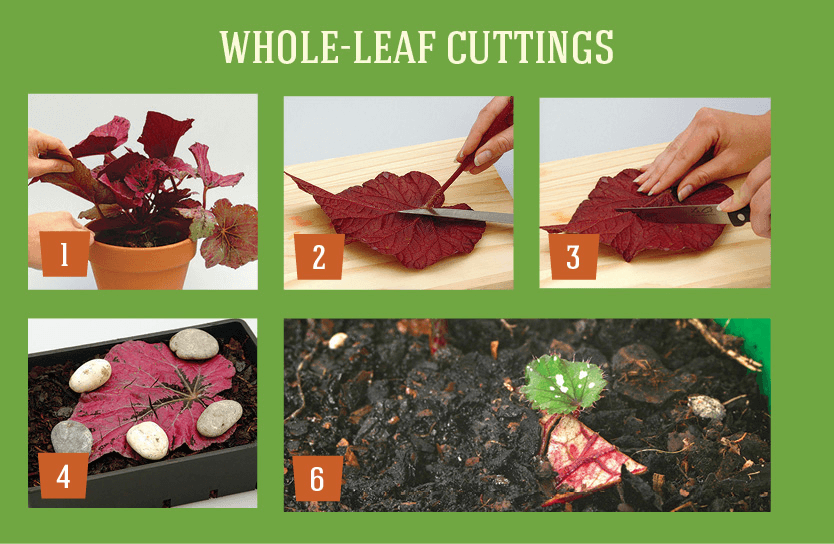
Step-by-Step: Whole-Leaf Cuttings
Large-leaved begonias, such as Begonia rex (Rex Begonia) and Begonia masoniana (Iron Cross Begonia), can be increased by this method or the one following (leaf-square cuttings).
- The day before taking cuttings, water the mother plant so the leaves are full of moisture. Select a healthy leaf and sever its stem just above the plant’s base.
- Invert the leaf and use a sharp knife to sever the stem close to the underside of the leaf.
- Cut across the main veins on the leaf’s underside with a sharp knife, positioning cuts ¾–1in (18–25mm) apart. Do not cut completely through the leaf.
- Fill a seed tray with equal amounts moist peat and sharp sand; pack it to ½in (12mm) below the rim. Place the leaf on the compost vein-side downward and lightly press it down, holding in position with a few pebbles (or use U-shaped pieces of wire).
- Put a plastic cover over the seed tray and place in gentle warmth. Keep the compost lightly moist.
- Later, when small plants develop from the leaf’s surface, these can be moved to individual pots.
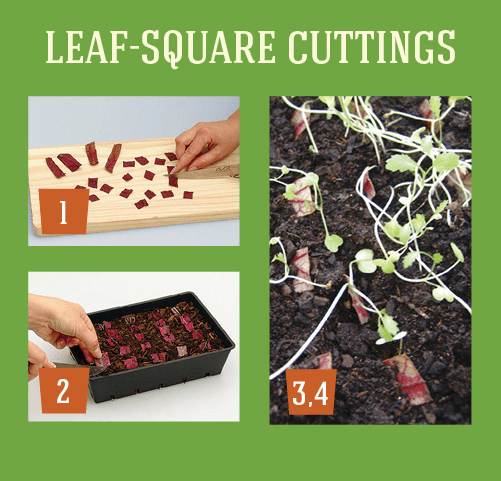
Step-by-Step: Leaf-Square Cuttings
- Cut a healthy leaf from a parent plant and sever the stem close to the leaf’s underside. Position the leaf upside down and cut it into 1 ¼in (3cm) square pieces. Each must have several veins.
- Fill a seed tray with equal parts moist peat and sharp sand; pack to ½in (12mm) below the rim. For each leaf cutting, use the blade of a knife to form a slit about ½in (12mm) deep in the compost’s surface. Push the side of a cutting (which was nearest to the leafstalk) into the slit and pack compost around it.
- Insert other leaf cuttings—not within ½in (12mm) of the edge—and gently water from above without disturbing the cuttings. Allow excess moisture to drain, then cover with a plastic dome.
- When young shoots develop from each cutting, transfer them to individual pots.
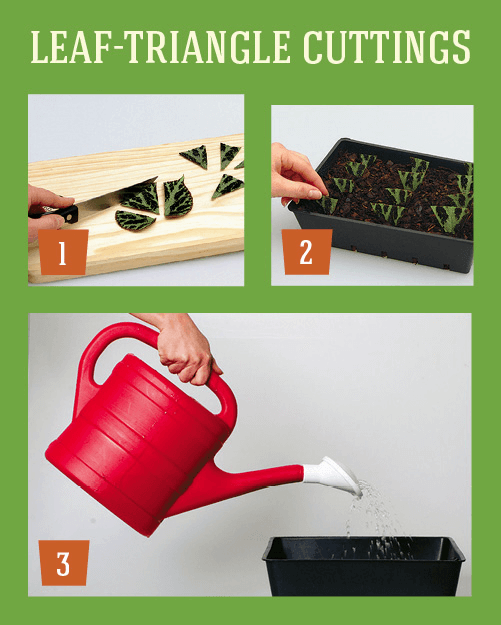
Step-by-Step: Leaf-Triangle Cuttings
This is another popular way to increase large-leaved houseplants. As with leaf-square cuttings, several new plants can be produced from one leaf.
- Cut a healthy leaf from a parent plant and sever the stem close to the leaf’s underside. Leave the leaf upside down and cut it into triangles, which tend to be longer than the squares of leaf-square cuttings. These can be inserted deeper into the compost, which helps to give them greater stability.
- Fill a seed tray with equal parts moist peat and sharp sand; pack to ½in (12mm) below the rim. Use a knife to form a slit ¾–1in (18–25mm) deep in the compost’s surface. Push the end of a cutting (which was nearest to the leafstalk) into the slit and pack compost around it.
- Insert other leaf cuttings (not within ½in [12mm] of the side) and gently water from above without disturbing the cuttings. Allow excess moisture to drain, then cover with a plastic dome.
- When young shoots develop from each cutting, transfer them to individual pots.
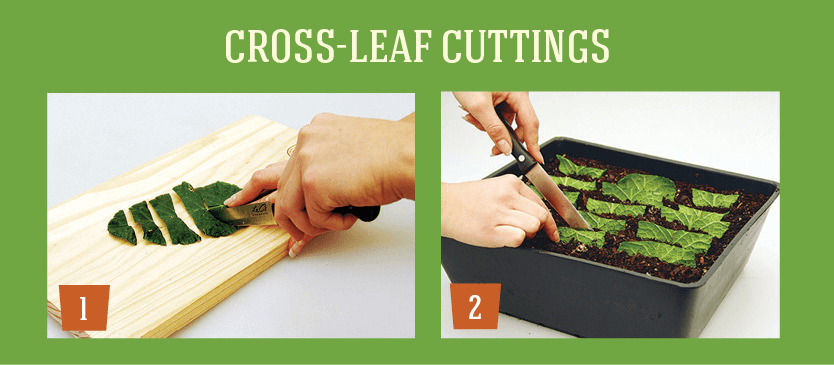
Step-by-Step: Cross-Leaf Cuttings
Sometimes known as cross-section and leaf-section cuttings, this technique is often used to increase Streptocarpus x hybridus (Cape Primrose).
- The day before taking cuttings, water the mother plant and allow excess water to drain. Sever a healthy leaf close to the base, place on a board, and cut into cross-sections 2in (5cm) wide.
- Fill a seed tray with equal parts moist peat and sharp sand; pack to ½in (12mm) below the rim. With a sharp knife, form slits ¾in (18mm) deep. Insert the cutting’s base into the slit. Pack compost around it.
- Gently water the compost. Allow the leaf’s surface to dry and place a transparent lid on top. When young shoots develop from the leaf, detach them individually (usually with part of the parent leaf still attached) and transfer them to a small pot. Small but established cuttings have a better chance of being repotted successfully than large ones.

Step-by-Step: Horizontal Cane Cuttings
Several thick-stemmed houseplants can be increased in this way, including dieffenbachias (Dumb Cane), dracaenas, and cordylines.
- Water the mother plant the day before taking cuttings. Sever a strong, healthy stem at its base, trying not to spoil the plant’s shape.
- Use a sharp knife to cut the stem into 2–3in (5–7.5cm) long pieces; each part must have at least one strong bud (they grow from leaf-joints).
- Fill a 5in (13cm)-wide pot with equal parts moist peat and sharp sand; pack to ½in (12mm) below the rim. Press each cutting horizontally into the compost to half its thickness, with the strongest bud facing upward. Hold in place with pieces of U-shaped wire.
- Lightly water the compost, allow excess to drain, and cover with a plastic lid. When shoots and roots develop, transfer them to individual pots.
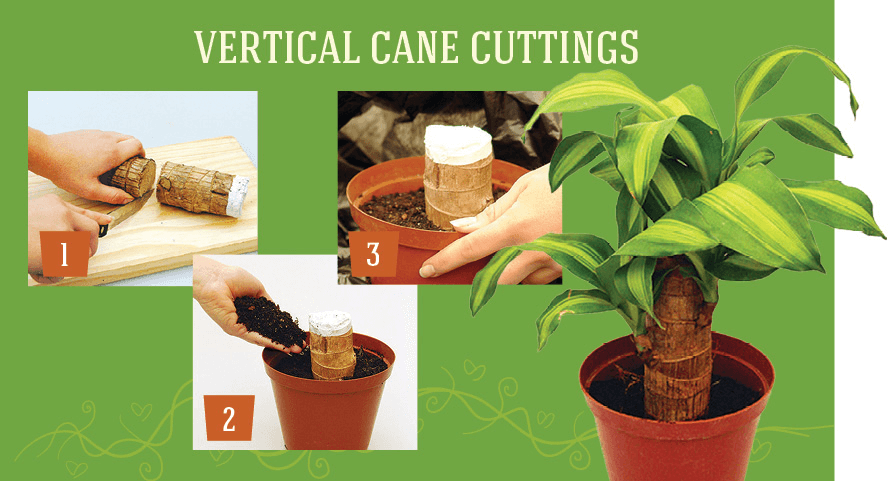
Step-by-Step: Vertical Cane Cuttings
Several houseplants can be increased in this way, including yuccas and dracaenas. Sometimes these cuttings are known as Ti-log cuttings (a word of Polynesian derivation), although properly this name refers solely to Cordyline fruticosa, earlier known as Cordyline terminalis and Dracaena terminalis. These Ti-logs are widely sold as specially prepared cuttings, with their ends covered in wax. The following advice refers specifically to them.
- Cut off the wax from the lower end, but leave the wax covering the top intact, as this prevents loss of moisture before the cutting forms roots.
- Add a handful of equal parts moist peat and sharp sand to the base of a pot. Hold the cutting with the waxed end upward and pot it up so its base is 1 ½–2in (36–50mm) deep. Gently water the compost.
- To encourage rapid rooting, put the pot and cutting in an opaque bag and place in gentle warmth. Check the compost every 10 days to ensure it is still damp. When shoots appear, remove the bag and slowly acclimatize the plant to a lower temperature. Later, usually in 2–4 weeks, transfer the rooted cutting to a larger pot
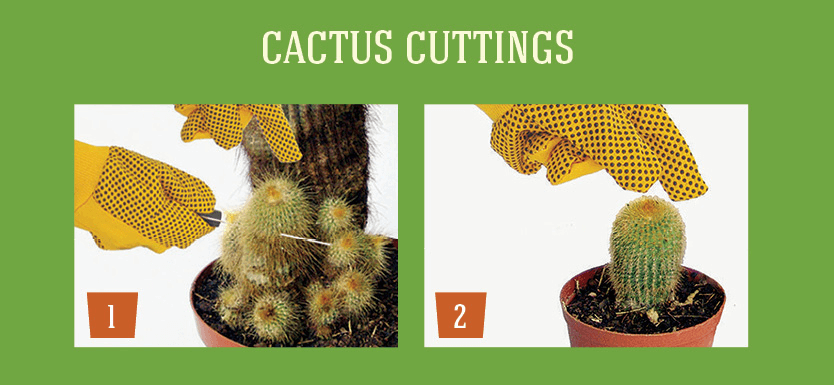
Step-by-Step: Cactus Cuttings
Some cacti, especially those that form clusters, can be increased from cuttings taken in spring or early summer. Remember to wear gloves when taking these cuttings.
- Use a sharp knife to sever a few stems from the plant’s base, taking care not to spoil its shape. Allow cut ends to dry for a day or so, then insert in compost.
- Fill a small pot with equal parts moist peat and sharp sand; pack to ½in (12mm) below the rim. Use a small dibber to form a hole to a depth about one-third of the cutting’s length. Insert the cutting, pack the compost, and lightly water from above. When young shoots develop or fresh growth develops at the cutting’s top, transfer to an individual pot.
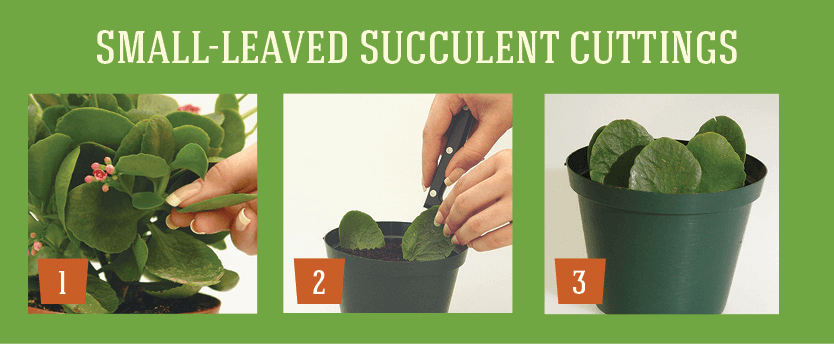
Step-by-Step: Small-Leaved Succulent Cuttings
Several succulents, such as echeverias and crassulas, have small leaves that can be removed and encouraged to develop roots.
- Water the mother plant the day before taking cuttings. Select a healthy leaf and gently snap it off downward or sideways. Take several cuttings without spoiling the plant’s shape. Allow cut edges to dry for a day or so.
- Fill a pot with equal parts moist peat and sharp sand; pack to ½in (12mm) below the rim. Add a dusting of sharp sand to the surface. Use a small dibber or knife to insert each cutting to about one-third of its length.
- When young shoots and roots develop from a cutting’s base, it can be transferred to another pot.
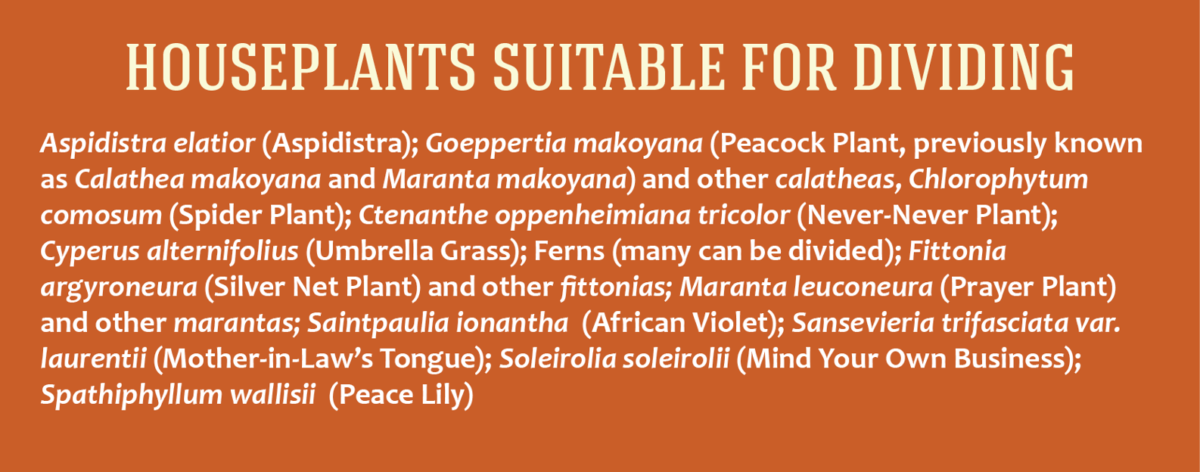
Dividing
Dividing is a quick and easy way to increase houseplants with fibrous roots and several stems. Spring and early summer are the best times to divide them.

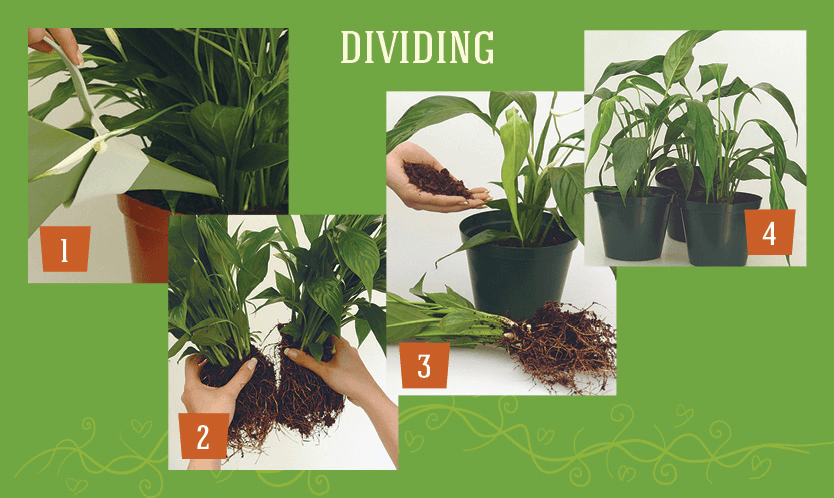
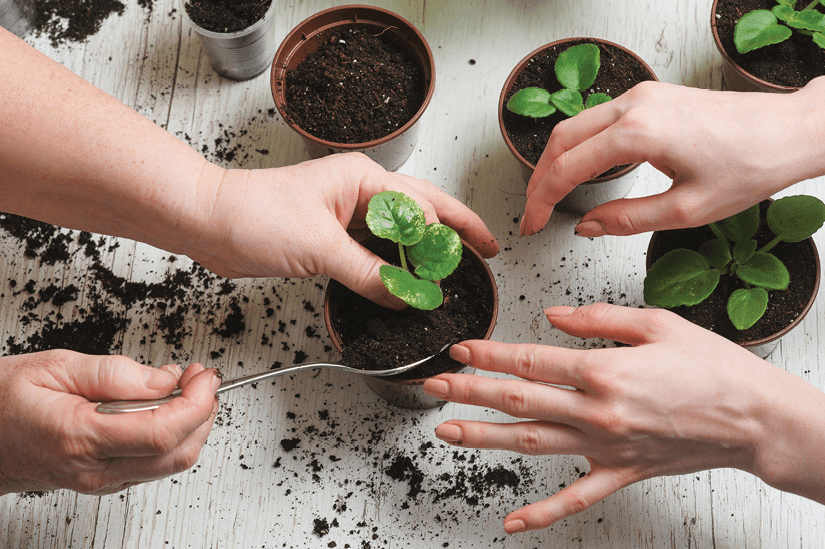
Step-by-Step: Dividing
- The day before dividing a congested plant, water the compost, and allow excess to drain. Then, to divide, place a hand over the soil-ball and invert the pot. Sharply tap the pot’s rim on a hard surface so the pot and root ball separate.
- Place the root ball on a firm surface and gently tease it apart into several substantial-sized pieces, making certain that each part has healthy roots, stems, and leaves.
- Prepare a clean, dry pot, filling its base with compost. Position one of the new plants centrally in the pot, so that the base of the stems is about ½in (12mm) below the rim. Dribble compost around the roots, packing it in layers until ½in (12mm) below the rim. Tap the side of the rim to level the compost.
- Water the plant from above by using a watering can with a fine rose. This helps to settle the compost around the roots of the newly divided plants. Place the plant in a location with light shade until it is established. By dividing a congested plant, several new plants can be produced.

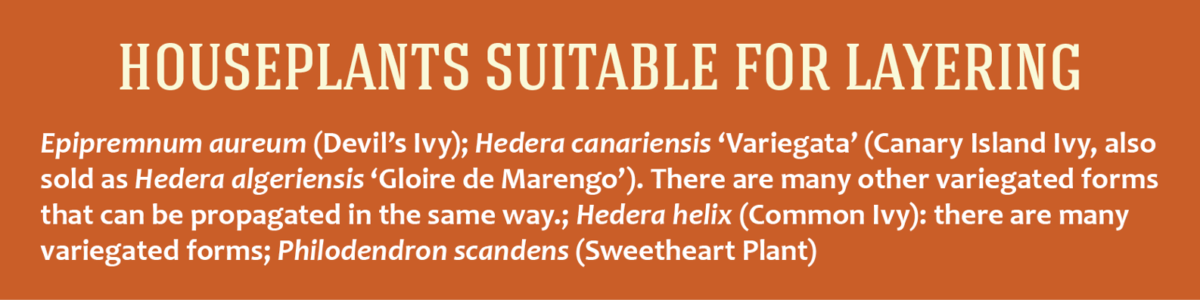
Layering
This is an easy way to increase houseplants with pliable stems, such as those that trail or climb. Late spring and early summer are the best times to do this.

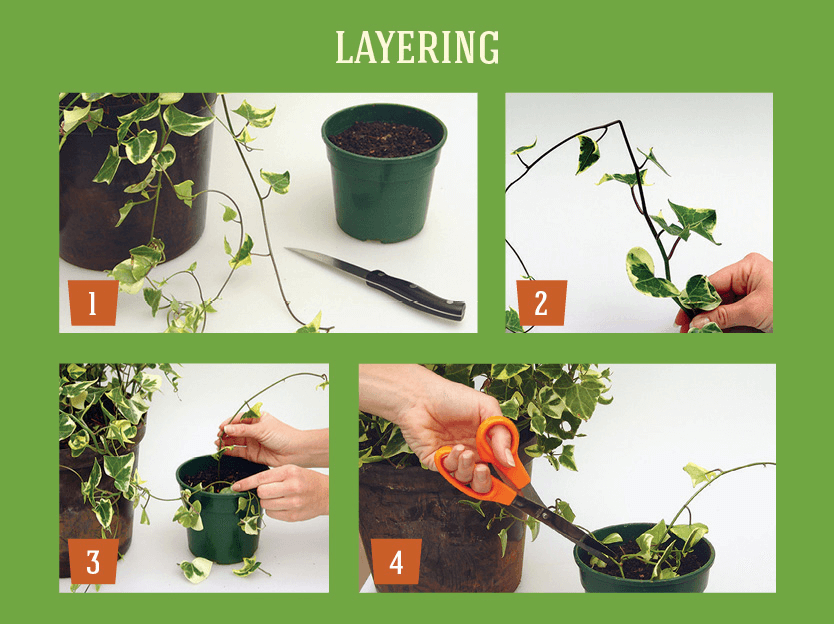
Step-by-Step: Layering
- The day before layering a plant, water the compost to ensure stems are turgid. Allow excess moisture to drain. Fill a clean pot, packing moist peat and sharp sand to about ½in (12mm) below the rim.
- Bend a long stem near a leafstalk and about 5in (13cm) from its end. This bend is not meant to sever the stem, but to constrict it so roots will develop at that point.
- Use a small piece of U-shaped wire to secure the bent section of stem 1–1 ½in (25–36mm) deep in the compost. Pack the compost around and over the stem and lightly water it.
- Put the mother plant and the layered stem in a plastic tray so that they can be moved together. When fresh shoots develop, use a sharp knife to sever the stem.
Air Layering
Air layering is used to increase large, woody houseplants such as Ficus elastica (Rubber Plant) that have grown tall, with bare woody stems. Best undertaken in early and midsummer, it involves partially severing a stem just below the lowest leaf and encouraging it to develop roots.

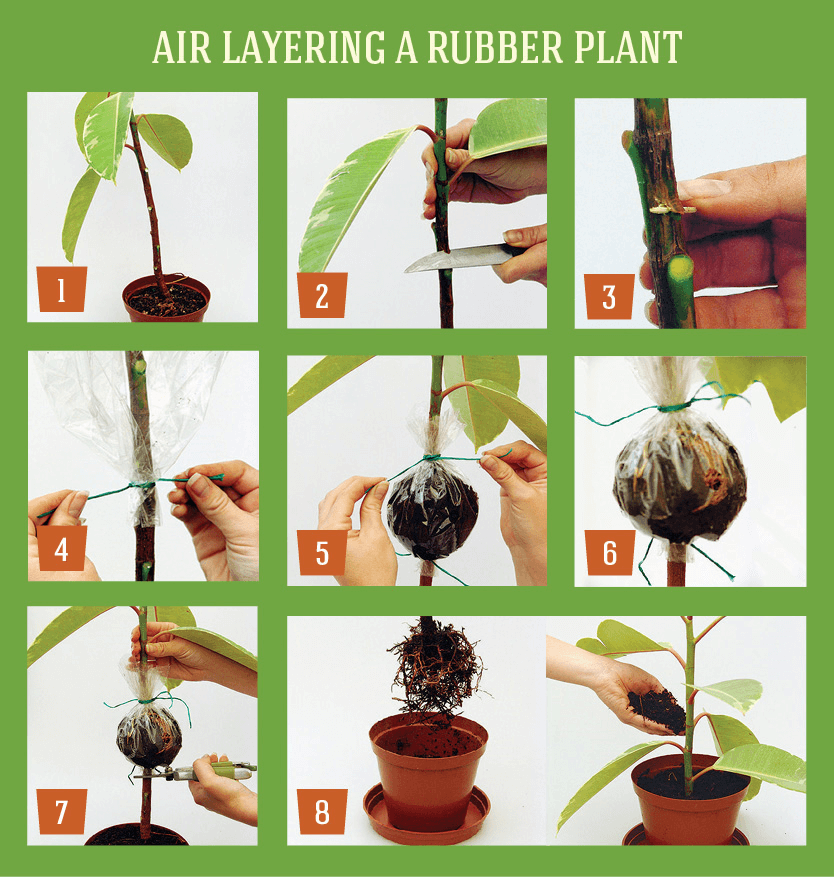
Step-by-Step: Air Layering a Rubber Plant
- Choose a healthy plant that is bare of leaves on the lower part of its stem. The top 1 ½ft (45cm) of the plant should have healthy leaves.
- Use a sharp knife to make an upward-slanting cut, two-thirds through the stem and 3–4in (7.5–10cm) below the lowest leaf. Take care that the top part does not snap off.
- Insert a matchstick into the cut to hold it open. Trim off its ends and use a small brush to coat the cut surfaces with a hormone rooting powder.
- Wind a piece of clear polythene film, about 9in (23cm) wide and 12in (30cm) long, around the stem, and secure its base about 2in (5cm) below the cut.
- Fill the tube formed by the polythene with moist peat. Pack it to about 3in (7.5cm) below the tube’s top. Tie the top around the stem with string.
- Keep the compost in the pot moist so the plant continues to grow. Six to eight weeks later you will see through the polythene that roots have formed.
- Hold the top of the plant and sever the stem directly below the polythene. Carefully remove the film.
- Immediately place the plant into potting compost in a clean pot. Dribble compost around the roots and carefully pack it. Support the stem until the plant is established. Do not throw away the old plant. Instead, cut it to about 9in (23cm) high and place in gentle warmth, about 54–64°F (12–18°C). Young shoots will develop from the stem to form a multistemmed plant.

Houseplants from Plantlets
A few houseplants develop small plantlets along or at the edges of leaves; these can be removed and encouraged to produce roots and develop into separate plants.
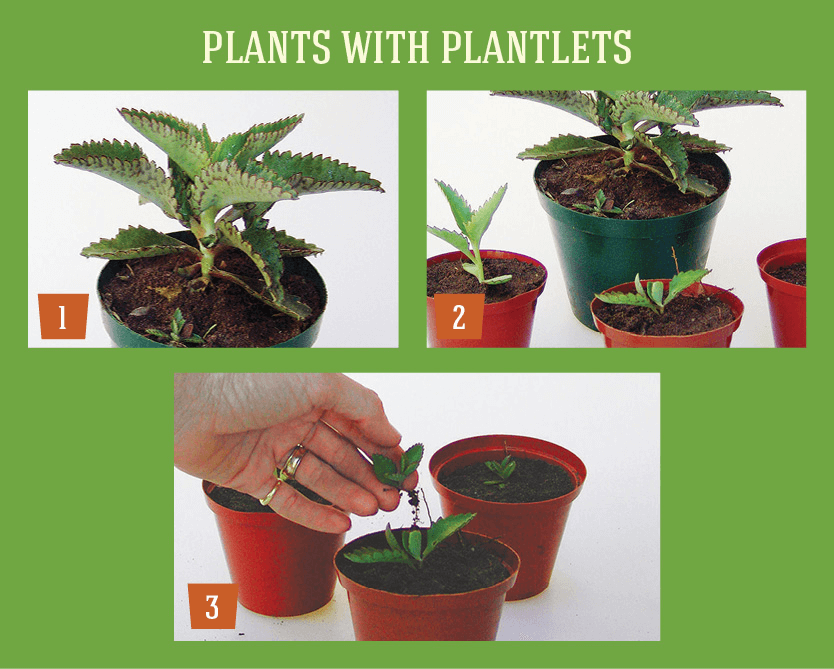

Step-by-Step: Plants with Plantlets
- Choose a healthy mother plant (such as the Kalanchoe daigremontiana) and gently detach plantlets growing along a leaf’s edges.
- Fill a pot that is 3in (7.5cm) wide with compost and pack it to about ½in (12mm) below the rim. Space out plantlets on the surface and slightly press them into the compost. Gently water the plantlets from above, taking care not to disturb them.
- When rooted and growing well, transfer them to individual small pots. When potting rooted plantlets of Kalanchoe delagoensis, put three plants in each pot.
Houseplants from Runners
Some houseplants produce plantlets at the ends of long, runner-like stems, perhaps the best-known example being Chlorophytum comosum (Spider Plant). Although this can be performed throughout the year, late spring to late summer is best.
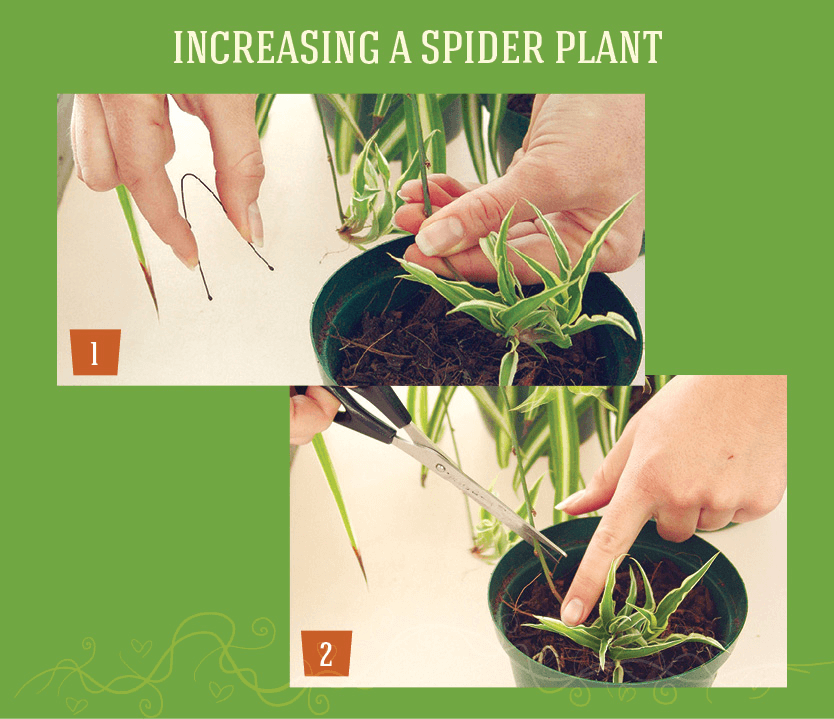
Step-by-Step: Increasing a Spider Plant
- Water the compost in the mother plant and select several long, healthy stems, each with a healthy plantlet at its end. Fill several pots with compost and pack it to ½in (12mm) below the rim. Position a plantlet in the compost and use U-shaped pieces of wire to hold it in place. Lightly water the compost and stand the mother plant and the pots with pegged-down plantlets in a large seed tray. This makes it easy to move them as a unit.
- When new shoots develop from the plantlet, sever the runner close to the plantlet. Also cut off the stem close to the mother plant’s base.

Tiếng Việt
Đang cập nhật