Ebook Việt Hoá] Plant parenting: Easy ways to make more houseplants vegetables and flowers - LESLIE F. HALLECK
[Ebook Việt Hoá] Plant parenting – LESLIE F. HALLECK (Nhân giống cây) – UNDERGROUND PROPAGULES (Nhân giống bằng chồi ngầm)
Th2
- Nguồn: [Ebook Việt Hoá] Plant parenting: Easy ways to make more houseplants, vegetables, and flowers – LESLIE F. HALLECK (Nhân giống cây: Những cách dễ nhất để nhân giống cây cảnh trong nhà, rau và hoa)
- Biên tập: Dũng Cá Xinh (Tháng 08/20201)
- Dịch: Huyền Nguyễn
English
Now that we’ve covered the plant parts that typically grow above ground, it’s time to dig a little deeper. There are several underground plant structures (propagules)—such as bulbs, rhizomes, and tubers—that you can use to multiply many plants.
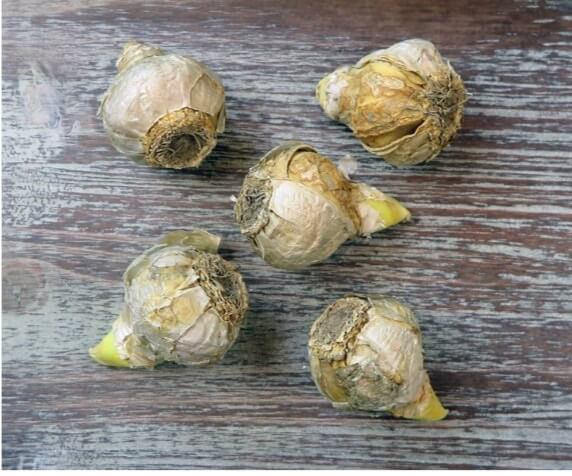
BULBS
You should know about two types of true bulbs: tunicate bulbs, such as tulips, muscari, hyacinth, garlic, and onions, and non-tunicate (scaly) bulbs, such as lilies. You can vegetatively propagate either type. Bulbs have a central growing point (stem shoot), surrounded by modified leaf tissue that stores food and water. The shoot tip and the surrounding fleshy leaf tissue are attached to a stem that attaches to the base of the bulb.
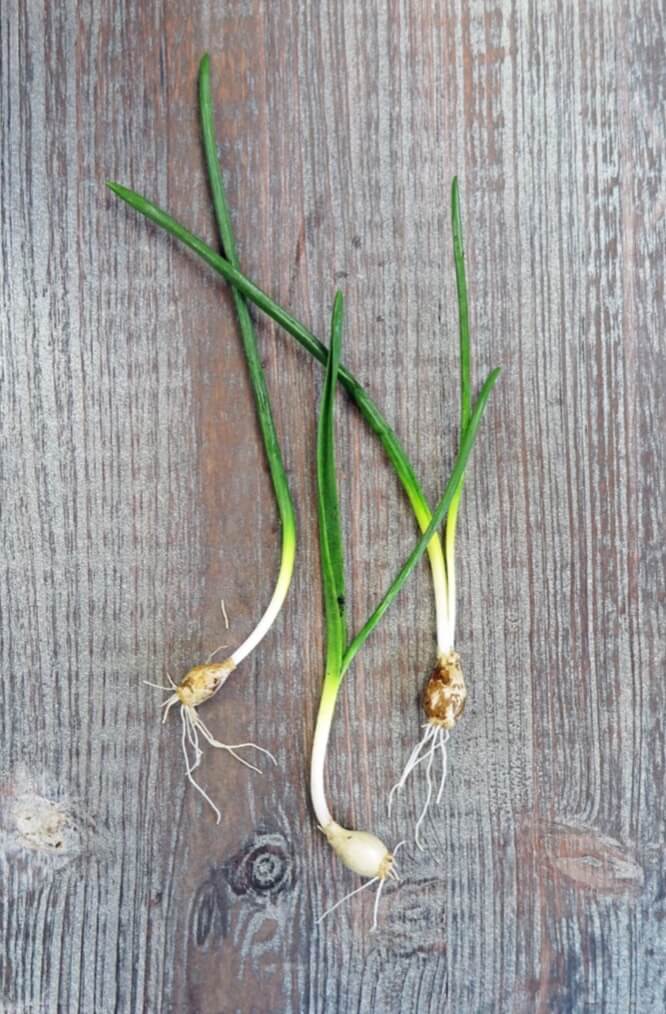
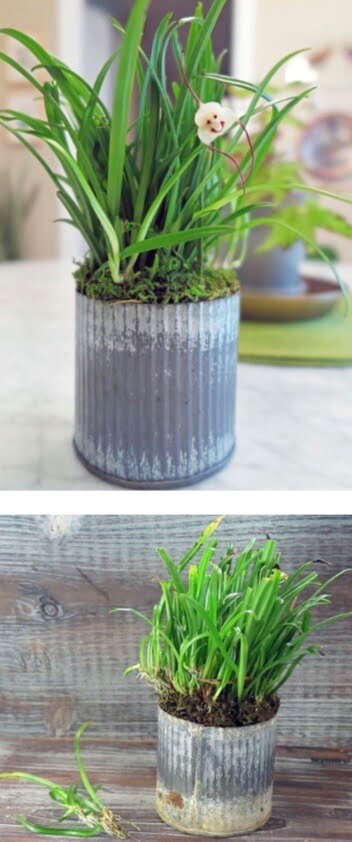
A simple way to propagate bulbs is to let them naturally develop bulblets—a type of offset. Bulblets are small bulb-like structures that can develop at the base of tunicate bulbs, and on underground stem tissue of scaly bulbs. These tiny bulbs typically have root initials developing on them and can be gently cut or pulled away from the main bulb’s structure. You can plant bulblets by submerging just the base into potting mix. They will continue to develop into full-sized bulbs, which will generate new plants. It will take several years for bulblets to mature to a flowering size.
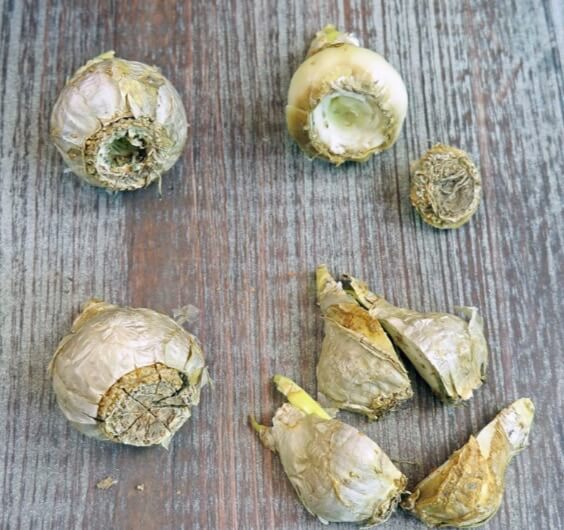
If you want to encourage tunicate bulbs to produce more bulblets faster, you can damage the base of the bulb using several different techniques: coring out the center of the bulb, scooping out the base of the bulb, cross-cutting the base of the bulb, or cutting it into sections. Then dust the exposed areas with garden sulfur to prevent fungal growth. Place some slightly moist peat or coir in a plastic bag and insert your bulbs. Blow air into the bag to inflate it, then close the bag with a twist tie. Place in a dark cool-temperature area. In a few months you’ll find tiny bulblets developing that you can remove and pot up.
To propagate scaly bulbs, simply remove the outer scales from the bulb, and submerge the bottom half into a container with potting mix or other rooting media. These scaly bulb leaves will produce bulblets.
CORMS
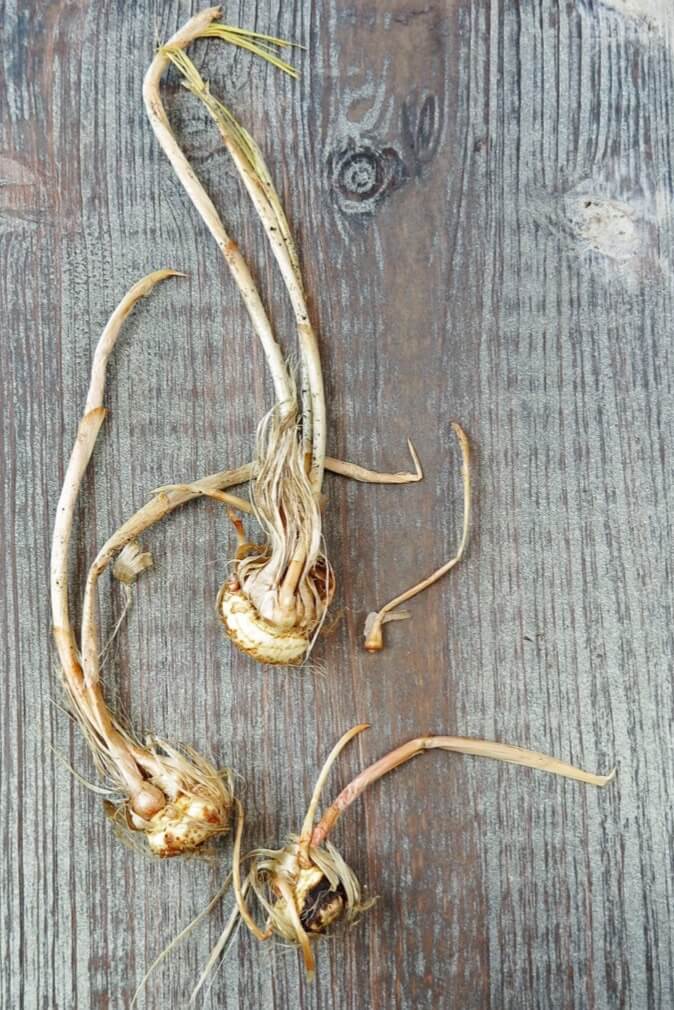
While often confused with bulbs, a corm is actually a swollen base of a flowering stem, wrapped in several thin leaves. Dense stem tissue forms inside these leaves. Plants that grow from corms, such as crocus and gladiolus, produce a new corm at the base of each new shoot, every year.
To propagate directly from corms, you’ll need to dig up some in the fall when there are still green leaves left on the plant. Lay the clump on newspaper to dry completely. Then clean all the soil off the corms. You’ll find tiny baby corms, called cormels, growing attached to the main corm—much like bulblets on a bulb. You can remove the cormels and plant them about 1 inch deep in growing media.
RHIZOMES
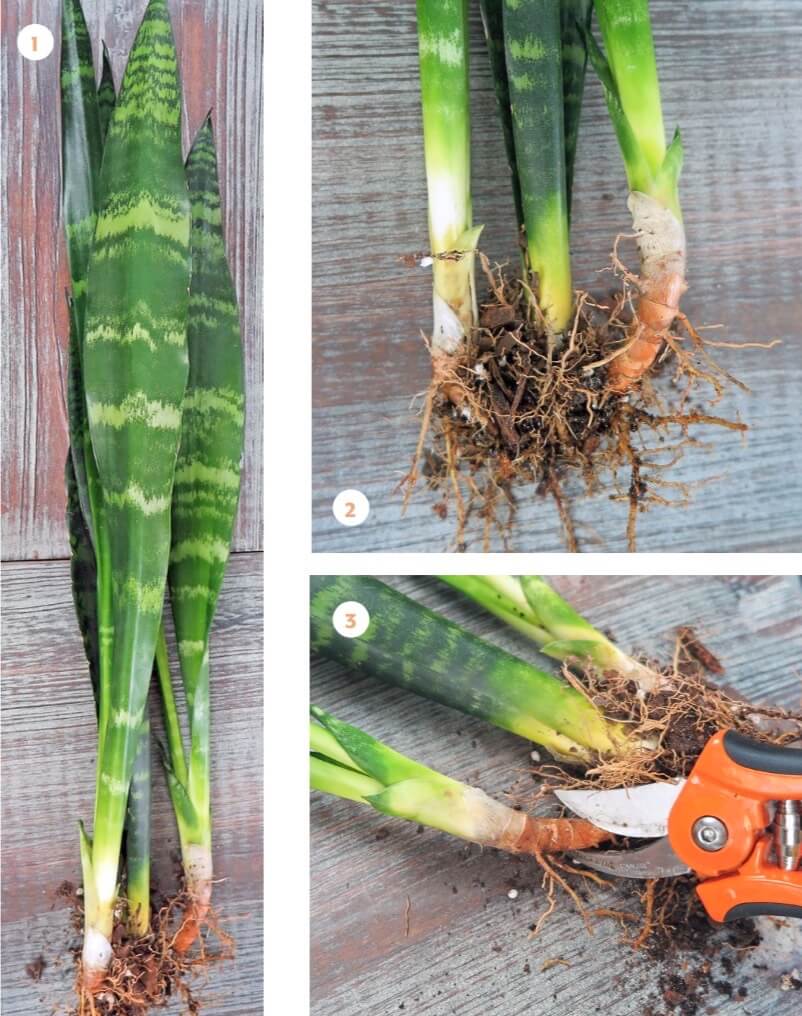
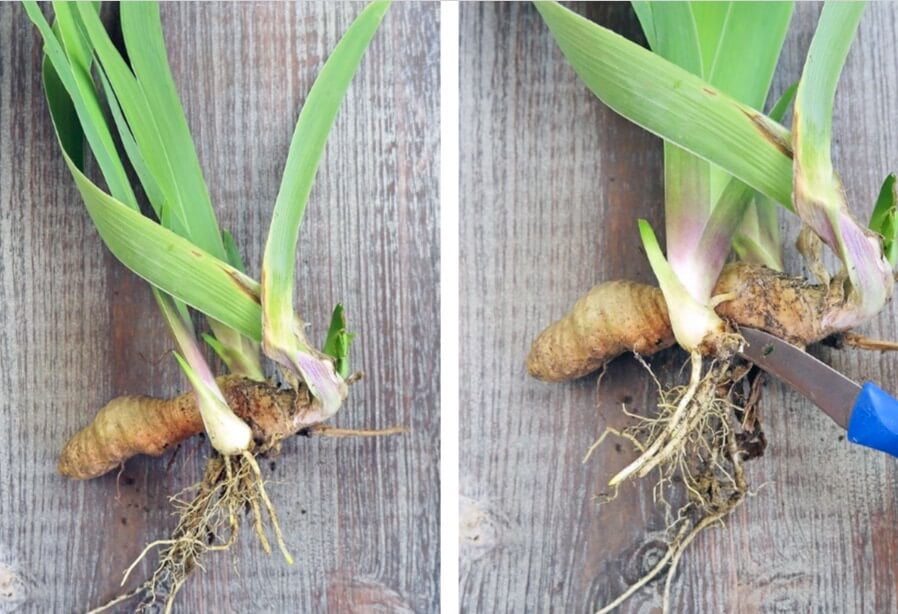
Rhizome cuttings are similar to root cuttings, except that a rhizome is actually a type of stem tissue (not root tissue) that grows underground. Ginger and canna lily plants, for example, grow underground rhizomes. Some plants, such as iris, have rhizomes that grow partially submerged. Other plants, such as rabbit’s foot fern (Davallia spp.), have rhizomes that grow on top of the soil. Sympodial orchids—such as dendrobium, cattleya, and dracula orchids—produce offsets (keikis) from surface rhizomes.
A rhizome has nodes that produce both roots and stem shoots. When you cut a rhizome into separate pieces, each piece can grow roots and shoots and develop into a whole new plant. Plants that produce rhizomes and that can be propagated from rhizome cuttings include bamboo, ginger, begonias, canna lilies, potatoes, irises, asparagus, geraniums, hops, snake plant, some aquatic plants, and Venus flytrap, to name a few.
Many plants that produce offsets (pups) beneath the soil are doing so by underground stem tissue or from rhizomes. Eventually, when the rhizome growth hits the soil surface, it will develop a new shoot that will emerge as a pup. Before this happens, you can dig up rhizomes and cut them up to make multiple new plants.
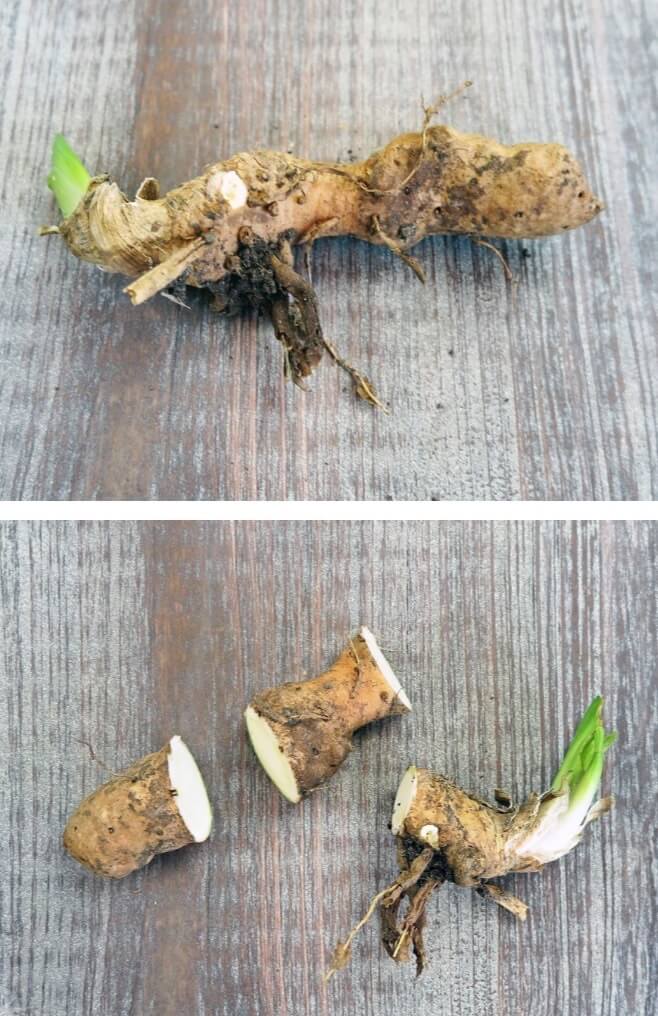
How to Take a Rhizome Cutting
- 1 Disinfect your knife using alcohol or a 10 percent bleach solution.
- 2 For under ground rhizomes, pull soil away from the base of the plant, exposing a rhizome.
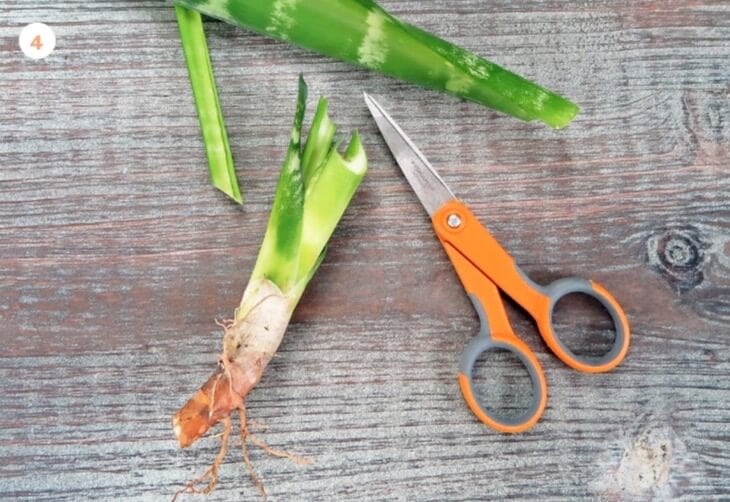
- 3 Chose a section of rhizome that has started to develop some roots and has at least one bud node. Cut a 1- to 3-inch rhizome section. Allow sections to cure for several days so exposed cuts are dry. Dip into powder rooting hormone.
- 4 Place the rhizome cutting horizontally on top of or into moist growing media in trays or 4-inch pots and cover lightly with more growing media. Keep the growing media moist but not wet. If you are using a plant that grows rhizomes on
- top of the soil, such as certain ferns, you’ll set the rhizome cutting on top of the growing media and press down so it is in firm contact with the soil. You may need to use toothpicks or wire to keep it flush with the soil.
- 5 You can use a humidity dome or bag if you have trouble keeping the growing media moist to the touch, but underground rhizome cuttings often won’t require a cover. Rhizomes that sit on top of the soil should be covered for a short time.
- 6 Rhizome cuttings won’t require any exposure to light until they begin to sprout new shoots.
- 7 Once new shoots emerge, follows teps 7 to 9 in “How to Take a Stem-Tip Cutting” (page 144).
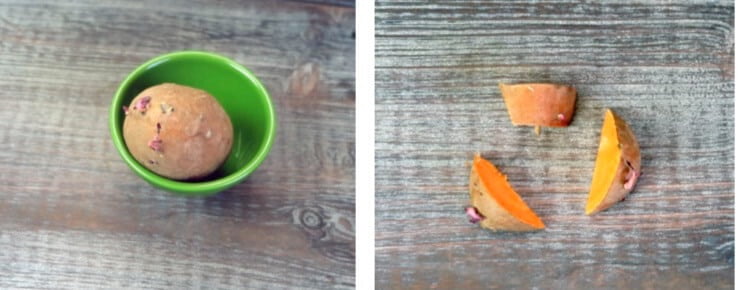
TUBERS
Tubers are a type of underground swollen stem or root tissue used for resource storage. Potatoes are tubers, as are sweet potatoes, cassava, cyclamen, and dahlias. Tubers develop “eyes,” which are shoot buds that will grow and develop new roots.
You can propagate tubers by cutting them into sections that each have at least one bud or eye. You’ll need to cure these tuber sections, so the cut areas can dry and heal for several days before you place them back in the ground or in growing media. It’s also good practice to dust your tuber cutting sections with gar- den sulfur before you replant them, to help cut down on fungal diseases.
ROOT CUTTINGS AND SUCKERS
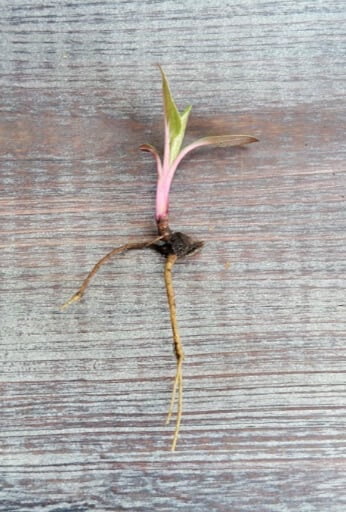
Some plants can develop new adventitious roots and shoots from a piece of their main root tissue. We call these root cuttings. Plants with thick, fleshy roots— including garden perennials such as Anemone spp., Echinacea spp., Echinops spp., Eryngium spp., Gaillardia spp., Geranium spp., Farfugium spp., Mentha spp., Papa- ver spp., Phlox spp., and Salvia spp.—are best suited to root cutting propagation. You can also propagate some shrubs (such as hydrangea) and a number of tropical trees by root cuttings.
A root cutting is just what it sounds like: you cut away a small section of root from the main root system, much like a cane cutting, and then pot it up into a small container of growing media. After several months the root cutting will develop new adventitious roots and new shoots. It’s best to take root cuttings in winter or early spring when plants are still dormant.
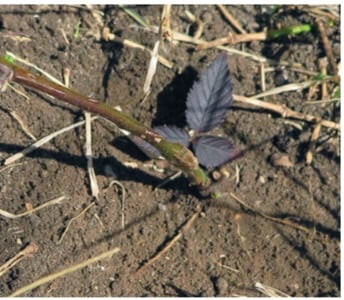
Some plants develop what we call suckers from their root tissue. These are sprouts that emerge from roots under the soil. The new plantlets can be dug and potted up to multiply your plants. Suckers are often seen as a negative thing in the landscape, because they can pull energy away from your main plant. They can also be a nuisance as they will pop up in your lawn and landscape in undesirable areas. However, if you want to make more of the plant that is making suckers, then you’re in luck. Blackberry and raspberry plants commonly sprout suckers in the landscape.
To propagate a sucker, simply follow the same process for taking an offset cutting. Carefully dig around in the soil around the sucker and cut it away from the main root system, making sure to include a portion of its root mat. Immediately plant the sucker elsewhere in your garden, or into small containers.
How to Take a Root Cutting
- 1 Disinfect your knife using alcohol or a 10 per- cent bleach solution.
- 2 Pull soil away from the base of the plant, exposing part of the roots. Choose a section with roots each the thickness of a heavy gauge wire. Some plants will have thicker roots, say, the width of your pinky finger.
- 3 Cut a length of root, then cut it into sections 1 to 2 inches long. Dip the sections into the rooting hormone.
- 4 Place the root cuttings horizontally (or vertically with the cut side facing up and the natural base of the root section pointing down) on top of or into a moist growing media in trays or 4-inch pots and cover lightly with more growing media— about 1/2 inch deep. Keep the growing media moist but not wet.
- 5 You can use a humidity dome or bag if you have trouble keeping the growing media moist to the touch, but root cuttings often won’t require a cover if soil is moist.
- 6 Your root cuttings won’t need any exposure to light until you see bud shoots emerging from the soil.
- 7 Once new shoots emerge, follow steps 7 to 9 in “How to Take a Stem-Tip Cutting” (page 144).
Tiếng Việt
Như vậy, chúng ta đã khám phá xong các bộ phận trên mặt đất của cây mà có thể nhân giống, đã đến lúc chúng ta phải đào sâu hơn một chút. Có một số cấu trúc thực vật dưới đất (trụ mầm), chẳng hạn như củ, thân rễ và rễ cũng có thể được sử dụng để nhân giống.
CỦ (BULB)
Bạn nên biết về hai loại củ thật: củ có vỏ, chẳng hạn như củ hoa Tulip, hoa Dạ Hương, Dạ Lan Hương, Tỏi và Hành Tây, và củ không có vỏ (có vảy), chẳng hạn như củ hoa Loa Kèn. Bạn có thể nhân giống thực dưỡng một trong hai loại. Củ có điểm phát triển trung tâm (chồi thân), được bao quanh bởi các mô lá đã biến đổi để dự trữ chất dinh dưỡng và nước. Đầu chồi và các mô lá có thịt xung quanh gắn liền với một thân bám vào gốc củ.
Một cách đơn giản để nhân giống bằng củ là để chúng phát triển tự nhiên các chồi. Chồi là những cấu trúc giống như củ nhỏ có thể phát triển ở gốc của củ không vỏ và trên mô thân ngầm của củ có vỏ. Những chồi nhỏ này thường có phần đầu rễ phát triển và có thể nhẹ nhàng cắt hoặc kéo ra khỏi củ chính. Bạn có thể trồng chồi bằng cách chỉ vun phần gốc vào hỗn hợp bầu. Chúng sẽ tiếp tục phát triển thành những củ có kích thước đầy đủ, sau đó tạo ra những cây mới. Sẽ mất vài năm để các chồi ngầm trưởng thành đến kích thước có thể nở hoa.
Nếu bạn muốn khuyến khích củ có vỏ tạo ra nhiều củ nhỏ nhanh hơn, bạn có thể làm hỏng phần đế củ bằng một số kỹ thuật khác nhau như: khoét phần tâm củ, khoét phần đáy củ, cắt chéo phần đế củ hoặc cắt nó thành nhiều phần. Sau đó phủ các vết cắt bằng lưu huỳnh làm vườn để ngăn chặn sự phát triển của nấm. Cho một ít than bùn hoặc xơ dừa hơi ẩm vào túi nhựa và cho củ vào. Thổi phồng túi, sau đó đóng túi lại bằng dây buộc xoắn, và đặt ở khu vực có nhiệt độ mát mẻ và tối. Trong một vài tháng, bạn sẽ thấy các khối nhánh nhỏ phát triển mà bạn có thể tách ra và đem trồng.
Để nhân giống củ có vỏ, bạn chỉ cần loại bỏ lớp vỏ bên ngoài khỏi củ và nhúng nửa dưới vào một thùng chứa có hỗn hợp bầu hoặc các chất tạo rễ khác. Những nhánh trong củ có vảy sẽ tạo ra những chồi nhỏ.
THÂN HÀNH
Mặc dù thường bị nhầm lẫn với củ, nhưng thân hành thực chất là một phần thân phình ra từ một thân cây có hoa, được bao bọc trong một số lá mỏng. Các mô thân dày đặc hình thành bên trong những chiếc lá này. Các cây mọc từ thân cây, chẳng hạn như Diên Vĩ (crocus) và Lay Ơn (gladiolus), hàng năm sẽ tạo ra một chồi mới ở gốc.
Để nhân giống trực tiếp từ thân cây, bạn cần đào một ít vào mùa thu khi cây vẫn còn lá xanh. Đặt thân hành trên giấy báo để khô hoàn toàn. Sau đó làm sạch hết đất bám trên thân. Bạn sẽ tìm thấy các đốt nhỏ, được gọi là ống mềm, phát triển gắn liền với thân hành chính, giống như các củ nhỏ trong củ lớn. Bạn có thể bỏ vỏ và trồng chúng sâu khoảng 1 inch trong chất trồng.
THÂN RỄ
Giâm thân rễ cũng tương tự như giâm rễ, chỉ khác là thân rễ thực sự là một loại mô thân (không phải mô rễ) mọc dưới đất. Ví dụ, cây Gừng và cây Dong Riềng mọc thân rễ dưới đất. Một số cây, chẳng hạn như cây Diên Vĩ, có thân rễ mọc một phần dưới đất. Các cây khác, chẳng hạn như cây Dương Xỉ chân thỏ (Davallia spp.), có thân rễ mọc trên mặt đất. Các loài Lan cùng họ, chẳng hạn như Lan Hoàng Thảo (dendrobium), Lan Cattleya, và Lan Dracula tạo ra các nhánh (keikis) từ các thân rễ trên bề mặt.
Thân rễ có các đốt tạo ra cả rễ và chồi thân. Khi bạn cắt thân rễ thành nhiều mảnh riêng biệt, mỗi mảnh có thể mọc rễ, chồi và phát triển thành một cây hoàn toàn mới. Các cây tạo ra thân rễ và có thể được nhân giống từ hom thân rễ bao gồm Tre, Gừng, Thu Hải Đường, hoa Loa Kèn, Khoai Tây, Diên Vĩ, Măng Tây, Phong Lữ, hoa Bia, cây Lưỡi Hổ, một số cây thủy sinh, và cây bắt ruồi (Venus flytrap).
Nhiều cây tạo ra các nhánh con (cây non) bên dưới đất nhờ có mô thân ngầm hoặc từ thân rễ. Cuối cùng, khi thân rễ phát triển chạm vào bề mặt đất, nó sẽ phát triển một chồi mới dưới dạng nhộng. Trước khi điều này xảy ra, bạn có thể đào thân rễ và cắt chúng để tạo ra nhiều cây mới.
Cách giâm thân rễ
- 1 Khử trùng dụng cụ cắt của bạn bằng cồn hoặc dung dịch thuốc tẩy 10 phần trăm.
- 2 Đối với thân rễ dưới mặt đất, phủ đất ra khỏi gốc cây, để lộ thân rễ.
- 3 Chọn một đoạn thân rễ đã bắt đầu phát triển một số rễ và có ít nhất một nút chồi. Cắt một đoạn thân rễ dài từ 1 đến 3 inch. Để các phần tự chữa lành trong vài ngày để các vết cắt khô đi. Sau đó, nhúng vào bột kích thích tố tạo rễ.
- 4 Đặt phần thân rễ đã cắt theo chiều ngang lên trên hoặc vào chất trồng ẩm trong khay hoặc chậu 4 inch và phủ nhẹ bằng chất trồng. Giữ ẩm cho chất trồng nhưng không để quá ướt. Nếu bạn đang sử dụng một loại cây phát triển thân rễ trên mặt đất, chẳng hạn như một số cây Dương Xỉ, bạn sẽ đặt phần thân rễ dùng để giâm lên trên chất trồng và ấn xuống để nó tiếp xúc chắc chắn với đất. Bạn có thể cần dùng tăm hoặc dây kẽm để giữ cho thân dễ dính vào đất.
- 5 Bạn có thể sử dụng mái vòm hoặc túi giữ ẩm nếu bạn gặp khó khăn trong việc giữ ẩm cho chất trồng, nhưng các cành giâm thân rễ dưới đất thường không cần có nắp đậy. Thân rễ nằm trên mặt đất nên được che phủ trong một thời gian ngắn.
- 6 Các hom thân rễ sẽ không cần tiếp xúc với ánh sáng cho đến khi chúng bắt đầu nảy mầm các chồi mới.
- 7 Sau khi chồi mới xuất hiện, hãy làm theo các bước từ 7 đến 9 trong phần “Cách giâm thân ngọn” (trang 144).
CỦ (TUBER)
Củ (Tuber) là một loại mô thân hoặc rễ phình to dưới đất được sử dụng để lưu trữ chất dinh dưỡng. Khoai Tây, Khoai Lang, Sắn, cây họ Cà và Thược Dược (dahlias) là các loại củ. Củ phát triển “mắt”, là vị trí mà chồi và rễ mới sẽ phát triển.
Bạn có thể nhân giống củ bằng cách cắt chúng thành các đoạn mà mỗi đoạn có ít nhất một chồi hoặc mắt. Bạn cần để những phần củ này tự chữa lành để những chỗ bị cắt có thể khô và lành lại trong vài ngày trước khi bạn trồng vào đất hoặc trong giá thể trồng trọt. Bạn cũng nên phủ các vết cắt củ bằng lưu huỳnh trước khi trồng lại, để giúp hạn chế nấm bệnh.
GIÂM RỄ VÀ CHỒI HÚT
Một số cây có thể phát triển rễ và chồi mới từ một phần mô rễ chính của chúng. Chúng tôi gọi đây là những phương pháp giâm rễ. Cây có rễ dày, nhiều thịt – bao gồm các cây lâu năm như cây Phong Quỳ (Anemone spp.), Cúc Tím (Echinacea spp.), Chi Keo (Echinops spp.), Cây Kế Hậu (Eryngium spp.), Lạc Cúc (Gaillardia spp.), Phong Lữ Thảo (Geranium spp.), họ Cúc (Farfugium spp.), chi Bạc Hà (Mentha spp.), Hoa Anh Túc (Papaver spp.), hoa Thiên Lam Tú Cầu (Phlox spp.), và cây Xô Thơm (Salvia spp.) thích hợp nhất để nhân giống bằng cách giâm rễ. Bạn cũng có thể nhân giống một số cây bụi (chẳng hạn như hoa Cẩm Tú Cầu – hydrangea) và một số cây nhiệt đới bằng cách giâm rễ.
Quá trình giâm rễ chỉ đơn giản là như sau: bạn cắt một đoạn rễ nhỏ khỏi bộ rễ chính, giống như cắt mía, và sau đó trồng vào một thùng nhỏ chứa chất trồng. Sau vài tháng, cành giâm rễ sẽ phát triển các rễ mới và chồi mới. Tốt nhất nên giâm rễ vào mùa đông hoặc đầu mùa xuân khi cây còn ở trạng thái ngủ đông.
Một số thực vật phát triển chồi hút từ mô rễ. Đây là những mầm nhú ra từ rễ dưới đất. Các chồi hút này có thể được đào và trồng trong chậu để nhân giống. Những chồi hút thường được coi là một thứ tiêu cực trong cảnh quan, bởi vì chúng có thể hút năng lượng từ cây chính. Chúng cũng có thể gây phiền toái vì chúng sẽ xuất hiện trên bãi cỏ và cảnh quan ở những khu vực không mong muốn. Tuy nhiên, nếu bạn muốn nhân giống loài thực vật đang tạo chồi hút, thì bạn là người may mắn. Cây Mâm Xôi (blackberry & raspberry) thường mọc chồi hút.
Để nhân giống bằng chồi hút, bạn chỉ cần làm theo quy trình tương tự như giâm chồi. Cẩn thận đào đất xung quanh chồi và cắt nó khỏi bộ rễ chính, đảm bảo chồi hút có một phần rễ. Sau đó trồng ngay chồi hút ở vị trí khác trong vườn hoặc trồng vào các thùng chứa nhỏ.
Cách giâm rễ
- 1 Khử trùng dụng cụ cắt bằng cồn hoặc dung dịch tẩy 10%.
- 2 Phủi đất ra khỏi gốc cây, để lộ một phần rễ. Chọn một đoạn có rễ bằng chiều dày của dây đo. Một số cây sẽ có rễ dày hơn, có thể dày bằng chiều rộng ngón út của bạn.
- 3 Cắt một đoạn rễ dài, sau đó cắt thành các đoạn dài từ 1 đến 2 inch. Nhúng các phần vào hormone tạo rễ.
- 4 Đặt các hom rễ theo chiều ngang (hoặc chiều dọc với mặt cắt hướng lên trên và phần gốc tự nhiên của phần rễ hướng xuống dưới) lên trên hoặc vào chất trồng ẩm trong khay hoặc chậu 4 inch và phủ nhẹ bằng nhiều chất trồng hơn, sâu khoảng 1/2 inch. Giữ ẩm cho chất trồng nhưng không để chất trồng quá ướt.
- 5 Bạn có thể sử dụng vòm hoặc túi giữ ẩm nếu bạn gặp khó khăn trong việc giữ ẩm cho chất trồng, nhưng các cành giâm rễ thường không cần che phủ nếu đất ẩm.
- 6 Các cành giâm rễ sẽ không cần tiếp xúc với ánh sáng cho đến khi bạn thấy các chồi trồi lên khỏi đất.
- 7 Khi chồi mới xuất hiện, hãy làm theo các bước từ 7 đến 9 trong phần “Cách giâm thân ngọn” (trang 144).