Bonsai, Bonsai Focus Magazine, Hành trình - Khám phá, Người nổi tiếng
Giacomo Pappalardo – Tạo dáng một cây Bonsai vô vọng theo dáng thác đổ (Cascade)

Th8
Nguồn: Tạp chí Bonsai Focus English Edition T7/T8 2019
Dịch và biên tập: Dũng Cá Xinh (13/08/2021)
English
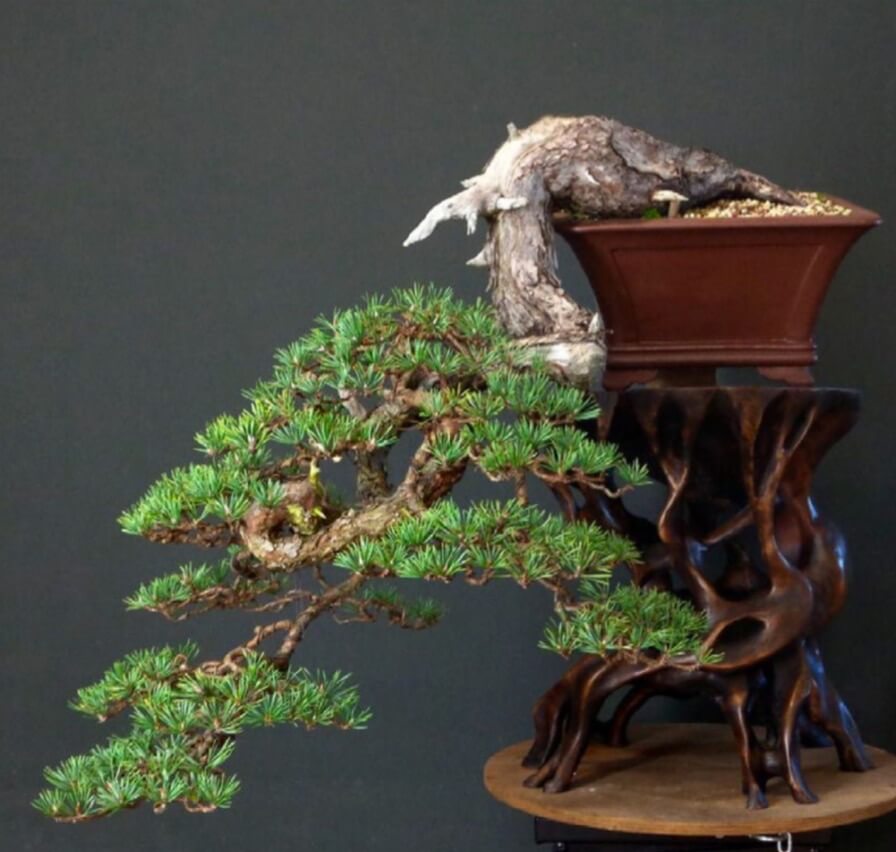
An impossible pine is just perfect for a cascade, but it takes a little time
- Text and photography: Giacomo Pappalardo. Illustrations: Bonsai Focus Studio
Giacomo Pappalardo likes the dramatic moves of the cascading pines you encounter in the mountains. An unsightly pine with a very long pale trunk seems to be just perfect to transform into a cascade. Taking it step by step, it took almost ten years to create this compacted cascade
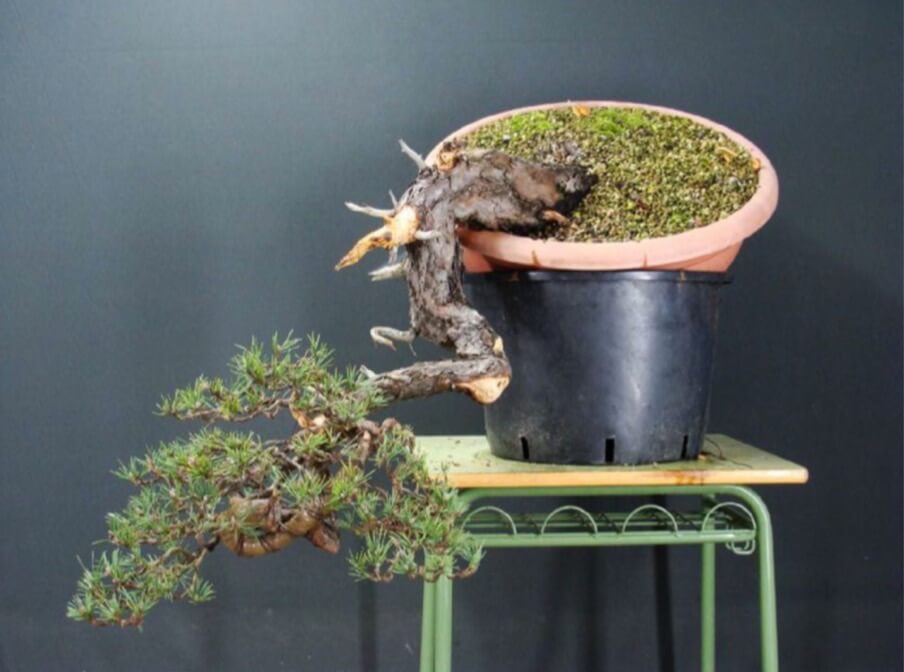
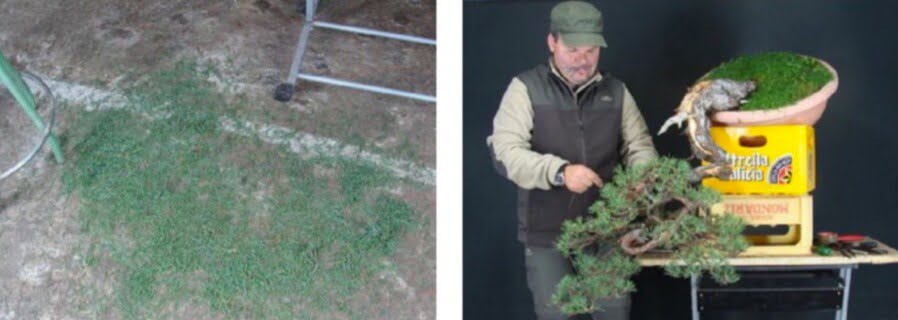
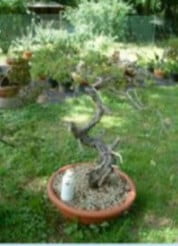
This pine was collected by me in France in 2008. Right at the start it was placed in a pot in the position in which it grew in nature Unfortunately I only have one photo of the tree at that very early stage.
Remove all the soil
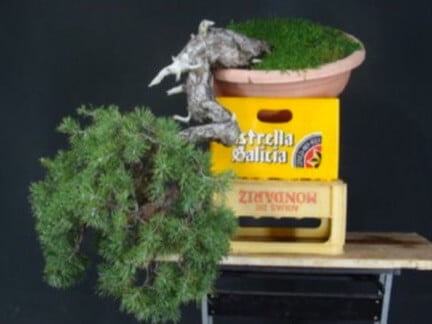
After two years the tree was repotted and I removed all the original soil completely. This is very important to safeguard the vigour of the tree since over time you can risk the original soil becoming compacted so much that it lets no oxygen and water through. The tree was repotted in a very well-draining mixture to ensure healthy and rapid growth to the new roots. Then the tree was allowed to grow freely for another two years without intervention on the foliage. In the four years since its collection, I had plenty of time to study the tree and to evaluate possible design solutions. Already in the repotting phase, I decided that the best option was to make a cascade so I had to change its position by laying the tree on its side and to let it hang out over the edge of the pot, thus also preparing the root ball for the future bonsai pot.
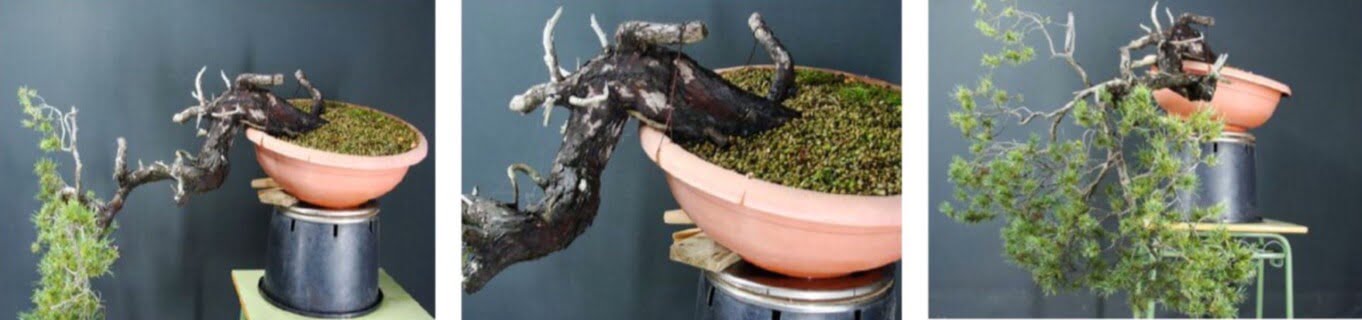
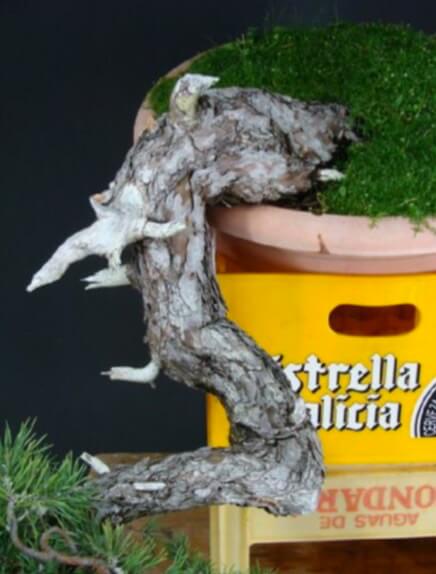
- The situation seen from above
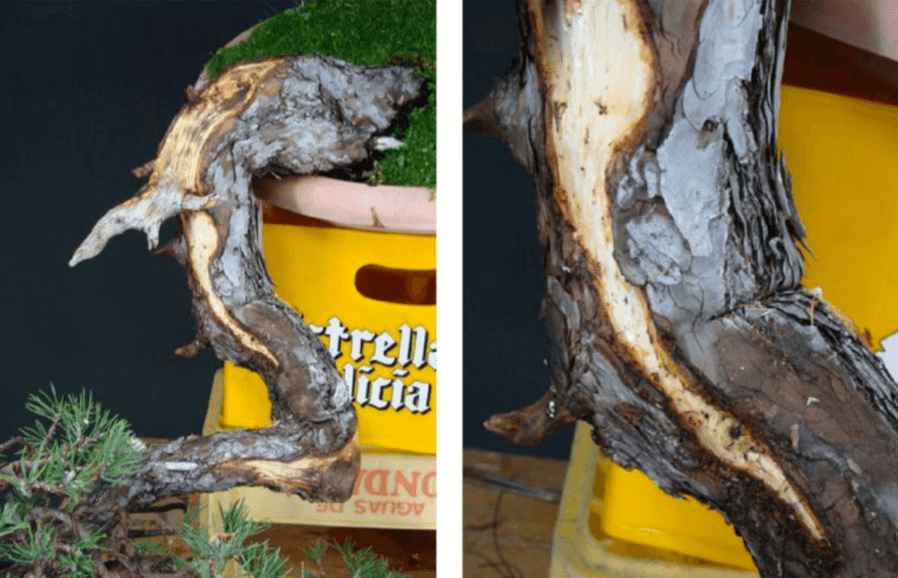
- Detail view of the base of the trunk, it’s destined to become a cascade
- Seen from the front of the tree, the long straight branch (A) needs to be bent upwards to the right
Packaging tape
In the spring of 2012 the first step began on this pine. I cleaned the bark from the old branch stumps and added different jin and, where possible, I created shari on the trunk to emphasize the old age of the tree and make it look more dramatic for a cascade.
The most delicate job was to bring the foliage back closer to the base, to prevent any breakage I wrapped the branch in packaging tape, which works effectively. As the trunk didn’t offer much resistance,Pinus sylvestris is quite flexible, the bend was made in just a single step.
As can be seen from the photos with the bend, the trunk was made to move more than 180 degrees without showing any damage. Next, the branches were wired and the foliage was put in position.
The first six months after the first step, the wire began to bite into the bark of the branches so I removed all wires and let the tree grow freely.
Spring 2012: First step
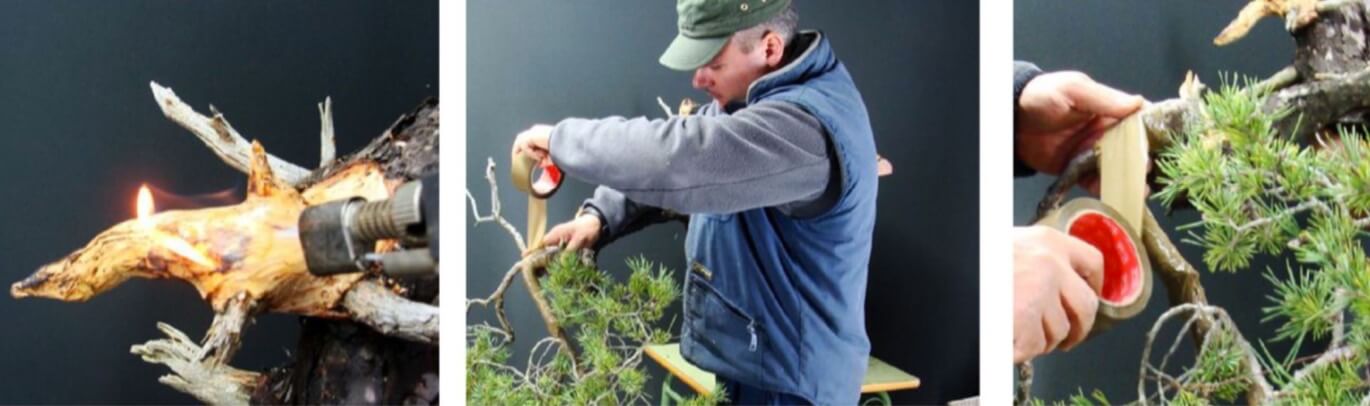
- I added some jin and shari, a blow torch helps to give the fresh wood cracks making it look older
- The branch is being wrapped in packaging tape
- Wrapping it up with the tape

- Then I’m going to wire the branch, which then will be bent towards the base of
the trunk - Detail of the wired branch, I use double gauge copper wire
- The result after the bending
- Some refinement is done on the jin at the top
- The foliage pads are set and I take care to position all candles upwards
More work
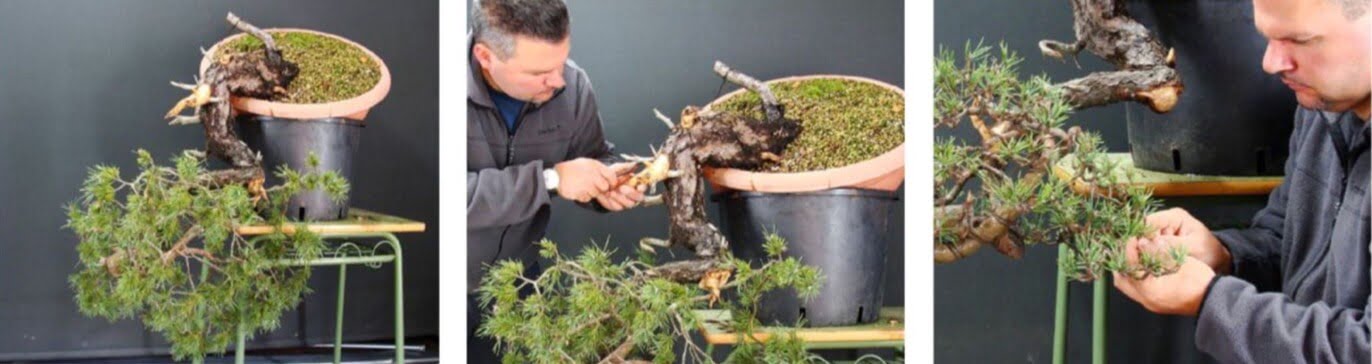
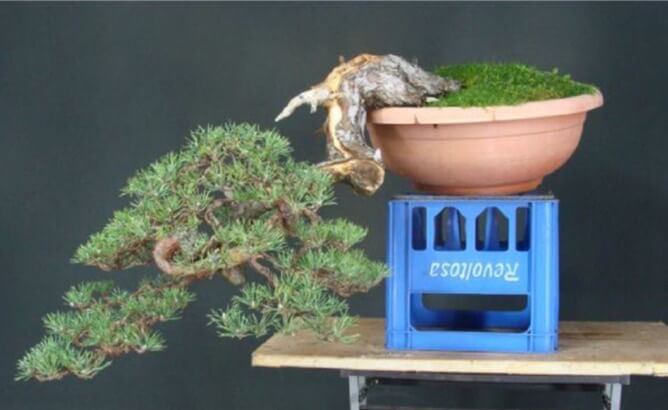
Two years later, in 2014, I proceeded to a second step, the rearranging of the branches, the foliage of which had grown very dense in the meantime. However, I was not happy about the angle of the cascade. Maybe it would be better to have it more vertical. I decided to postpone this decision until the next step, because that is the stage I would plant it in a bonsai pot. Repotting successfully took place in the spring of 2015, when I did plant it in a slightly more vertical position.
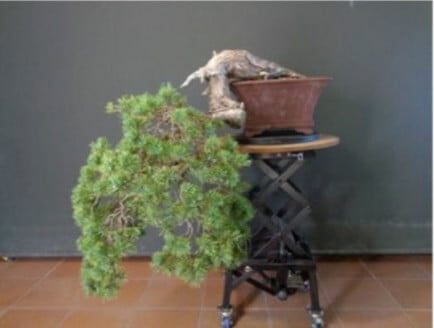
In the spring of 2018 the tree was ready for a third step. I am always very keen to stress this aspect. It is not we who decide when to work a tree, but the tree itself. You therefore need to be able to listen to its needs.
- The pine had grown very dense
- I removed old needles before proceeding with wiring and positioning the branches for the second time
- Detail view of the needle -pinched branches
Finally the image of the tree I had in mind was clearer when planted in its new pot. I decided that I wanted to raise its apex a little further, so I used a large lever to bend the upper part even closer to the trunk. After six hours’ work the fourth step was concluded
- The number of needles that came off
- Wiring the tree again and placing the branches
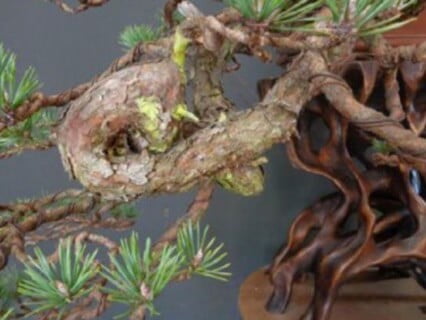
- I made a shari at the top including the jin. And I extended the shari on the lower right side
- Detail of the shari
The masterplan for the cascade
 The plan for creating this cascade took me almost ten years, starting in spring of 2012. First step is to get the long straight branch bent to compact the tree. Then I concentrated on the development of the foliage pads. Gradually I managed to get the apex closer to the base of the trunk.
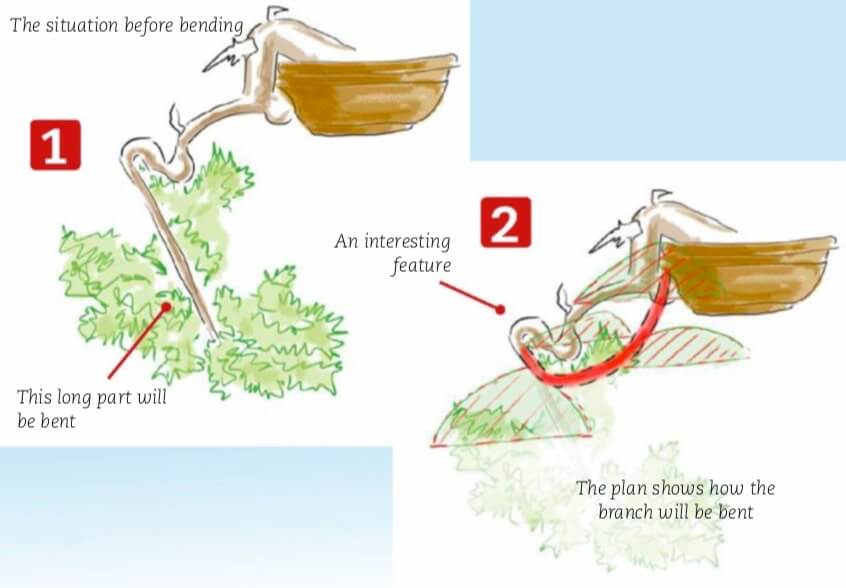
- The situation before bending
- This long part will be bent
- An interesting feature
- The plan shows how the branch will be bent
Listen to the tree, because it is not we who decides when to work on a tree, but the tree itself.
The final step
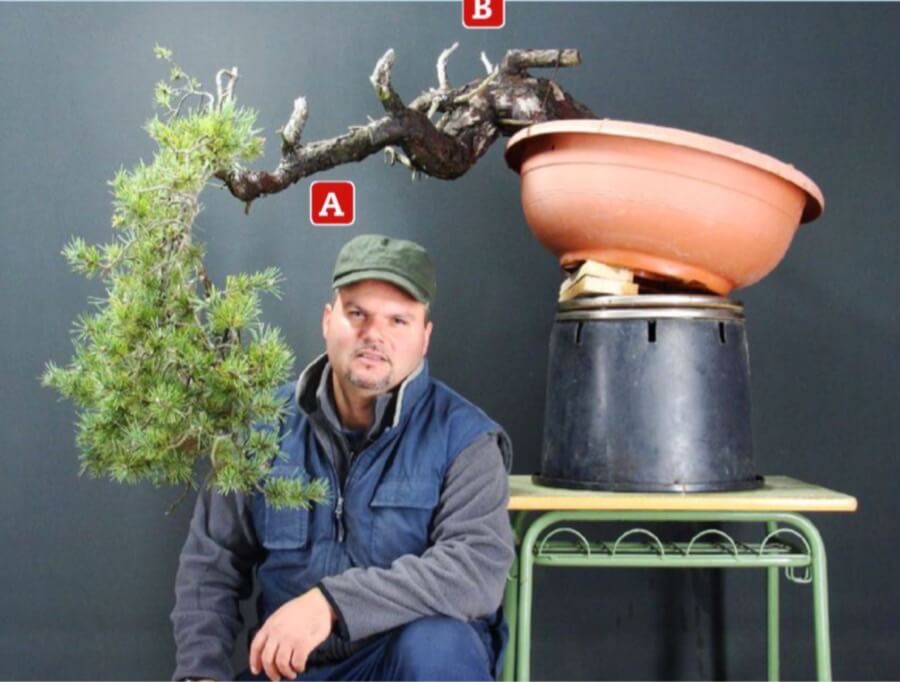
The final step is to bring the foliage even closer to the base. This is done by using a lever to push up the branch (A) so that all comes up further
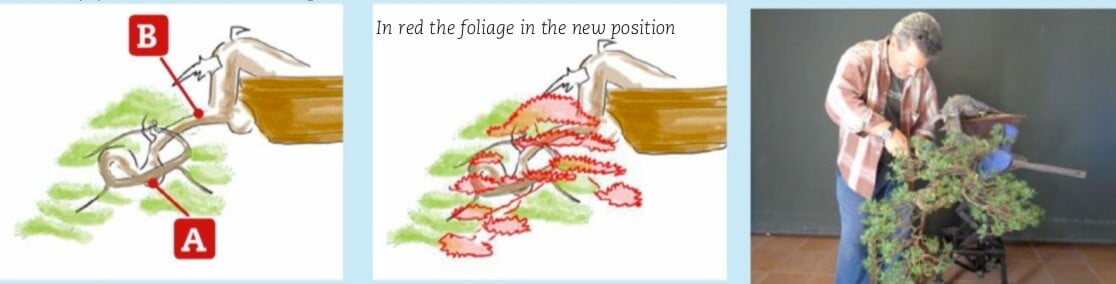
- The situation before, there is still a lot of space (B) between foliage and the trunk
- In red the foliage in the new position
- I use a lever to bring the end of the branch closer to its base. The apex will move upwards
Tiếng Việt
An impossible pine is just perfect for a cascade, but it takes a little time
- Text and photography: Giacomo Pappalardo. Illustrations: Bonsai Focus Studio
Giacomo Pappalardo likes the dramatic moves of the cascading pines you encounter in the mountains. An unsightly pine with a very long pale trunk seems to be just perfect to transform into a cascade. Taking it step by step, it took almost ten years to create this compacted cascade
This pine was collected by me in France in 2008. Right at the start it was placed in a pot in the position in which it grew in nature Unfortunately I only have one photo of the tree at that very early stage.
Remove all the soil
After two years the tree was repotted and I removed all the original soil completely. This is very important to safeguard the vigour of the tree since over time you can risk the original soil becoming compacted so much that it lets no oxygen and water through. The tree was repotted in a very well-draining mixture to ensure healthy and rapid growth to the new roots. Then the tree was allowed to grow freely for another two years without intervention on the foliage. In the four years since its collection, I had plenty of time to study the tree and to evaluate possible design solutions. Already in the repotting phase, I decided that the best option was to make a cascade so I had to change its position by laying the tree on its side and to let it hang out over the edge of the pot, thus also preparing the root ball for the future bonsai pot.
- The situation seen from above
- Detail view of the base of the trunk, it’s destined to become a cascade
- Seen from the front of the tree, the long straight branch (A) needs to be bent upwards to the right
Packaging tape
In the spring of 2012 the first step began on this pine. I cleaned the bark from the old branch stumps and added different jin and, where possible, I created shari on the trunk to emphasize the old age of the tree and make it look more dramatic for a cascade.
The most delicate job was to bring the foliage back closer to the base, to prevent any breakage I wrapped the branch in packaging tape, which works effectively. As the trunk didn’t offer much resistance,Pinus sylvestris is quite flexible, the bend was made in just a single step.
As can be seen from the photos with the bend, the trunk was made to move more than 180 degrees without showing any damage. Next, the branches were wired and the foliage was put in position.
The first six months after the first step, the wire began to bite into the bark of the branches so I removed all wires and let the tree grow freely.
Spring 2012: First step
- I added some jin and shari, a blow torch helps to give the fresh wood cracks making it look older
- The branch is being wrapped in packaging tape
- Wrapping it up with the tape
- Then I’m going to wire the branch, which then will be bent towards the base of
the trunk - Detail of the wired branch, I use double gauge copper wire
- The result after the bending
- Some refinement is done on the jin at the top
- The foliage pads are set and I take care to position all candles upwards
More work
Two years later, in 2014, I proceeded to a second step, the rearranging of the branches, the foliage of which had grown very dense in the meantime. However, I was not happy about the angle of the cascade. Maybe it would be better to have it more vertical. I decided to postpone this decision until the next step, because that is the stage I would plant it in a bonsai pot. Repotting successfully took place in the spring of 2015, when I did plant it in a slightly more vertical position.
In the spring of 2018 the tree was ready for a third step. I am always very keen to stress this aspect. It is not we who decide when to work a tree, but the tree itself. You therefore need to be able to listen to its needs.
- The pine had grown very dense
- I removed old needles before proceeding with wiring and positioning the branches for the second time
- Detail view of the needle -pinched branches
Finally the image of the tree I had in mind was clearer when planted in its new pot. I decided that I wanted to raise its apex a little further, so I used a large lever to bend the upper part even closer to the trunk. After six hours’ work the fourth step was concluded
- The number of needles that came off
- Wiring the tree again and placing the branches
- I made a shari at the top including the jin. And I extended the shari on the lower right side
- Detail of the shari
The masterplan for the cascade
The plan for creating this cascade took me almost ten years, starting in spring of 2012. First step is to get the long straight branch bent to compact the tree. Then I concentrated on the development of the foliage pads. Gradually I managed to get the apex closer to the base of the trunk.
- The situation before bending
- This long part will be bent
- An interesting feature
- The plan shows how the branch will be bent
Listen to the tree, because it is not we who decides when to work on a tree, but the tree itself.
The final step
The final step is to bring the foliage even closer to the base. This is done by using a lever to push up the branch (A) so that all comes up further
- The situation before, there is still a lot of space (B) between foliage and the trunk
- In red the foliage in the new position
- I use a lever to bring the end of the branch closer to its base. The apex will move upwards