Ebook Việt Hoá] Plant parenting: Easy ways to make more houseplants vegetables and flowers - LESLIE F. HALLECK
[Ebook Việt Hoá] Plant parenting – LESLIE F. HALLECK (Nhân giống cây) – STEM CUTTINGS (Giâm chồi, ngọn)
Th2
- Nguồn: [Ebook Việt Hoá] Plant parenting: Easy ways to make more houseplants, vegetables, and flowers – LESLIE F. HALLECK (Nhân giống cây: Những cách dễ nhất để nhân giống cây cảnh trong nhà, rau và hoa)
- Biên tập: Dũng Cá Xinh (Tháng 08/20201)
- Dịch: Huyền Nguyễn
English
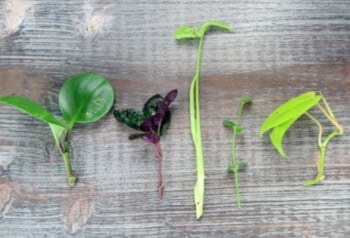
When it comes to plant cloning, you’ll probably take more stem cuttings than any other type. There are a few different methods you can use to take stem cut- tings depending on your plant of choice. Many small houseplants are easily propagated by stem-tip cuttings, while large tropical specimens can be air layered. Here we’ll cover the different types of stem cutting methods and corresponding plant types.
STEM-TIP CUTTINGS
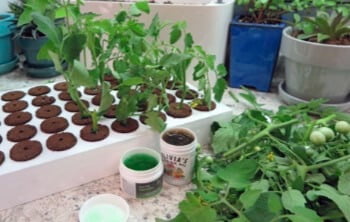
Once you get down to making more plants, you’ll do most of your cloning using stem-tip cuttings—also called tip cuttings—especially if you love water rooting. Tip cuttings are taken from plants with distinct stem tissue that can be cut away in sections from the mother plant. Plants commonly propagated via this method include basil, pothos ivy, mint, philodendron, salvia, geraniums, coleus, and many succulents.
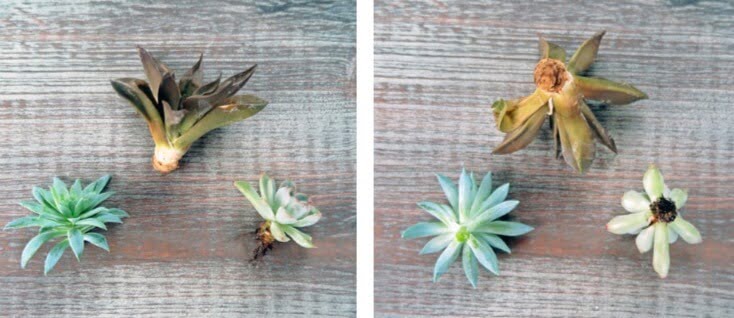
Because succulent plants contain so much moisture, it’s best to let cuttings cure for at least a few days before inserting into water or growing media, so the wounded area of the cut can begin to seal and callus. Once your succulent tip cuttings have cured and begun to callus, you can set the stem in water or into a slightly moist growing media or plug. Don’t be concerned if you notice a bit of drying or shriveling on some of the leaves—succulents are resilient. In fact, you can often leave succulent cuttings out for extended periods of time until they develop new root tissue, then put them in water or pot them up. Succulent cuttings do not need to be covered.
When taking stem-tip cuttings, you will find that different plants will require you to remove more or less foliage from the new cutting. Tomatoes, salvia, mint, and pothos ivy, for example, are fast, vigorous stem rooters. You can get away with leaving more foliage on the cutting.
Slow-to-root and woody cuttings perform better if you remove more leaves. When you leave excess foliage on slow-to-root cuttings, the chances of fungal problems with surrounding cuttings can increase. Excess leaves can yellow and drop off the cutting. The excess leaves also cause the cutting to lose more moisture and take up resources. So, I usually remove all but one or two of the top leaves from slower cuttings, such as peppers and citrus, before sticking them. For many woody types of plants, such as roses, you may remove all the leaves from the cutting.
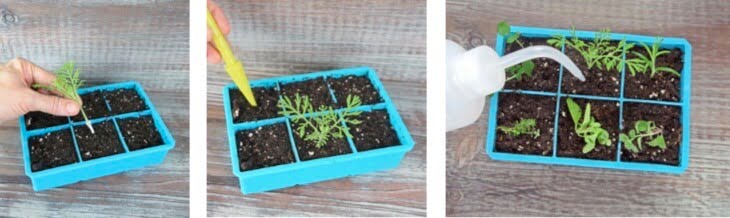
How to Take a Stem-Tip Cutting
- 1 Disinfect your snips using alcohol or a 10 per- cent bleach solution.
- 2 Make a clean cut about 4inches below a relatively new stem tip that has no flowers or buds on it. Take a 3- to 5-inch cutting from a plant stem, then remove any additional side stems and the bottom leaves. After removing leaves, you can trim the cutting to 3 to 3 1/2 inches, snipping just below a leaf node. Be sure that the remaining cutting includes at least one leaf node, which is where the new shoot will emerge from the main stem. Be careful not to damage the stem base, as this is where the callus and adventitious roots will form.
- 3 Dip the bare end of the stem into the rooting hormone.
- 4 Gently place or stick the cutting into water, rooting growing media, rooting plug, or an automatic propagator system.
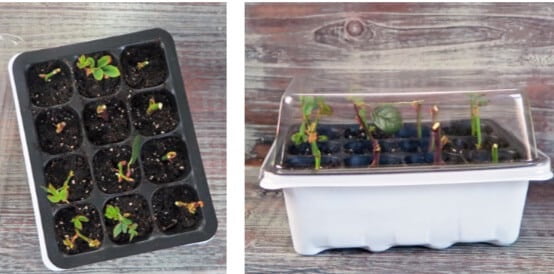
- 5 Tropical plants and plants that prefer more moisture and humidity may root faster if covered until rooted. If you are rooting cuttings in organic or inert growing media—or a propagator— cover your cuttings with a humidity dome or other plastic cover. (If you are water rooting, you don’t need to cover the cuttings.) If your humidity dome has a vent, you can crack it open if water is condensing on the plastic. Don’t overcrowd—while you must maintain humidity around the cuttings during rooting, they also need good air circulation. Once the cuttings have started developing roots, you can remove the dome or cover.
- 6 Keep the rooting media moist, but not soggy.
- 7 Place your cuttings near natural light from a window or a couple of feet away from fluorescent, CFL, or LED grow light fixtures. Intense light will burn cuttings. If using grow lighting, leave lights on for 24 hours a day.
- 8 Give it time. Some plants can take a couple of months to root, while others root in a matter of days. For plants that like warm growing conditions, or if you’re starting cuttings in winter or in a cool part of your home, use a seedling heat mat under the rooting tray to speed things up.
- 9 Once roots have filled the original container, it’s time to bump up your plant to a slightly larger container.


GROUND AND AIR LAYERING
Ground layering, also called simple layering, is a straightforward way to propagate plants that easily grow new roots along their stems. Layering occurs in nature when a branch bends down or falls over and touches the ground. If it stays in contact with the soil, adventitious roots can develop and anchor into the ground. Eventually the newly rooted shoot is separated from the parent plant (or the parent plant may die) and the rooted shoot becomes a new plant specimen.
You can replicate this process in certain plants by bending a branch down and pinning it to the ground so a piece of the stem meets with ground soil or into another pot of soil. You can also bury the tip of the branch (called tip layering), so it will first grow down- ward and then back up out of the soil.
Depending on the plant, new roots can take any- where from several weeks to a year to develop. You can speed up the process by making a small wound on the branch to expose the inner tissue and applying some rooting hormone to the area before pinning it to the ground or soil. After the shoot has rooted, you cut it away from the parent plant and it will continue to grow on its own.
Brambling plants, such as blackberries and raspberries, are commonly layered, but this method also works for many other plants, including fruit trees, tropicals, vines, azaleas, forsythia, rhododendron, and roses.
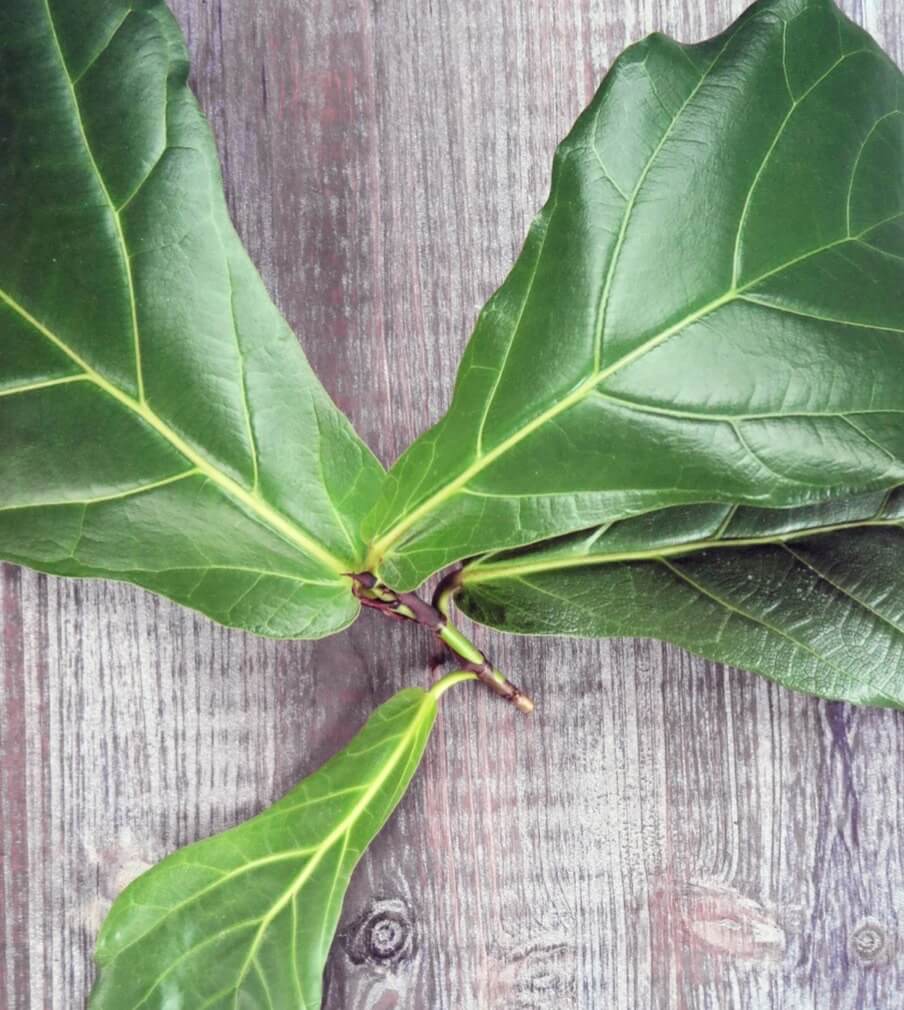
If you are focused on propagating houseplants and tropicals in containers, then you can try air layering. Air layering, or air propagation, is similar to rooting with ground layering or a stem-tip cutting, except you don’t bury the stem in soil or remove a cutting from the mother plant; you root it right on the plant while it’s growing! You accomplish this fascinating feat by creating an artificial root zone right along an actively growing stem. If the cells along the stem think they are under soil or in water, they will start producing new roots—just as with ground layering.
Citrus trees and large tropical houseplants are good candidates for air layering. You can also air layer shrubs and trees (fruit trees are a popular choice) in your outdoor garden. The best time to start an air layer cutting is in early spring when the sap inside the plant begins flowing—especially with fruit trees. If you plan to air layer deciduous plants outdoors, watch for the first sign of their buds turning green. Indoor tropical plants can be air layered any time of year they are actively growing.
You can air layer a plant on its side branches or even on its main trunk. This is a great way to rejuvenate ragged houseplants that have become over- stretched or overgrown. Instead of throwing away the plant, you can air layer it along the main trunk, preserving the healthy top growth. Once a new root mat has developed, simply remove and pot up the cutting—like new!
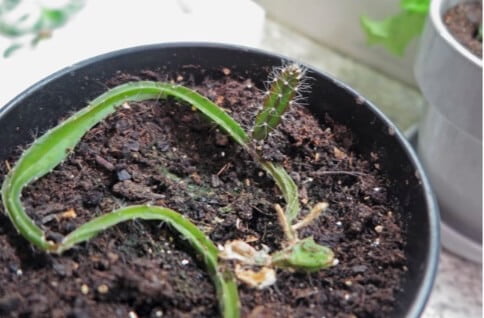
You can grow dragon fruit (Hylocereus spp.) from seed, but germination is unpredictable and can take a long time. Vegetative cuttings, on the other hand, are easy. This young, fleshy stem of a succulent dragon fruit bent over and touched the soil in the pot. The stem, where it touched the soil, produced new adventitious roots and a new bud shoot. I can now cut this shoot away from the stem on either side and transplant it. You can also cut the fleshy stem into several sections, let them cure, then pot them up individually to root.

How to Take an Air Layer Cutting
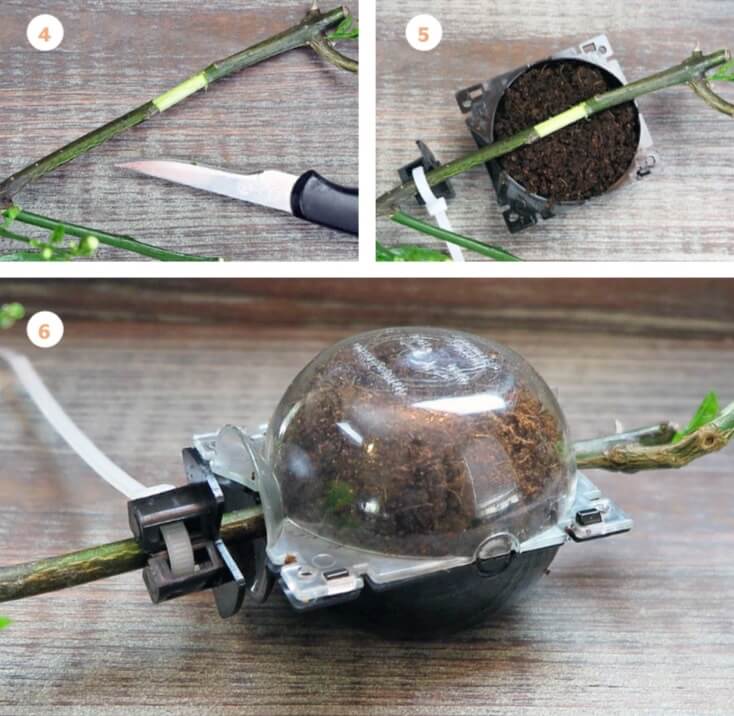
- 1 Disinfect your knife using alcohol or a 10 percent bleach solution.
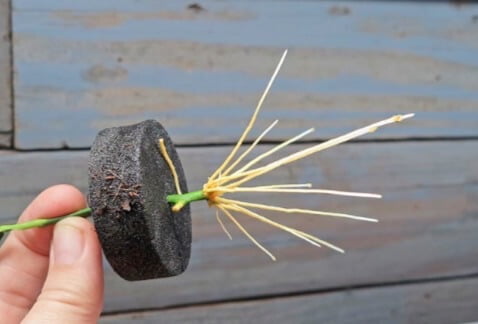
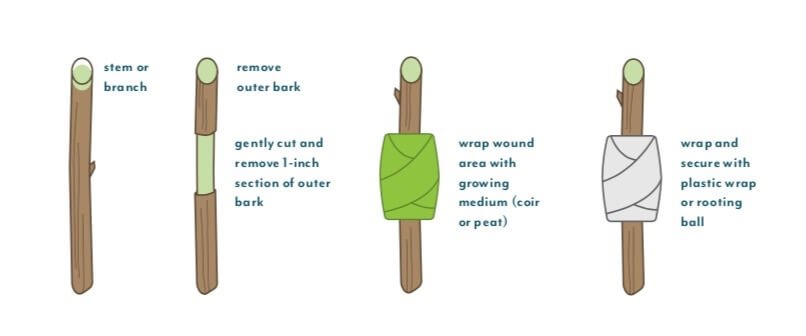
- 2 Choose a branch (either side stem or main stem) that is at least 3/8 inch thick to girdle. Cut through the external bark layer, all around the circumference of the stem. Then make a second identical cut on the same stem. The distance of the second cut should be about one and a half times the diameter of the branch/stem.
- 3 Make a couple of perpendicular cuts between the two original cuts so that you can peel the bark away from the section. Essentially, you’re removing a section of “skin” to stimulate the plant to generate new tissue. On plants that don’t have thick bark, you can simply scrape away the outer tissue between the cuts.
- 4 Use the edge of the knife to scrape away some of the cambium layer. This stops the flow of water and nutrients from the main part of the plant into the stem section. This is where your new roots will grow.
- 5 Soak some sphagnum moss or coir in a bowl of water overnight. Squeeze out extra moisture before you use it.
- 6 Cover and protect the cut area by packing a mat of moist sphagnum moss or coir around the girdled area. The moss mat should be about the size of a baseball. Make sure it completely covers the girdled section.
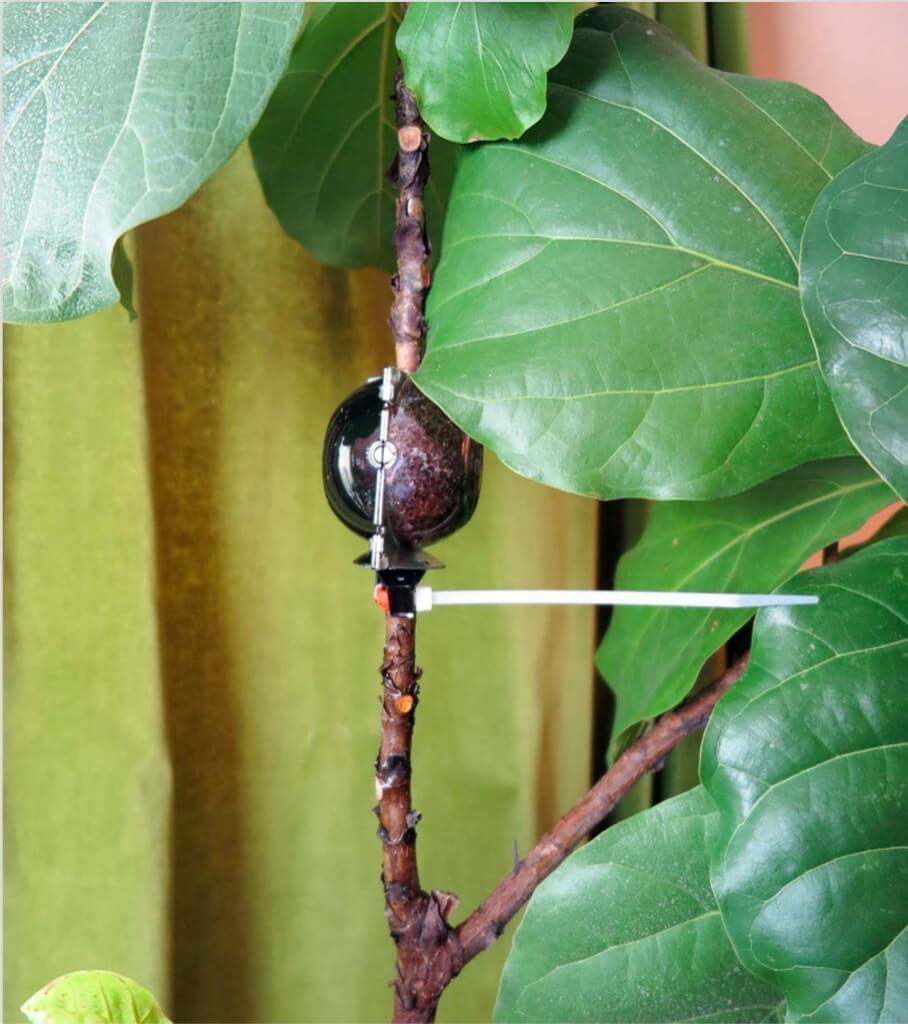
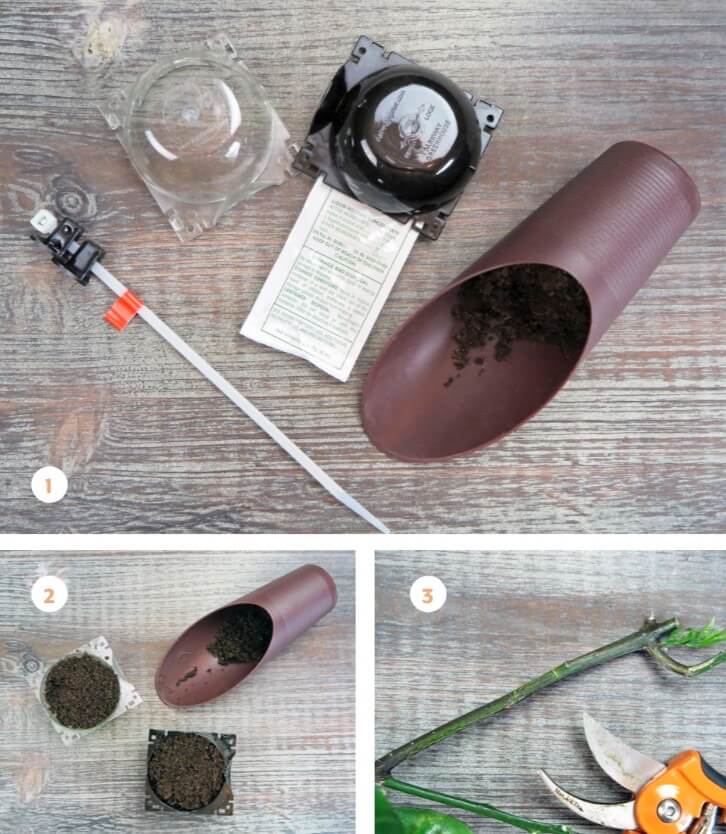
- 7 Use clear plastic wrap around the moss mat, wrapping tightly, so that the moss is in firm contact with the stem and there are no loose areas. Seal both ends, like a candy wrapper, with twist ties so that all the moisture is contained. You can also use an air layering kit with a ball that snaps together.
- 8 After the girdled section is wrapped uptight, it’s best to trim off any small side branches growing above the air layered section but leave any side branches that are growing on the top
- 6 inches of the stem. The section of stem inside the plastic wrap or layering ball does not need any light exposure.
- 9 Once you see new root tips growing all the way around the moss, it’s time to cut your new plant away from the mother plant. This process can often take 2 to 3 months—longer for certain types of plants. To harvest your new cutting, cut the branch below where the new root ball has formed and pot it up.
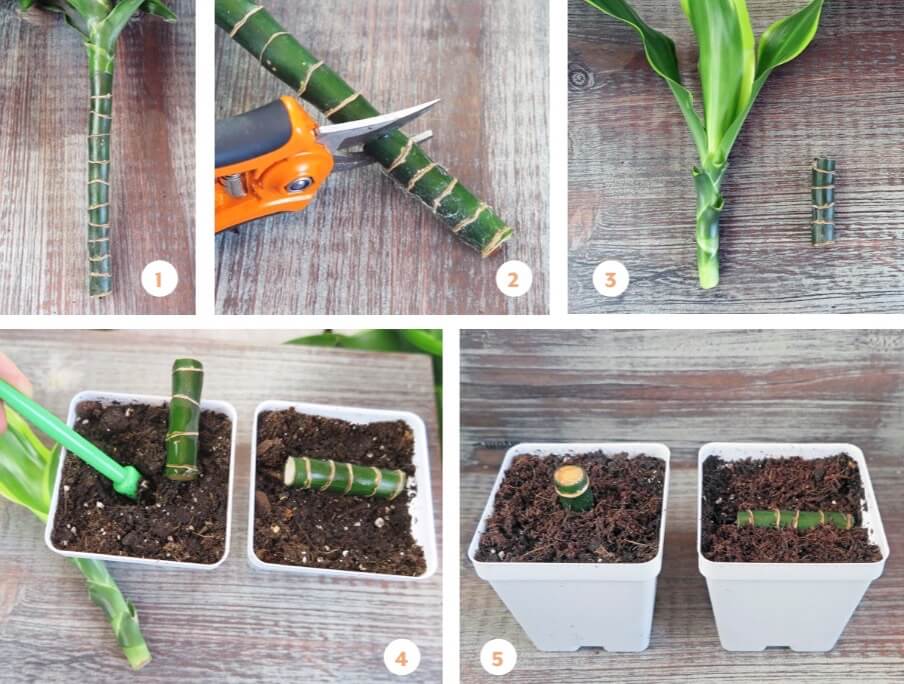
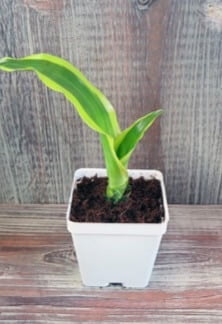
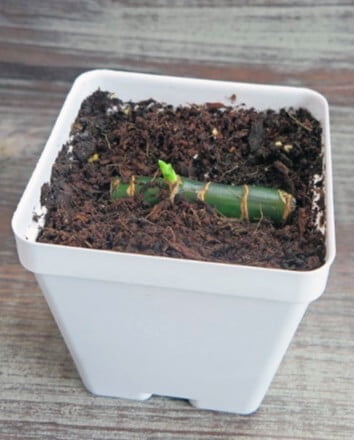
The step-by-step process to taking a cane cutting from a corn plant (Dracaena spp.).
CANE CUTTINGS
Cane cuttings are an easy way to propagate many tropicals that grow thick, sectioned stems, such as Chinese evergreen (Aglaonema spp.) or corn plant (Dracaena spp.). You can also propagate certain types of orchids that grow upright (monopodal), such as Vanda spp. and moth orchid (Phalaenopsis spp.), by removing a section of stem/cane.
If you have houseplants that have become leggy and stretched in low light, it may be time to start new ones. With cane cuttings, you’ll remove a 2- to 3-inch section of older main cane stems without any leaves. You can root cane cuttings either horizontally (if you don’t want a cut section of cane exposed on your new plant) or vertically. Once the cane cutting develops roots and a new bud shoot, you can let it fill out the container and then repot it into a larger container.
How to Take a Cane Cutting
- 1 Disinfect your snips using alcohol or a 10 percent bleach solution.
- 2 Choose an older section of a leaf less main stem that includes two or three nodes and cut it from the plant. Make flat cuts—not at an angle. Cut away top growth with any leaves.
- 3 Dip the bottom end (vertical cutting) or the bottom half (horizontal cutting) into the rooting hormone.
- 4 If rooting horizontally, simply lay the cutting on top of the rooting media and press down a bit so it makes contact with the media. If rooting vertically, stick the cutting into rooting media or
- plug, ensuring that about half of the cutting is beneath the surface. You can also vertically root cane cuttings in water or propagators.
- 5 Cane cuttings typically benefit from use ofa small humidity dome or a clear plastic bag, although some cane cuttings will root and shoot perfectly fine uncovered. Do keep the growing media moist if you’re using potting mix or substrates such as Oasis or rockwool.
- 6 Then follow steps 7 to 9 in “How to Take a Stem-Tip Cutting” (page 144).
STEM LEAF-BUD CUTTINGS
Stem leaf-bud cuttings are similar to stem-tip cuttings, except you make two cuts to remove sections from along the plant stem—usually from plants with long trailing stems, such as ivy, philodendron, jasmine, and clematis. Tropicals such as rubber and jade plants, herbs such as basil and mint, and many shrubs such as camellia, black- berry, and citrus are also propagated using this technique.
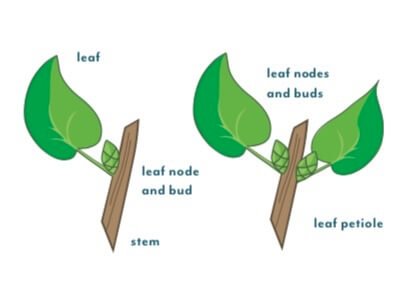
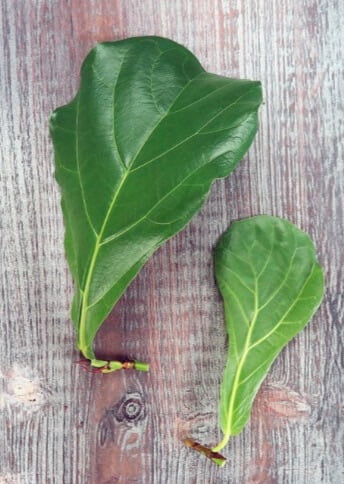
Stem leaf-bud cuttings include a leaf, petiole, and a small section of attached stem. You take a leaf-bud cutting by cutting both below and above a leaf node. The piece of stem that is below the leaf node (closest to growing crown of the plant) is what you will insert into water or growing media. Or, you can place it horizontally into the soil, with the leaf and node above the soil (like a cane cutting). New roots will develop from the cut portion of the stem and a new shoot will emerge from the leaf node.
How to Take a Stem Leaf-Bud Cutting
- 1 Disinfect your snips using alcohol or a 10 per- cent bleach solution.
- 2 Make a clean cut about 4 inches below a relatively new stem tip that has no flowers or buds on it. Then take a 2- to 3-inch cutting from along the plant stem, making the first cut at an angle about 1/4 inch above the leaf node and then a second straight cut 1 to 2 inches below the leaf node. Be sure that the remaining cutting includes at least one leaf node, which is where the new shoot will emerge from the main stem. Be careful not to damage the stem base as this is where the callus and adventitious roots will form.
- 3 Remove all but one or two leaves.
- 4 Gently place or stick the cutting into water, rooting growing media, rooting plug, or an automatic propagator system.
- 5 Leaf-bud cuttings can benefit from usinga humidity dome, plastic cover, or plastic bag to increase humidity. Keep the rooting media moist, but not soggy.
- 6 Then follow steps 7 to 9in “HowtoTakea Stem-Tip Cutting” (page 144).
Tiếng Việt
Khi nói đến nhân giống cây trồng, bạn có thể sẽ hay sử dụng phương pháp giâm chồi, ngọn nhiều hơn bất kỳ loại nào khác. Có một số phương pháp khác nhau bạn có thể sử dụng để giâm chồi, ngọn tùy thuộc vào loại cây bạn chọn. Nhiều cây trồng nhỏ trong nhà có thể dễ dàng nhân giống bằng cách giâm ngọn, trong khi các giống cây nhiệt đới lớn có thể được áp dụng phương pháp phân lớp không khí. Trong phần này, chúng tôi sẽ đề cập đến các phương pháp giâm cành khác nhau và các loại cây trồng tương ứng.
GIÂM CHỒI, NGỌN
Để tạo ra nhiều cây hơn, hầu như các bạn sẽ thực hiện việc nhân giống bằng cách sử dụng phương pháp giâm ngọn, còn được gọi là giâm cành, đặc biệt nếu bạn thích phương pháp ra rễ bằng nước. Cành giâm ngọn được lấy từ những cây có mô thân rõ ràng có thể được cắt đi từng đoạn từ cây mẹ. Các loại cây thường được nhân giống bằng phương pháp này bao gồm Húng Quế (basil), cây Thường Xuân (pothos ivy), Bạc Hà (mint), Trầu Bà (philodendron), Salvia, Phong Lữ (geraniums), cây Lá Gấm (coleus) và nhiều loài cây mọng nước.
Bởi vì cây mọng nước có độ ẩm cao, tốt nhất nên để cành giâm tự chữa lành vết cắt ít nhất vài ngày trước khi cắm vào nước hoặc chất trồng, để vết cắt bắt đầu đóng vảy và chai cứng. Khi vết cắt trên cành giâm ngọn cây mọng nước đã khô và bắt đầu chai sần, bạn có thể đặt thân cây vào nước, chất trồng hoặc ô cắm hơi ẩm. Đừng lo lắng nếu bạn nhận thấy một số lá bị khô hoặc teo lại, các loài mọng nước có khả năng phục hồi. Trên thực tế, bạn thường có thể để cành giâm cây mọng nước trong thời gian dài cho đến khi chúng phát triển mô rễ mới, sau đó cho chúng vào nước hoặc trồng trong chậu. Hom mọng nước không cần che phủ.
Khi giâm ngọn, các ngọn cây khác nhau sẽ cần được loại bỏ ít nhiều tán lá. Ví dụ như Cà Chua (tomato), cây Salvia, Bạc Hà (mint) và cây Thường Xuân (pothos ivy) là những loại cây ra rễ nhanh và khỏe. Bạn có thể để lại nhiều lá hơn trên cành giâm.
Việc giâm cành gỗ chậm ra rễ sẽ tốt hơn nếu bạn loại bỏ nhiều lá hơn. Khi bạn để lại những tán lá thừa trên những cành giâm chậm ra rễ, khả năng xảy ra các vấn đề về nấm ở các cành giâm xung quanh có thể tăng lên. Các lá thừa có thể vàng và rụng khi cắt. Phần lá thừa cũng làm cho vết cắt mất nhiều độ ẩm và tốn chất dinh dưỡng. Vì vậy, tôi thường cắt bỏ tất cả trừ một hoặc hai lá trên cùng khỏi những cành giâm chậm ra rễ trước khi giâm, chẳng hạn như đối với Tiêu (pepper) và Cam Quýt (citrus). Đối với nhiều loại cây thân gỗ, chẳng hạn như hoa Hồng (rose), bạn có thể cắt bỏ hết lá.
Làm thế nào để giâm ngọn
- 1 Khử trùng dụng cụ cắt bằng cồn hoặc dung dịch tẩy 10%.
- 2 Cắt dứt khoát một đoạn ngọn khoảng 4 inch kể từ ngọn thân tương đối non không có hoa hoặc nụ trên đó. Lấy một đoạn dài 3 đến 5 inch từ thân cây, sau đó loại bỏ các thân phụ và lá phía dưới. Sau khi loại bỏ lá, bạn có thể tỉa cành giâm sao cho có độ dài từ 3 đến 3 inch rưỡi, cắt ngay dưới nút lá. Đảm bảo rằng cành giâm còn lại bao gồm ít nhất một nút lá, đây là nơi chồi mới sẽ mọc ra từ thân chính. Hãy cẩn thận để không làm hỏng phần gốc của cành giâm, vì đây là nơi sẽ hình thành các mô sẹo và rễ.
- 3 Nhúng đầu dưới của cành giâm vào hoocmôn tạo rễ.
- 4 Nhẹ nhàng đặt hoặc cắm cành giâm vào nước, chất trồng tạo rễ, ô cắm rễ hoặc hệ thống nhân giống tự động.
- 5 Cây nhiệt đới và cây ưa ẩm hơn có thể ra rễ nhanh hơn nếu được che phủ cho đến khi ra rễ. Nếu bạn đang giâm cành trong môi trường hữu cơ hoặc chất trồng trơ, hoặc chất nhân giống, hãy che cành giâm bằng mái vòm ẩm hoặc bìa nhựa khác. Nếu bạn đang áp dụng phương pháp ra rễ trong nước, bạn không cần phải che đậy các cành giâm. Nếu vòm độ ẩm có lỗ thông hơi, bạn có thể mở nó ra nếu nước ngưng tụ trên nhựa. Đừng tạo quá nhiều lỗ thông hơi vì bạn phải duy trì độ ẩm xung quanh cành giâm trong quá trình ra rễ, đồng thời lưu thông không khí tốt. Khi cành giâm đã bắt đầu phát triển rễ, bạn có thể dỡ bỏ vòm hoặc giàn che.
- 6 Giữ ẩm cho chất trồng, nhưng không để chất trồng bị sũng nước.
- 7 Đặt cành giâm gần ánh sáng tự nhiên từ cửa sổ hoặc cách xa các thiết bị chiếu sáng huỳnh quang, CFL hoặc LED một vài mét. Ánh sáng mạnh sẽ làm cháy cành giâm. Nếu sử dụng đèn chiếu sáng, hãy để đèn sáng 24 giờ một ngày.
- 8 Chờ đợi cành giâm ra rễ. Một số cây có thể mất vài tháng để ra rễ, trong khi những cây khác mọc rễ chỉ trong vài ngày. Đối với những cây ưa điều kiện phát triển ấm áp hoặc nếu bạn bắt đầu giâm cành vào mùa đông hoặc trong khu vực mát mẻ trong ngôi nhà, hãy sử dụng tấm lót giữ nhiệt cho cây con dưới khay để đẩy nhanh tiến độ.
- 9 Khi rễ đã lấp đầy thùng chứa ban đầu, đã đến lúc bạn chuyển cây sang thùng lớn hơn một chút.
PHÂN LỚP TRÊN MẶT ĐẤT VÀ PHÂN LỚP KHÔNG KHÍ
Phân lớp trên mặt đất, còn được gọi là phân lớp đơn giản, là một cách đơn giản để nhân giống cây sao cho rễ mới mọc dọc theo thân. Sự phân lớp xảy ra trong tự nhiên khi một cành cây bị uốn cong xuống hoặc rơi xuống và chạm đất. Nếu nó tiếp xúc với đất, rễ có thể phát triển và bám vào đất. Cuối cùng, chồi mới ra rễ được tách ra khỏi cây mẹ (hoặc cây mẹ có thể chết) và chồi mới ra rễ trở thành một cây mới.
Bạn có thể lặp lại quá trình này ở một số loại cây nhất định bằng cách uốn một cành cây xuống và ghim xuống đất sao cho một phần thân cây tiếp xúc với đất hoặc vào một chậu đất khác. Bạn cũng có thể cắm đầu cành xuống đất (gọi là phân lớp đầu cành), để cành mọc xuống và sau đó mọc ngược lên khỏi đất.
Tùy thuộc vào cây, rễ mới có thể mất từ vài tuần đến một năm để phát triển. Bạn có thể đẩy nhanh quá trình này bằng cách rạch một vết nhỏ trên cành để làm lộ mô bên trong và bôi một chút hoóc môn tạo rễ vào khu vực đó trước khi ghim xuống đất. Sau khi chồi đã bén rễ, bạn cắt nó khỏi cây mẹ và chồi sẽ tiếp tục tự phát triển.
Các loại cây thân leo, chẳng hạn như Mâm Xôi (blackberry), thường được phân lớp, nhưng phương pháp này cũng hiệu quả đối với nhiều loại cây khác, bao gồm cây ăn quả, cây nhiệt đới, cây dây leo, Đỗ Quyên (azaleas), Ô liu (forsythia), và hoa Hồng (rose).
Nếu bạn tập trung vào việc nhân giống cây trồng trong nhà và các giống cây nhiệt đới trong các thùng chứa, thì bạn có thể thử phân lớp không khí. Phân lớp không khí, hoặc nhân giống bằng không khí, tương tự như tạo rễ bằng cách phân lớp dưới đất hoặc giâm ngọn, điểm khác biệt đó là bạn sẽ không cắm thân cây trong đất hoặc cắt ngọn khỏi cây mẹ, bạn khiến cành ra rễ ngay trên cây khi nó đang phát triển! Kết quả thu được là bạn sẽ tạo ra những cành có vùng rễ nhân tạo mọc dọc theo thân cây đang phát triển tích cực. Nếu các tế bào dọc theo thân cây nghĩ rằng chúng đang ở dưới đất hoặc trong nước, chúng sẽ bắt đầu tạo ra rễ mới, giống như khi phân lớp trên mặt đất.
Các loại cây có múi và cây trồng nhiệt đới lớn là những loại cây phù hợp để phân lớp không khí. Bạn cũng có thể phân lớp không khí cho cây bụi và cây cối (cây ăn quả là một lựa chọn phổ biến) trong khu vườn ngoài trời. Thời điểm tốt nhất để bắt đầu phân lớp không khí là vào đầu mùa xuân khi nhựa cây bắt đầu chảy, đặc biệt là với cây ăn quả. Nếu bạn định trồng cây rụng lá ở ngoài trời, hãy để ý dấu hiệu đầu tiên khi chồi chuyển sang màu xanh. Cây nhiệt đới trong nhà có thể được phân lớp không khí vào bất kỳ thời điểm nào trong năm khi chúng đang phát triển mạnh.
Bạn có thể phân lớp không khí cho cây trên các cành phụ hoặc thậm chí trên thân chính. Đây là một cách tuyệt vời để phục hồi những cây trồng trong nhà bị hư hại quá mức hoặc phát triển quá mức. Thay vì vứt bỏ cây, bạn có thể phân lớp không khí dọc theo thân cây chính để bảo vệ cây phát triển khỏe mạnh. Khi lớp rễ mới đã phát triển, bạn chỉ cần cắt cành và trồng vào chậu mới, như vậy là bạn đã có một cây mới rồi!
Bạn có thể trồng Thanh Long (Dragon fruit) (Hylocereus spp.) từ hạt giống, nhưng quá trình nảy mầm không thể đoán trước và có thể mất nhiều thời gian. Mặt khác, giâm cành sinh dưỡng rất dễ dàng. Thân cây Thanh Long (Dragon fruit) mọng nước non này cong xuống chạm đất trong chậu. Thân cây, nơi nó tiếp xúc với đất, tạo ra rễ mới và chồi mới. Bây giờ tôi có thể cắt chồi này khỏi thân cây và cấy ghép. Bạn cũng có thể cắt thân cây Thanh Long (Dragon fruit) thành nhiều đoạn, để chúng tự chữa lành, sau đó giâm các đoạn thân này.
Làm thế nào để giâm cành phân lớp không khí
- 1 Khử trùng dao bằng cồn hoặc dung dịch thuốc tẩy 10 phần trăm.
- 2 Chọn một cành (thân bên hoặc thân chính) dày ít nhất 3/8 inch. Cắt qua lớp vỏ bên ngoài, quanh chu vi của thân cây. Sau đó, cắt một vết khác tương tự như vậy trên cùng một thân cây. Khoảng cách của vết cắt thứ hai nên bằng 1,5 lần đường kính của cành / thân.
- 3 Cắt một vài vết vuông góc giữa hai vết cắt ban đầu để bạn có thể tách vỏ ra. Về cơ bản, bạn đang loại bỏ một phần “vỏ cây” để kích thích cây tạo mô mới. Trên những cây không có vỏ dày, bạn chỉ cần cạo bỏ lớp mô bên ngoài giữa các vết cắt.
- 4 Sử dụng cạnh dao để cạo đi lớp cambium. Điều này ngăn nước và chất dinh dưỡng từ phần chính của cây đi vào phần thân đang được phân lớp. Đây là nơi mà rễ mới sẽ phát triển.
- 5 Ngâm một ít rêu hoặc xơ dừa sphagnum trong bát nước qua đêm. Hút bớt độ ẩm trước khi sử dụng.
- 6 Che phủ và bảo vệ khu vực cắt bằng cách phủ một lớp rêu sphagnum ẩm hoặc xơ dừa xung quanh. Thảm rêu nên có kích thước bằng một quả bóng chày. Đảm bảo rằng nó bao phủ hoàn toàn phần được bọc.
- 7 Dùng ni lông trong bọc xung quanh thảm rêu, quấn chặt để rêu tiếp xúc chắc với thân cây và không lỏng lẻo. Bịt kín cả hai đầu, giống như giấy gói kẹo, bằng các dây buộc xoắn để giữ hơi ẩm. Bạn cũng có thể sử dụng một bộ phân lớp không khí với một quả bóng bắt vào nhau.
- 8 Sau khi đã quấn chặt, tốt nhất bạn nên cắt bỏ các nhánh phụ nhỏ mọc phía trên phần được phân lớp không khí nhưng để lại các nhánh phụ đang phát triển ở 6 inch trên cùng của thân cây. Phần thân cây bên trong bọc nhựa hoặc bóng phân lớp không cần tiếp xúc với ánh sáng.
- 9 Khi bạn thấy rễ mới mọc khắp rêu, đã đến lúc bạn nên cắt cây mới khỏi cây mẹ. Quá trình này thường có thể mất từ 2 đến 3 tháng, lâu hơn đối với một số loại cây. Để trồng cây mới, hãy cắt cành tại vị trí phía dưới bóng rễ mới đã hình thành và đem trồng.
Quy trình từng bước để giâm cành cây Thiết Mộc Lan (Dracaena spp.).
GIÂM CÀNH
Giâm cành là một cách dễ dàng để nhân giống nhiều loại cây nhiệt đới mọc dày và có thân nhiều đoạn, chẳng hạn như cây Thường Xanh Trung Quốc (Aglaonema spp.) hoặc cây Thiết Mộc Lan (Dracaena spp.). Bạn cũng có thể nhân giống một số loại Lan mọc thẳng đứng (đơn thân), chẳng hạn như Vanda spp. và Lan bướm đêm (Phalaenopsis spp.), bằng cách cắt một đoạn thân cây.
Nếu bạn có những cây trồng trong nhà mập mạp và phát triển dài trong điều kiện ánh sáng yếu, có thể đã đến lúc bạn nên bắt đầu trồng những cây mới. Với hom thân, bạn sẽ cắt một đoạn thân dài 2 đến 3 inch từ những đoạn thân già và không có lá. Bạn có thể giâm cành theo chiều ngang (nếu bạn không muốn phần thân bị cắt lộ ra trên cây mới) hoặc theo chiều dọc. Khi cành giâm phát triển rễ và chồi mới, bạn có thể để cây phát triển thêm và sau đó trồng chúng vào thùng lớn hơn.
Cách giâm cành
- 1 Khử trùng dụng cụ cắt bằng cồn hoặc dung dịch thuốc tẩy 10%.
- 2 Chọn phần già hơn của thân chính ít lá có hai hoặc ba đốt và cắt khỏi cây. Cắt bằng phẳng, không phải cắt một góc. Cắt bỏ lá ở phía trên cành giâm.
- 3 Nhúng đầu dưới (giâm cành theo chiều dọc) hoặc nửa dưới (giâm cành theo chiều ngang) vào kích thích tố tạo rễ.
- 4 Nếu giâm cành theo chiều ngang, bạn chỉ cần đặt cành giâm lên trên hỗn hợp tạo rễ và ấn xuống một chút để cành giâm tiếp xúc với hỗn hợp. Nếu giâm cành theo chiều dọc, bạn hãy cắm cành giâm vào phương tiện tạo rễ, đảm bảo rằng khoảng một nửa cành giâm nằm bên dưới bề mặt. Bạn cũng có thể giâm cành thẳng đứng trong nước hoặc trong bình nhân giống.
- 5 Việc sử dụng vòm ẩm nhỏ hoặc túi nhựa trong sẽ hữu ích cho quá trình ra rễ của cành giâm, mặc dù một số cành giâm sẽ ra rễ và chồi hoàn toàn tốt khi không được che đậy. Giữ ẩm cho chất trồng nếu bạn đang sử dụng hỗn hợp bầu hoặc giá thể như Oasis hoặc rockwool.
- 6 Sau đó, hãy làm theo các bước từ 7 đến 9 trong phần Cách giâm ngọn.
GIÂM CHỒI LÁ NGỌN
Giâm chồi lá cũng tương tự như giâm ngọn, ngoại trừ bước cắt 2 lần để loại bỏ các phần dọc theo thân cây, thường là đối với những cây có thân dài, chẳng hạn như cây Thường Xuân (ivy), Trầu Bà (philodendron), hoa Nhài (jasmine) và cây Thông (clematis). Các loại cây nhiệt đới như cây Cao Su (rubber) và cây Ngọc Bích (jade plant), các loại thảo mộc như Húng Quế (basil) và Bạc Hà (mint), và nhiều loại cây bụi như hoa Trà (camellia), Dâu Đen (blackberry) và Cam Quýt (citrus) cũng được nhân giống bằng phương pháp này.
Cành giâm chồi bao gồm một lá, cuống lá và kèm theo một đoạn thân nhỏ. Bạn thực hiện phương pháp giâm chồi lá bằng cách cắt cả bên dưới và bên trên một nút lá. Phần thân bên dưới nút lá (gần nhất với ngọn cây đang phát triển) là phần bạn sẽ giâm vào nước hoặc chất trồng. Hoặc, bạn có thể đặt chồi lá theo chiều ngang vào đất sao cho lá và nút phía trên đất (giống như giâm cành). Rễ mới sẽ phát triển từ phần thân bị cắt và một chồi mới sẽ mọc ra từ nút lá.
Cách giâm chồi lá
- 1 Khử trùng dụng cụ cắt bằng cồn hoặc dung dịch tẩy 10%.
- 2 Cắt dứt khoát khoảng 4 inch phía dưới ngọn thân không có hoa hoặc nụ. Sau đó, cắt 2-3 inch dọc theo thân cây, vết cắt đầu tiên ở một góc khoảng 1/4 inch trên nút lá và sau đó cắt thẳng từ 1 đến 2 inch dưới nút lá. Đảm bảo rằng phần cắt còn lại bao gồm ít nhất một nút lá, đây là nơi chồi mới sẽ mọc ra từ thân chính. Hãy cẩn thận để không làm hỏng phần gốc của thân vì đây là nơi sẽ hình thành mô sẹo và rễ.
- 3 Loại bỏ gần hết lá, chỉ để lại một hoặc hai lá.
- 4 Nhẹ nhàng đặt hoặc cắm cành chồi vào nước, chất trồng tạo rễ, ô cắm rễ hoặc hệ thống nhân giống tự động.
- 5 Cành giâm có thể được hưởng lợi từ việc sử dụng vòm giữ ẩm, che phủ ni lông hoặc túi ni lông để tăng độ ẩm. Giữ ẩm cho chất tạo rễ, nhưng không để bị sũng nước.
- 6 Sau đó, làm theo các bước từ 7 đến 9 trong Cách giâm ngọn.