Ebook Việt Hoá] Plant parenting: Easy ways to make more houseplants vegetables and flowers - LESLIE F. HALLECK
[Ebook Việt Hoá] Plant parenting – LESLIE F. HALLECK (Nhân giống cây) – LEAF CUTTINGS (Nhân giống bằng cách Giâm Lá)
Th2
- Nguồn: [Ebook Việt Hoá] Plant parenting: Easy ways to make more houseplants, vegetables, and flowers – LESLIE F. HALLECK (Nhân giống cây: Những cách dễ nhất để nhân giống cây cảnh trong nhà, rau và hoa)
- Biên tập: Dũng Cá Xinh (Tháng 08/20201)
- Dịch: Huyền Nguyễn
English
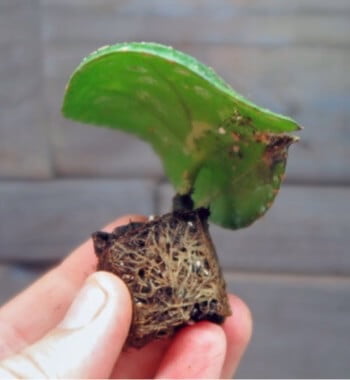
Taking leaf cuttings is an easy and fun way to propagate new plants. No matter how many times I do it, seeing a tiny new plant growing right from the base of an old leaf is always exciting. You’ll take leaf cuttings from plants that are very leafy with only small sections of short stems, or fleshy succulents with the ability to form new roots and buds directly from leaf and leaf petiole tissue. We’ll discuss how to take several differ- ent types of leaf cuttings.
WHOLE-LEAF CUTTINGS
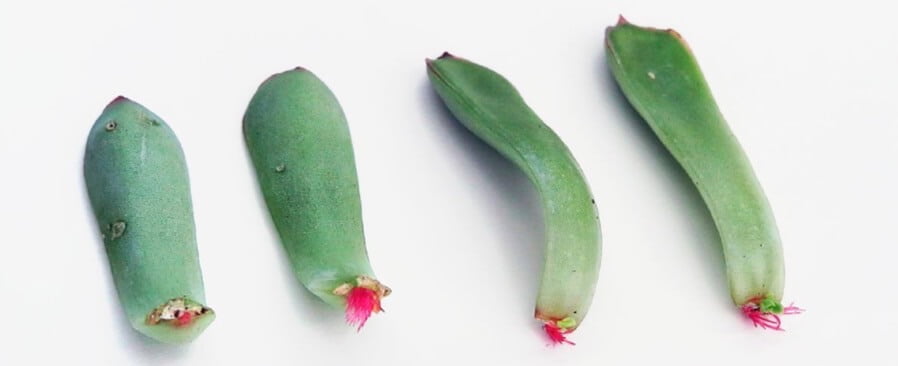
For whole-leaf cuttings, look for plants that lack petioles with the leaf attaching directly to the main stem. Succulents are a great example of a type of plant from which you can easily take whole-leaf cuttings—just be sure to allow leaves to develop a callus.
How to Take a Whole-Leaf Cutting
- 1 You’ll take most whole-leaf cuttings from succulent plants. Gently snap off a leaf at the base where it attaches to the main stem. Take care not to break away any of the leaf tissue at the base or it may not be able to form a callus or new root tissue.
- 2 Set succulent leaves out on a dry, hard surface to cure. You can also rest succulent leaves on the surface of a totally dry growing media to cure. The area attached to the stem will begin to seal and form a small callus.
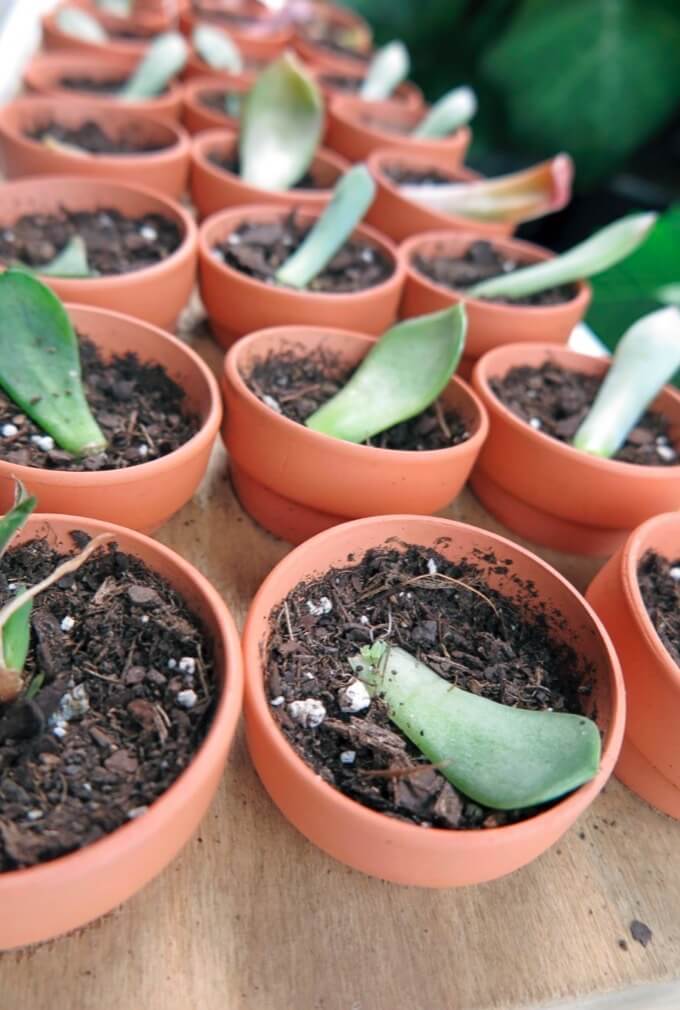
- 3 If you’ve cured the callused succulent leaves on a hard surface, now place them directly on top of a loose succulent potting mix or a 50/50 mixture of builder’s sand and coir in a flat or other shallow container, where they will begin to develop new adventitious roots. You also can set leaf cuttings on top of mix in a small pot with a drainage hole.
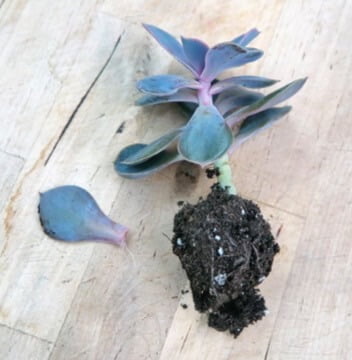
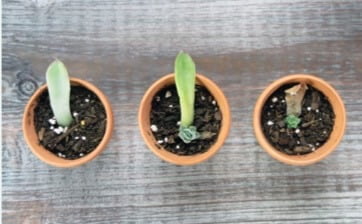
- 4 It’s best to not cover succulent leaf cuttings. You can lightly mist the soil and cuttings after they begin to develop new roots. Once small bud shoots and plantlets begin to appear, you can water lightly using a water dropper or squeeze bottle. These whole-leaf cuttings of an echeveria are growing new bud shoots. The parent leaf, the original leaf cutting, is beginning to dry and will eventually fall away from the new plantlet.
- 5 Place your cuttings near natural light from a window or a couple of feet away from fluorescent, CFL, or LED grow light fixtures. Intense light will burn cuttings. If using grow lighting, leave lights on for 24 hours a day.
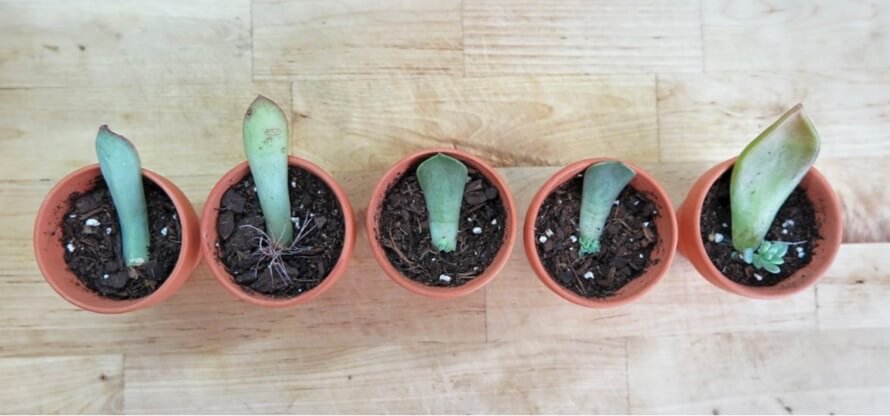
- 6 Eventually, as the new plantlet continues to grow, the original leaf cutting, also called the parent leaf, will dry up and fall away. At this point, you can transplant your new succulent from the propagation tray into a small container or allow it to continue to grow in its small pot.
LEAF-PETIOLE CUTTINGS
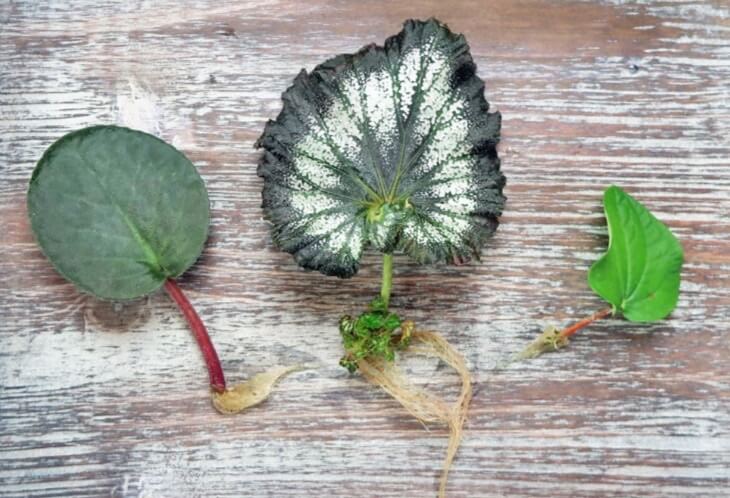
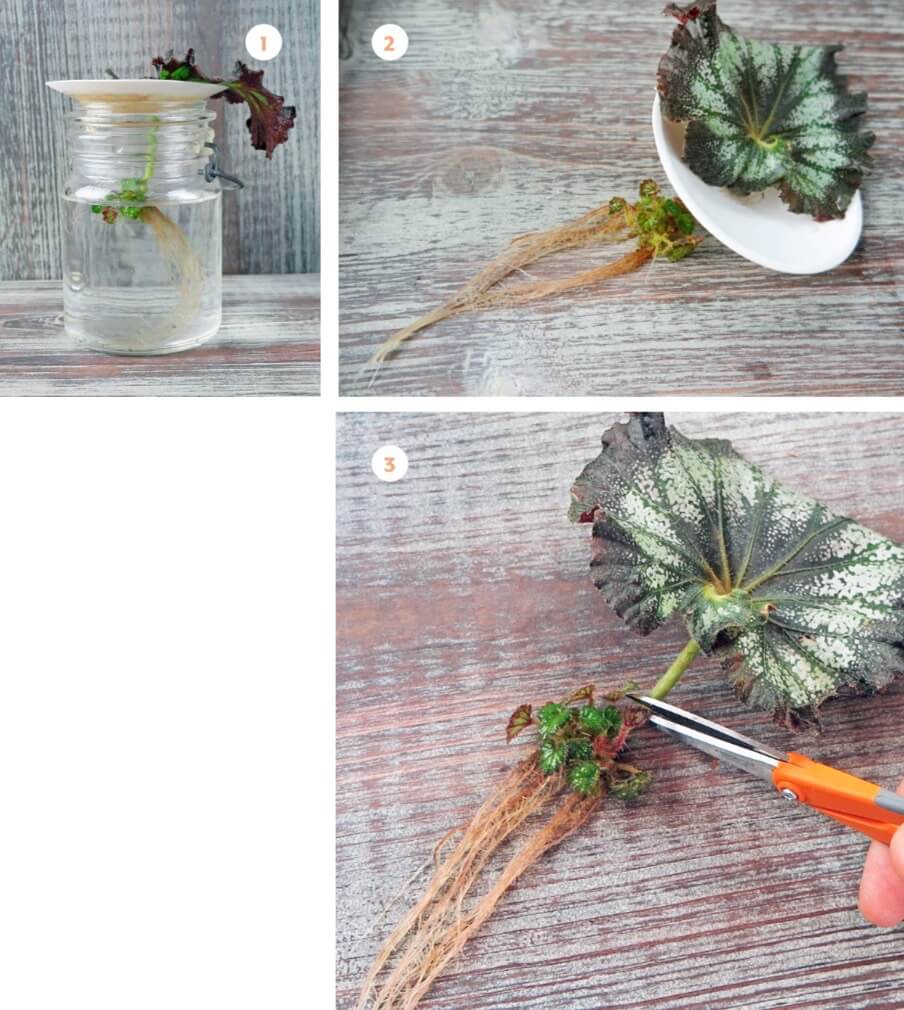
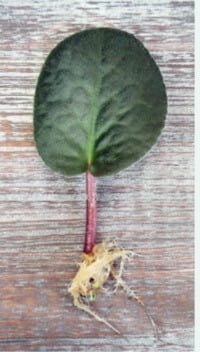
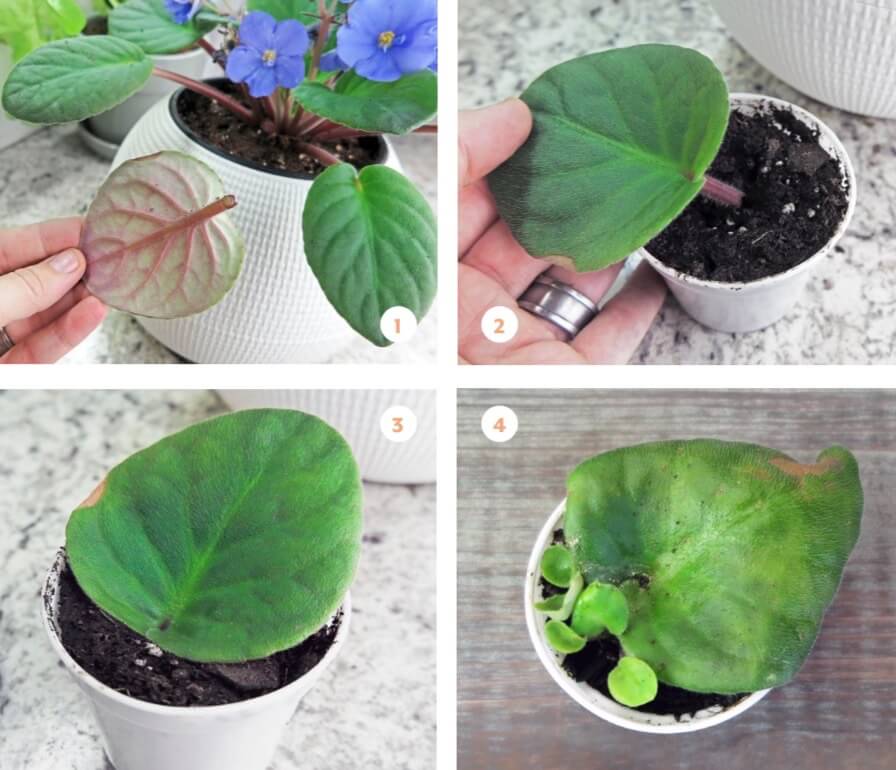
Not all plants can develop adventitious roots and buds directly from the base of a leaf—many need a section of petiole attached or a piece of the main stem. Plants that can generate new roots and bud shoots from the leaf petiole (the stalk that connects the leaf to a main plant stem) can be propagated from leaf-petiole cuttings, also called leaf-stem cuttings. Leaf-petiole cuttings are better for plants that are very leafy with only small sections of short stems, such as begonias, peperomias, and African violets, as well as other gesneriads. You can root leaf-petiole cuttings in potting mix, water, propagators, or in other inert substrates such as Oasis.
How to Take a Leaf-Petiole Cutting
- 1 Disinfect your snips using alcohol or a 10 percent bleach solution.
- 2 Choose a healthy leaf and make a clean cut on the petiole, leaving about 1 inch of the petiole attached to the leaf. Cut the petiole at a 45-degree angle with the cut side facing up to encourage more root and bud production.
- 3 Optional step: You can use a sharp razor blade to cut off the top half of the leaf blade. This can encourage faster rooting—but is not necessary.
- 4 Dip the bare end of the petiole into rooting hormone.
- 5 Gently place or stick the petiole into water, rooting growing media, rooting plug, or an automatic propagator system. Make sure the petiole is in firm contact with the surrounding growing media.
- 6 Many plants from which you typically take leaf-petiole cuttings may not require a humidity dome or plastic cover, as many are susceptible to fungal diseases. Do keep the growing media moist, especially if you’re using potting mix or substrates such as Oasis or rockwool. Use heat mats to speed up rooting.
- 7 Place your cuttings near natural light from a window or a couple of feet away from fluorescent, CFL, or LED grow light fixtures. Intense light will burn cuttings. If using grow lighting, leave lights on for 24 hours a day.
- 8 New roots and bud shoots will develop at the base of the petiole and emerge through the soil. If you are water rooting leaf-petiole cuttings, you’ll need to pot up the cutting after a small root mat develops at the base of the petiole.
NON-PETIOLE AND SPLIT-VEIN CUTTINGS
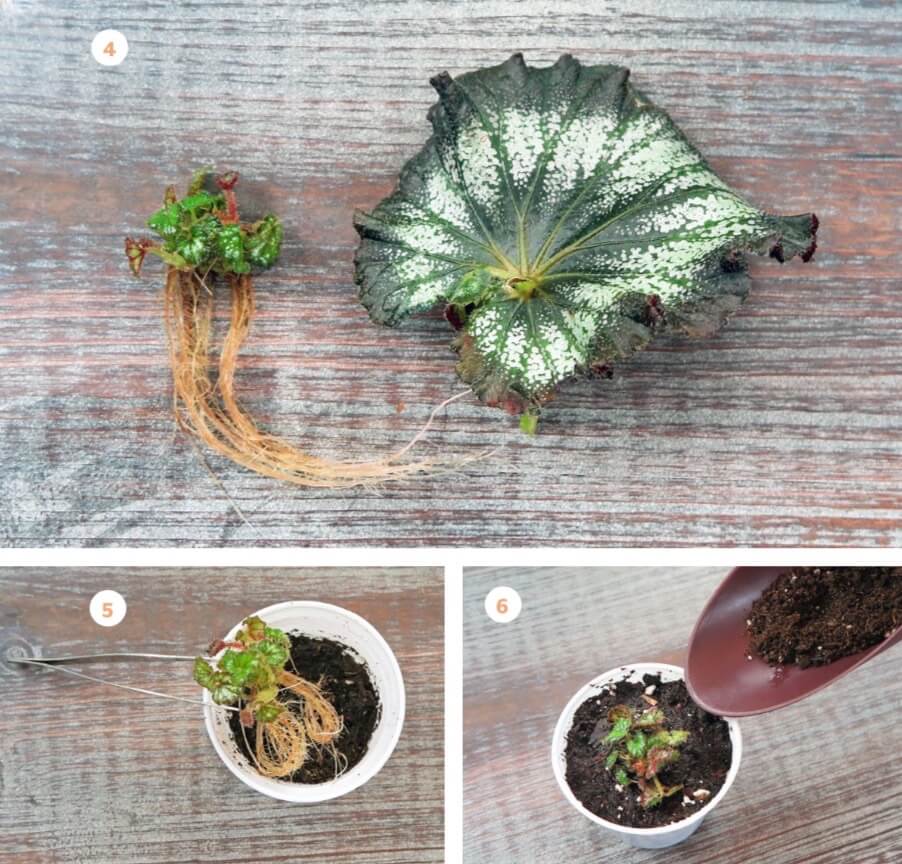
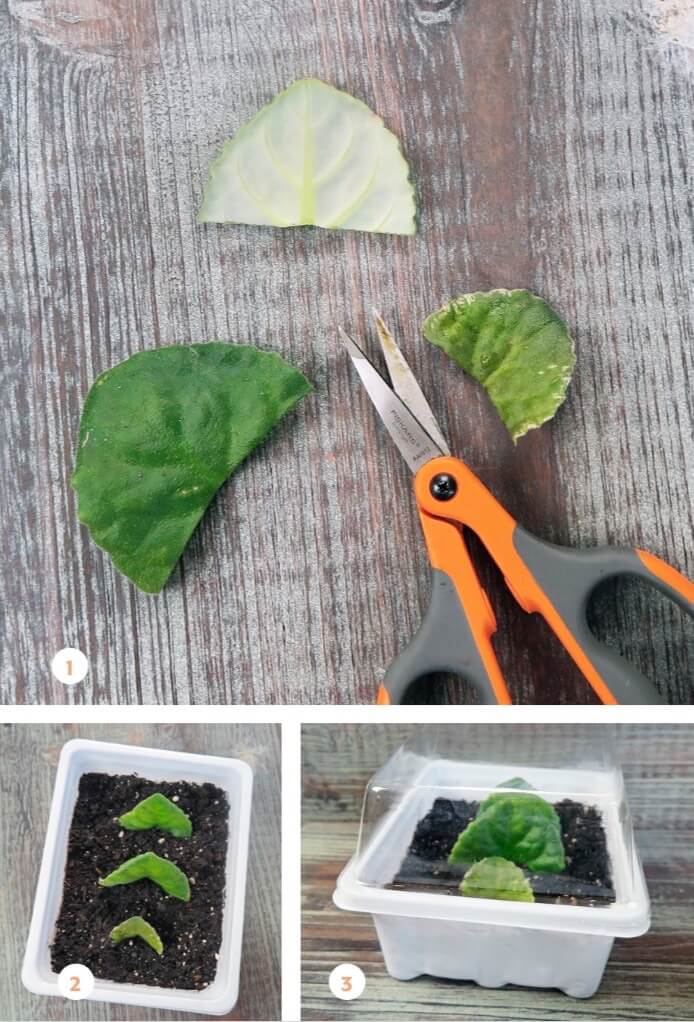
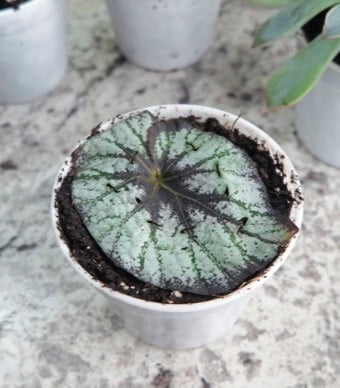
Not all plants need a stem or leaf petiole to sprout new plants. Some plants can develop both roots and bud shoots with only a piece of a leaf (non-petiole cutting) or directly from leaf-vein margins along the leaf (split-vein cutting). When the leaves of plants with this ability become damaged or a piece of leaf falls to the ground, they might start developing new roots and shoots from the leaf, unless the leaf rots first. There are a few different methods for taking non-petiole and split-vein leaf cuttings, and different types of plants respond differently to each method. Plants that respond well to split-vein cuttings include plants with large fleshy leaf veins, such as African violets, rex begonias, pilea, Gloxinia spp., and Smithiantha spp.

How to Take a Non-Petiole Leaf-Section Cutting
- 1 Disinfect your snips using alcohol or a 10 percent bleach solution.
- 2 Choose a healthy leaf from your mother plant.
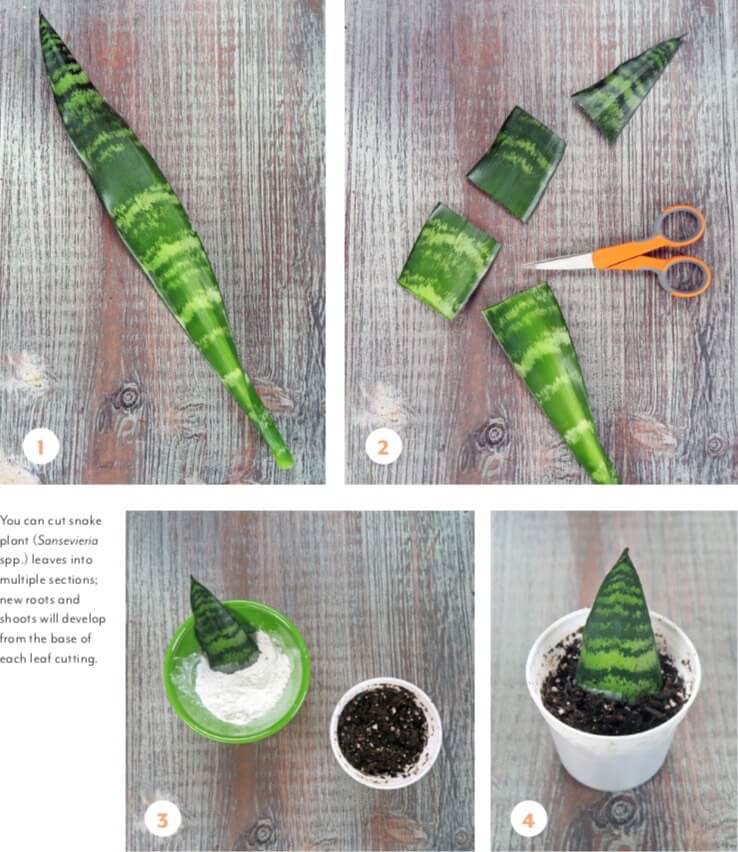
- 3 Cut off a small 1-to2 inch section of the leaf with a horizontal cut (plants that respond well to this method include African violet, begonia, pilea, snake plant, and eucomis); you can cut larger leaves into multiple sections. Or, cut the leaf in half along the midrib, then discard the midrib so you’re left with two leaf sections (plants that respond well to this method include African violet and Streptocarpus spp.).
- 4 Dip the cut end into rooting hormone. For leaves cut into multiple sections, dip the bottom cut end (originally closest to the base of the plant) into rooting hormone.
- 5 For leaves cut horizontally, gently place or stick the leaf section into water or the rooting media. Make sure the cutting is placed in the same direction in which it was growing on the plant. For leaves cut along the midrib, create a small trench in the growing media and gently insert the cut side of the leaf cutting. Make sure that both types of cuttings are in firm contact with the growing media.
- 6 Non petiole cuttings from fleshy or succulent plants typically root just fine uncovered, while more tropical plant types can benefit from a humidity dome, plastic cover, or plastic bag. Keep the media moist but not soggy. Remove the cover if it appears the cutting is too wet or beginning to decay. Use heat mats to speed up rooting.
- 7 Place your cuttings near natural lightfroma window or a couple of feet away from fluorescent, CFL, or LED grow light fixtures. Intense light will burn cuttings. If using grow lighting, leave lights on for 24 hours a day.
- 8 New bud shoots, or plantlets, will develop along the cut section of the leaf. Eventually, the original parent leaf section will die and fall away. You can cut away or lift out the new plantlets for repotting.
.
How to Take a Split-Vein Cutting
- 1 Disinfect your snips using alcohol or a 10 percent bleach solution.
- 2 Choose a healthy leaf from your mothe rplant.
- 3 Make small cuts through some of the main veins on the underside of the leaf. You may also cut off the leaf margins (the edges of a leaf) if you’d like. Dab rooting hormone on vein cuts.
- 4 Place the leaf flat on the surface of a loose potting soil/growing media, making sure that the top of the leaf faces up and the cut veins under-neath make contact with the growing media. You may need to use toothpicks or other small weighted objects (glass beads, small pebbles) to hold the leaf in place.
- 5 Split-vein cuttings can benefit from use of a humidity dome, plastic cover, or plastic bag to increase humidity. Don’t let media or the leaf stay soggy when under plastic. Remove the cover if the cutting appears to be too wet or is beginning to decay. Use heat mats to speed up rooting.
- 6 Place your cuttings near natural light from a window or a couple of feet away from fluorescent, CFL, or LED grow light fixtures. Intense light will burn cuttings. If using grow lighting, leave lights on for 24 hours a day.
- 7 The new plantlets will develop roots and shoots where the veins were cut. You can cut away, or lift out, the new plantlets for repotting.
BLIND CUTTINGS
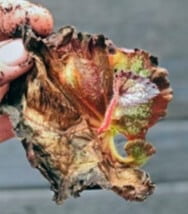
One important thing to know about leaf cuttings is that just because a certain plant can easily develop a callus or adventitious roots on a leaf, petiole, or stem section, it may not be able to develop a new adventitious bud or shoot from that same location. In fact, some leaf cuttings can survive on their roots for a very long time, yet never develop a new bud or shoot. We call these blind cuttings. Some parts of the plant can generate some forms of new tissue, but others cannot.
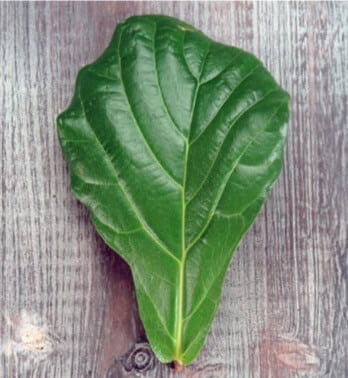
This is true for certain species of ficus, such as the classic rubber plant (Ficus elastica) and the oh-so-trendy fiddle leaf fig (F. lyrata), as well as certain species of hoya (Hoya kerrii) and jade (Crassula spp.). Sure, you can pop off a whole leaf or a leaf with a piece of petiole attached and it will develop roots in water or soil—but that’s all it will ever do. For these plants, a leaf-petiole cutting won’t be enough, as the leaf-petiole cutting will almost never form a new bud on its own. You must take leaf-bud cuttings, a piece of stem with a leaf node included, for these plants to grow a new whole plant.
I’ve also experienced this challenge with leaf-petiole cuttings of Chinese money plant (Pilea peperomioides). The petiole developed a callus and roots, but the cuttings never developed new buds or plants. So frustrating! Certain chemicals can be applied to such blind cuttings to help them develop a new bud shoot, but for the home gardener, it’s best to pitch blind cuttings into the compost bin and try a new cutting method.
Tiếng Việt
Giâm lá là một cách dễ dàng và thú vị để nhân giống cây mới. Dù tôi có làm bao nhiêu lần đi chăng nữa, thì việc nhìn thấy một cái cây mới nhỏ xíu mọc lên từ gốc của một chiếc lá già luôn khiến tôi phấn khích. Bạn sẽ lấy lá trên những đoạn thân ngắn hoặc thân mọng từ những cây có nhiều lá, những lá này có khả năng hình thành rễ và chồi mới trực tiếp từ mô lá và cuống lá. Chúng ta sẽ thảo luận về cách thực hiện một số loại giâm lá khác nhau.
GIÂM CẢ LÁ
Phương pháp giâm cả lá được áp dụng đối cới cây không có cuống lá với phần lá bám trực tiếp vào thân chính. Cây mọng nước là một ví dụ tuyệt vời về loại cây mà bạn có thể dễ dàng giâm cả lá, chỉ cần đảm bảo để cho lá phát triển thành mô sẹo.
Cách giâm cả lá
- 1 Hầu như bạn sẽ lấy lá giâm cả lá từ những cây mọng nước. Nhẹ nhàng ngắt một chiếc lá ở gốc tại vị trí lá gắn vào thân chính. Chú ý không làm đứt bất kỳ mô lá nào ở gốc nếu không lá có thể không hình thành mô sẹo hoặc mô rễ mới.
- 2 Đặt những chiếc lá mọng nước lên một bề mặt khô và cứng để cuống lá chai sần. Bạn cũng có thể đặt những chiếc lá mọng nước lên bề mặt của chất trồng hoàn toàn khô để cuống lá chai sần. Khu vực gắn liền với thân cây sẽ bắt đầu khô lại và hình thành một mô sẹo nhỏ.
- 3 Nếu bạn đã đặt những chiếc lá mọng nước đã chai sần trên một bề mặt cứng, bây giờ hãy đặt chúng trực tiếp lên trên một hỗn hợp bầu mọng nước xốp hoặc hỗn hợp 50/50 cát xây dựng và xơ dừa trong một thùng phẳng hoặc một thùng nông khác, nơi chúng sẽ bắt đầu để phát triển các gốc mới đầy hứa hẹn. Bạn cũng có thể đặt lá giâm lên trên hỗn hợp trong một chậu nhỏ có lỗ thoát nước.
- 4 Tốt nhất là không che các hom lá mọng nước. Bạn có thể phun sương nhẹ cho đất và cành giâm sau khi chúng bắt đầu phát triển rễ mới. Khi chồi non và cây con bắt đầu xuất hiện, bạn có thể tưới nhẹ bằng ống nhỏ giọt hoặc bình bóp. Khi những cành giâm cả lá của cây thuộc họ Sen Đá (echeveria) đang phát triển các chồi chồi mới, lá mẹ, phần lá giâm ban đầu, bắt đầu khô và cuối cùng sẽ rụng khỏi cây con mới
- 5 Đặt ho lá gần ánh sáng tự nhiên từ cửa sổ hoặc cách xa các thiết bị chiếu sáng huỳnh quang, CFL hoặc LED một vài mét. Ánh sáng mạnh sẽ làm cháy hom lá. Nếu sử dụng đèn chiếu sáng, hãy để đèn sáng 24 giờ một ngày.
- 6 Cuối cùng, khi cây con mới tiếp tục phát triển, phần lá giâm ban đầu, còn được gọi là lá mẹ, sẽ khô và rụng đi. Tại thời điểm này, bạn có thể cấy cây mọng nước mới từ khay nhân giống vào một chậu nhỏ hoặc để chúng tiếp tục phát triển trong chậu giâm lá.
GIÂM CUỐNG LÁ
Không phải tất cả các loại cây đều có thể phát triển rễ và chồi nhanh chóng trực tiếp từ phần gốc của lá, nhiều cây cần một phần của cuống lá hoặc một phần của thân chính. Những cây có thể tạo rễ mới và chồi từ cuống lá (phần nối lá với thân cây chính) có thể được nhân giống bằng phương pháp giâm cuống lá. Giâm cành từ cuống lá tốt hơn đối với những cây có nhiều lá, chỉ có những đoạn cuống nhỏ và ngắn, chẳng hạn như Thu Hải Đường (begonias), cây Trường Sinh (peperomias), và hoa Violet Châu Phi (Africa Violet), cũng như các loại cây thuộc họ Thượng tiễn (gesneriad) khác. Bạn có thể giâm cuống lá trong bầu đất, nước, chất nhân giống hoặc trong các giá thể trơ khác như Oasis.
Cách giâm cuống lá
- 1 Khử trùng dụng cụ cắt bằng cồn hoặc dung dịch thuốc tẩy 10%.
- 2 Chọn một lá khỏe mạnh và cắt cuống lá một cách dứt khoát, sao cho khoảng 1 inch cuống lá dính vào lá. Cắt cuống lá ở góc 45 độ so với mặt cắt hướng lên trên để khuyến khích ra nhiều rễ và chồi.
- 3 Bước tùy chọn: Bạn có thể sử dụng một lưỡi dao cạo sắc để cắt bỏ nửa trên của phiến lá. Điều này có thể khuyến khích ra rễ nhanh hơn, nhưng không nhất thiết phải thực hiện bước này.
- 4 Nhúng phần đầu của cuống lá vào chất kích thích tạo rễ.
- 5 Nhẹ nhàng đặt hoặc cắm cuống lá vào nước, chất trồng tạo rễ, ô ươm rễ hoặc hệ thống nhân giống tự động. Đảm bảo cuống lá tiếp xúc chắc chắn với chất trồng.
- 6 Nhiều cây mà bạn thường lấy cành giâm cuống lá có thể không cần mái che ẩm hoặc che bằng ni lông, vì nhiều cây dễ bị nấm bệnh. Giữ ẩm cho chất trồng, đặc biệt nếu bạn đang sử dụng hỗn hợp bầu hoặc giá thể như Oasis hoặc rockwool. Sử dụng thảm giữ nhiệt để tăng tốc độ ra rễ.
- 7 Đặt cành giâm cuống lá của bạn gần ánh sáng tự nhiên từ cửa sổ hoặc cách xa các thiết bị chiếu sáng huỳnh quang, CFL hoặc LED một vài mét bởi ánh sáng mạnh sẽ làm cháy hom. Nếu sử dụng đèn chiếu sáng, hãy để đèn sáng 24 giờ một ngày.
- 8 Rễ và chồi chồi mới sẽ phát triển ở phần gốc của cuống lá và trồi lên khỏi đất. Nếu bạn sử dụng phương pháp giâm cuống lá trong nước, bạn cần tưới nước cho lá giâm sau khi một lớp rễ nhỏ phát triển ở phần gốc của cuống lá.
CÁCH GIÂM PHẦN LÁ KHÔNG CÓ CUỐNG VÀ GIÂM GÂN LÁ
Không phải tất cả các loại cây đều cần thân hoặc cuống lá để ươm mầm cây mới. Một số cây có thể phát triển cả rễ và chồi chỉ với một phần của lá (giâm phần lá không có cuống) hoặc mép gân lá dọc theo lá (giâm gân lá). Khi lá của một số loại cây có thể giâm theo phương pháp này bị hư hỏng hoặc một mảnh lá rơi xuống đất, chúng có thể bắt đầu phát triển rễ và chồi mới, trừ khi lá đã bị thối từ trước. Có một số phương pháp khác nhau để giâm cành lá không có cuống và gân lá, và các loại cây khác nhau sẽ có phản ứng khác nhau đối với mỗi phương pháp. Các cây phù hợp với hai phương pháp giâm lá này bao gồm các cây có gân lá to, nhiều thịt, chẳng hạn như hoa Violet Châu Phi, Thu Hải Đường (rex begonias), cây Cỏ Gương (pilea), Gloxinia spp., và Smithiantha spp.
Cách giâm phần lá không có cuống
- 1 Khử trùng dụng cụ cắt bằng cồn hoặc dung dịch thuốc tẩy 10%.
- 2 Chọn một lá khỏe mạnh từ cây mẹ.
- 3 Cắt ngang một phần nhỏ từ 1 đến 2 inch lá (các cây phù hợp với phương pháp này bao gồm cây hoa Violet châu Phi, cây Thu Hải Đường – begonia, cây cỏ Gương – pilea, cây Lưỡi Hổ – snake plant, và cây Bạch Đàn – eucomis). Bạn có thể cắt những chiếc lá lớn thành nhiều phần. Hoặc, cắt đôi chiếc lá dọc theo gân giữa, sau đó loại bỏ gân giữa để bạn có hai phần lá (những cây phù hợp với phương pháp này bao gồm hoa Violet châu Phi và Streptocarpus spp.
- 4 Nhúng phần đầu đã cắt vào hormone tạo rễ. Đối với những chiếc lá được cắt thành nhiều đoạn, nhúng phần bị cắt dưới cùng (phần đầu gần nhất với phần gốc của cây) vào thuốc kích thích ra rễ.
- 5 Đối với những chiếc lá được cắt theo chiều ngang, nhẹ nhàng đặt hoặc cắm phần lá vào nước hoặc chất tạo rễ. Đảm bảo rằng phần lá giâm được đặt theo cùng hướng mà nó đã mọc trên cây. Đối với những chiếc lá được cắt dọc theo gân giữa, hãy tạo một rãnh nhỏ trên chất trồng và nhẹ nhàng đưa mặt cắt của lá vào. Đảm bảo rằng cả hai loại hom đều tiếp xúc chắc chắn với chất trồng.
- 6 Giâm phần lá không có cuống lá từ các cây thân thịt hoặc mọng nước thường chỉ ra rễ tốt khi không có mái che, trong khi các loại cây nhiệt đới có thể được hưởng lợi từ vòm ẩm, bìa nhựa hoặc túi nhựa. Giữ cho chất trồng ẩm nhưng không bị sũng nước. Tháo nắp ra nếu phần lá giâm quá ướt hoặc bắt đầu mục nát. Sử dụng thảm nhiệt để tăng tốc độ ra rễ.
- 7 Đặt hom giống gần cửa sổ nơi có ánh sáng tự nhiên hoặc cách xa đèn chiếu sáng huỳnh quang, CFL hoặc LED một vài mét bởi ánh sáng mạnh sẽ làm cháy hom. Nếu sử dụng đèn chiếu sáng, hãy để đèn sáng 24 giờ một ngày.
- 8 Chồi mới, hoặc cây con, sẽ phát triển dọc theo phần bị cắt trên lá. Cuối cùng, phần lá gốc ban đầu sẽ chết và rụng đi. Bạn có thể cắt hoặc nhổ cây con mới để thay chậu.
Cách giâm gân lá
- 1 Khử trùng dụng cụ cắt bằng cồn hoặc dung dịch thuốc tẩy 10%.
- 2 Chọn một lá khỏe mạnh từ cây mẹ.
- 3 Cắt nhẹ nhàng qua một số đường gân chính ở mặt dưới của chiếc lá. Bạn cũng có thể cắt bỏ các mép lá nếu muốn. Chấm hormone tạo rễ lên vết cắt trên gân lá.
- 4 Đặt lá phẳng trên bề mặt bầu đất tơi xốp hoặc giá thể trồng trọt, đảm bảo rằng phần trên của lá hướng lên trên và các gân lá đã cắt bên dưới tiếp xúc với chất trồng. Bạn có thể dùng tăm hoặc các vật có trọng lượng nhỏ khác như hạt thủy tinh hoặc sỏi nhỏ để cố định chiếc lá ở vị trí cũ.
- 5 Giâm gân lá có thể được hưởng lợi từ việc sử dụng mái che ẩm, nắp nhựa hoặc túi nhựa để tăng độ ẩm. Không để giấy hoặc lá bị sũng nước khi ở dưới lớp nhựa. Tháo nắp ra nếu lá có vẻ quá ướt hoặc bắt đầu thối rữa. Sử dụng thảm giữ nhiệt để tăng tốc độ ra rễ.
- 6 Đặt lá giâm gân của bạn gần ánh sáng tự nhiên từ cửa sổ hoặc cách xa các thiết bị chiếu sáng huỳnh quang, CFL hoặc LED một vài mét bởi ánh sáng mạnh sẽ làm cháy hom. Nếu sử dụng đèn chiếu sáng, hãy để đèn sáng 24 giờ một ngày.
- 7 Các cây con mới sẽ phát triển rễ và chồi ở nơi các gân lá bị cắt. Bạn có thể cắt hoặc tách cây con mới ra để thay chậu.
CÀNH GIÂM MÙ
Một điều quan trọng cần biết về giâm cành lá là vì một loại cây nhất định có thể dễ dàng phát triển mô sẹo hoặc rễ bất thường trên lá, cuống lá hoặc phần thân, nên nó có thể sẽ không phát triển chồi hoặc chồi mới từ chính những vị trí đó. Trên thực tế, một số cành giâm lá có thể tồn tại trên rễ rất lâu, nhưng không bao giờ phát triển chồi mới. Chúng tôi gọi đây là những cành giâm mù. Một số bộ phận của cây có thể tạo ra một số dạng mô mới, nhưng những bộ phận khác thì không.
Điều này đúng đối với một số loài thuộc họ Sung (ficus), chẳng hạn như cây Cao Su cổ điển (Ficusastica) và cây Sung lá sành điệu (F. lyrata), cũng như một số loài Hoya (Hoya kerrii) và Ngọc Bích (Crassula spp.). Chắc chắn, khi bạn lấy một chiếc lá hoặc một chiếc lá có cuống đem giâm, lá sẽ phát triển rễ trong nước hoặc đất, nhưng đó là tất cả những gì bạn sẽ làm được. Đối với những cây này, việc giâm cuống lá là không đủ, vì phương pháp này hầu như không bao giờ giúp lá hình thành chồi mới. Bạn phải lấy cành giâm chồi lá, một đoạn thân có kèm theo nút lá, để những cây này mọc toàn bộ cây mới.
Tôi cũng đã từng trải qua thử thách này khi giâm cành từ cuống lá cây Kim Tiền Trung Quốc (Pilea peperomioides). Cuống lá phát triển mô sẹo và rễ, nhưng các cành giâm không bao giờ phát triển chồi hoặc cây mới. Điều này khiến tôi rất bực bội! Một số hóa chất có thể giúp những cành giâm mù này phát triển chồi mới, nhưng đối với người làm vườn tại nhà, tốt nhất là nên loại bỏ những cành giâm mù này và thử một phương pháp nhân giống mới.