[Ebook] Indoor Gardening Houseplants 2016 USA Magazine – VIII – Amazing Amaryllis (Rực rỡ Hoa Loa Kèn Đỏ)

ENGLISH

  • WRITER: PENELOPE O’SULLIVAN
  • PRODUCER: KARIN LIDBECK-BRENT
  • PHOTOGRAPHER: ANDRE BARANOWSKI

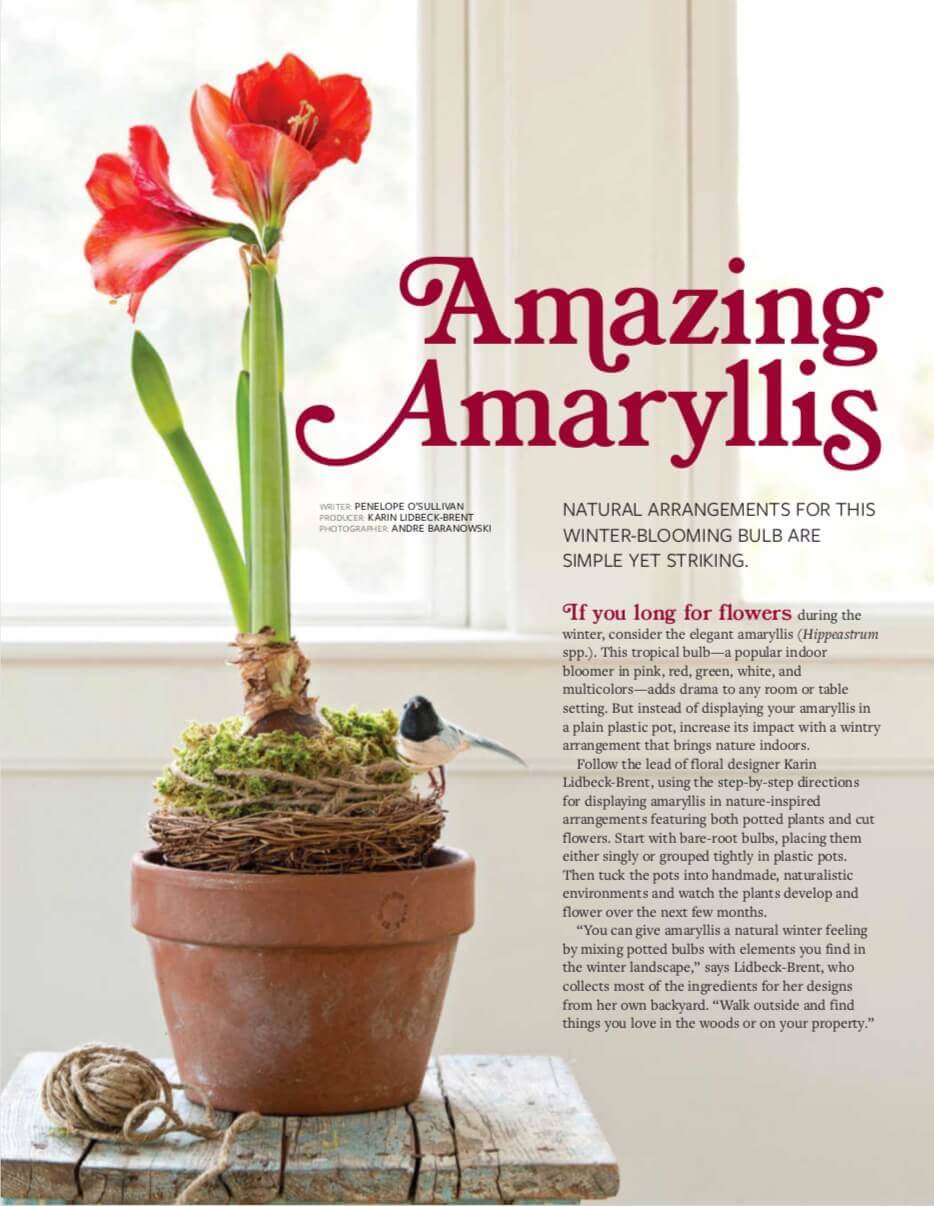
NATURAL ARRANGEMENTS FOR THIS WINTER-BLOOMING BULB ARE SIMPLE YET STRIKING.

If you long for flowers during the winter, consider the elegant amaryllis (Hippeastrumspp.). This tropical bulb—a popular indoor bloomer in pink, red, green, white, and multicolors—adds drama to any room or table setting. But instead of displaying your amaryllis in a plain plastic pot, increase its impact with a wintry arrangement that brings nature indoors.

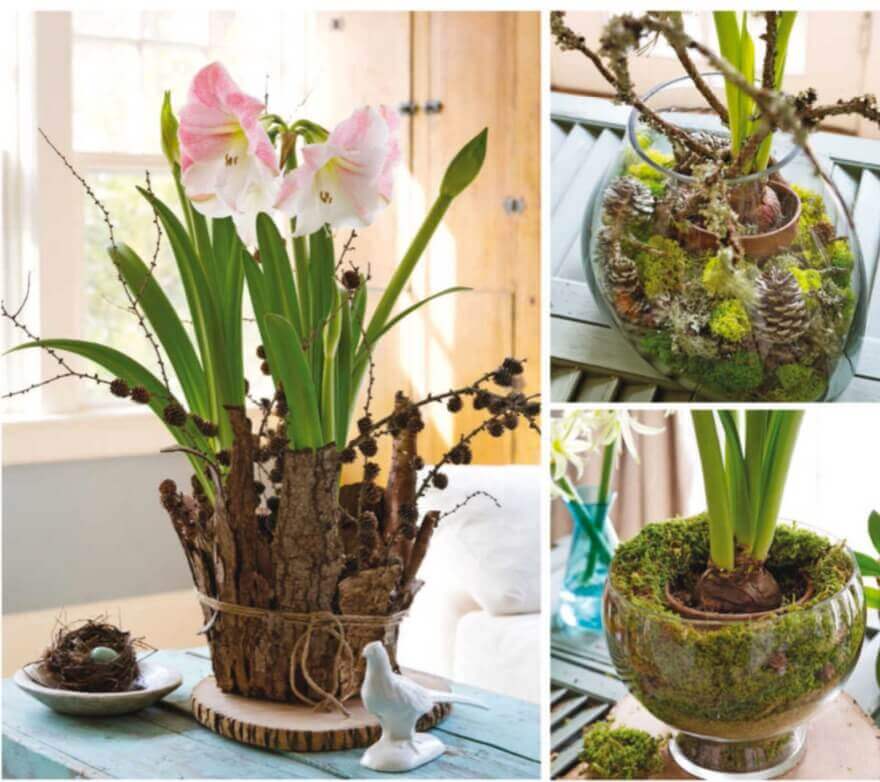
Follow the lead of floral designer Karin Lidbeck-Brent, using the step-by-step directions for displaying amaryllis in nature-inspired arrangements featuring both potted plants and cut flowers. Start with bare-root bulbs, placing them either singly or grouped tightly in plastic pots. Then tuck the pots into handmade, naturalistic environments and watch the plants develop and flower over the next few months.

“You can give amaryllis a natural winter feeling by mixing potted bulbs with elements you find in the winter landscape,” says Lidbeck-Brent, who collects most of the ingredients for her designs from her own backyard. “Walk outside and find things you love in the woods or on your property.”

 Opposite: To make a whimsical bird-nest design, wrap the shoulders and sides of a ‘Merry Christmas’ amaryllis bulb in moss; secure with twine. Add potting mix to a terra-cotta pot until it is three-quarters full. Set the nest in the pot atop the potting mix and place a little potting soil inside the nest. Put the wrapped bulb in the nest with its roots gently tucked underneath the bulb; they will grow through the nest into the pot below. Set an artificial bird on the nest’s edge. Above: The large, pale blooms of amaryllis ‘Nymph’ lend themselves to striking displays, whether planted singly or in groups. Amaryllis makes a stunning cut flower that can last 10 to 14 days. Prolong the life of the flowers by recutting stem ends every few days and replacing the vase water.
Opposite: To make a whimsical bird-nest design, wrap the shoulders and sides of a ‘Merry Christmas’ amaryllis bulb in moss; secure with twine. Add potting mix to a terra-cotta pot until it is three-quarters full. Set the nest in the pot atop the potting mix and place a little potting soil inside the nest. Put the wrapped bulb in the nest with its roots gently tucked underneath the bulb; they will grow through the nest into the pot below. Set an artificial bird on the nest’s edge. Above: The large, pale blooms of amaryllis ‘Nymph’ lend themselves to striking displays, whether planted singly or in groups. Amaryllis makes a stunning cut flower that can last 10 to 14 days. Prolong the life of the flowers by recutting stem ends every few days and replacing the vase water.

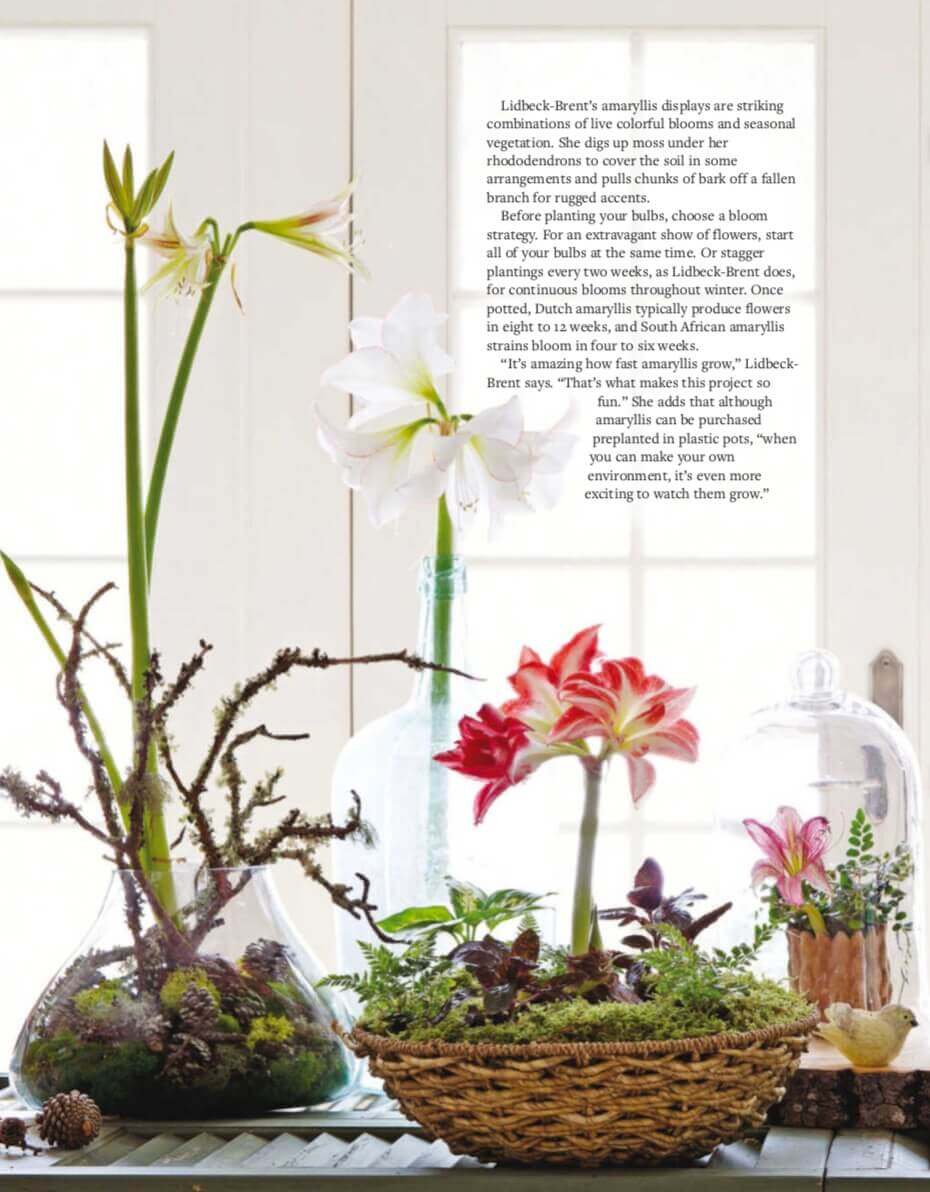
Lidbeck-Brent’s amaryllis displays are striking combinations of live colorful blooms and seasonal vegetation. She digs up moss under her rhododendrons to cover the soil in some arrangements and pulls chunks of bark off a fallen branch for rugged accents.

Before planting your bulbs, choose a bloom strategy. For an extravagant show of flowers, start all of your bulbs at the same time. Or stagger plantings every two weeks, as Lidbeck-Brent does, for continuous blooms throughout winter. Once potted, Dutch amaryllis typically produce flowers in eight to 12 weeks, and South African amaryllis strains bloom in four to six weeks.

“It’s amazing how fast amaryllis grow,” Lidbeck- Brent says. “That’s what makes this project so fun.” She adds that although amaryllis can be purchased preplanted in plastic pots, “when you can make your own environment, it’s even more exciting to watch them grow.”

Grouping several types of amaryllis enlivens any sunny tabletop. This display includes, from far left: green- throat cybister ‘Emerald’; ‘Picotee’, with crimson-edge white petals; red-and-white ‘Splash’; ‘Purple Rain’ under the cloche; spider-flower cybister ‘Evergreen’; budding ‘Faro’, which opens with a white starburst on salmon petals and a green eye; and ‘Summertime’.

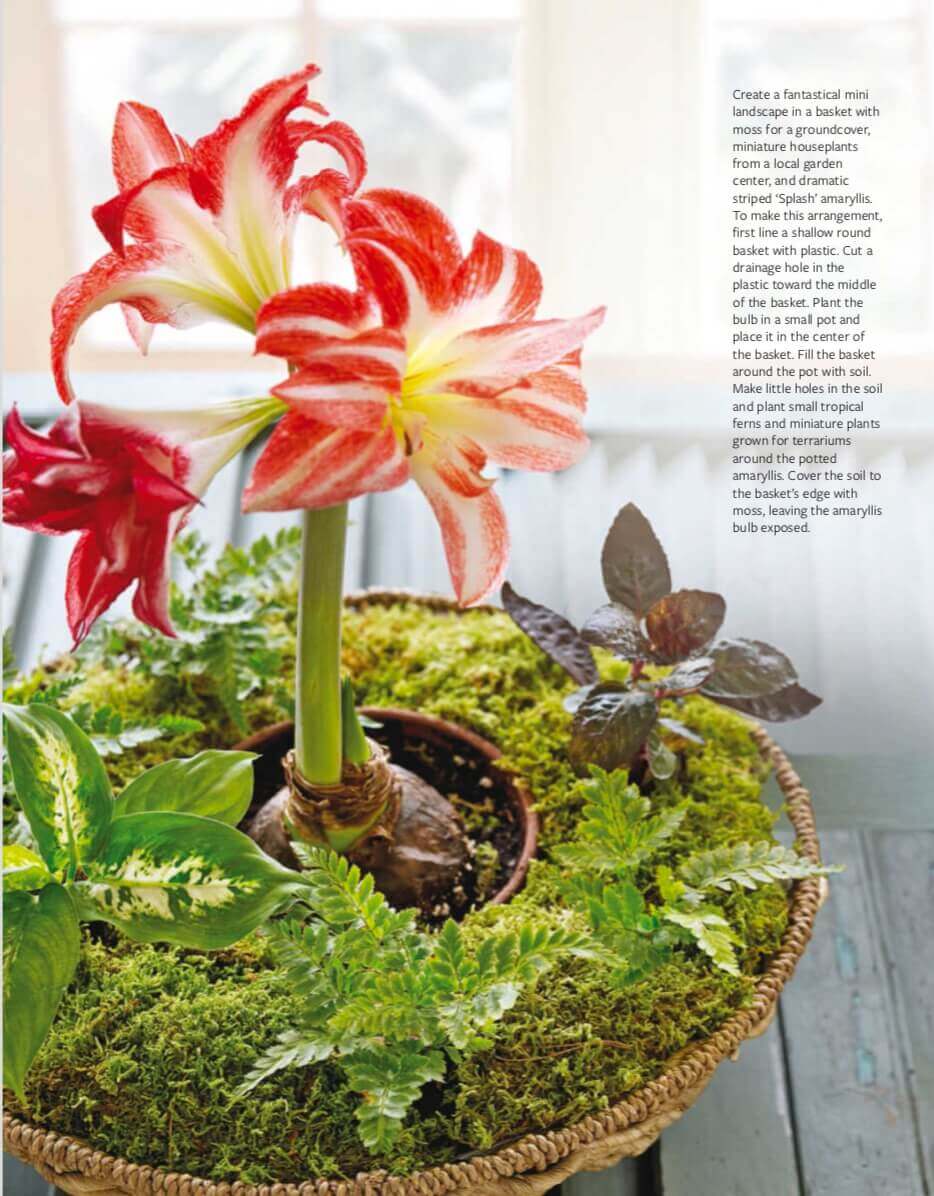
Create a fantastical mini landscape in a basket with moss for a groundcover, miniature houseplants from a local garden center, and dramatic striped ‘Splash’ amaryllis. To make this arrangement, first line a shallow round basket with plastic. Cut a drainage hole in the plastic toward the middle of the basket. Plant the bulb in a small pot and place it in the center of the basket. Fill the basket around the pot with soil. Make little holes in the soil and plant small tropical ferns and miniature plants grown for terrariums around the potted amaryllis. Cover the soil to the basket’s edge with moss, leaving the amaryllis bulb exposed.

 Above left: Use three bulbs of ‘Apple Blossom’ amaryllis in a plastic pot disguised for this earthy arrangement, which also includes bark, branches, and twine. Begin by collecting a few small branches and long, flat bark pieces from a fallen branch. Break the bark into strips taller than your pot. Piece by piece, hot-glue the strips vertically to the container, overlapping them slightly. Wrap twine several times around the container and tie it. Insert stark branches of cones into the soil for a wintry effect. Top right: Find a glass container with an opening wide enough at the top to fit a small or medium potted amaryllis inside. Set the pot in the container. To hold the pot in place as the flower stems grow and bloom, surround the pot with pinecones, twigs, moss, and other natural objects you’ve collected. Also use tall branches to support the stems of ‘Emerald’ amaryllis as they grow. Above right: Use a pot-in-bowl technique to create a balanced arrangement in scale with the tall stems and big blooms of ‘Summertime’ amaryllis. In a large glass bowl, place some moss at the bottom to elevate the potted amaryllis bulb so the top of the pot is roughly the same level as the bowl’s rim. Cover the inside of the glass bowl with moss to hide the pot.
Above left: Use three bulbs of ‘Apple Blossom’ amaryllis in a plastic pot disguised for this earthy arrangement, which also includes bark, branches, and twine. Begin by collecting a few small branches and long, flat bark pieces from a fallen branch. Break the bark into strips taller than your pot. Piece by piece, hot-glue the strips vertically to the container, overlapping them slightly. Wrap twine several times around the container and tie it. Insert stark branches of cones into the soil for a wintry effect. Top right: Find a glass container with an opening wide enough at the top to fit a small or medium potted amaryllis inside. Set the pot in the container. To hold the pot in place as the flower stems grow and bloom, surround the pot with pinecones, twigs, moss, and other natural objects you’ve collected. Also use tall branches to support the stems of ‘Emerald’ amaryllis as they grow. Above right: Use a pot-in-bowl technique to create a balanced arrangement in scale with the tall stems and big blooms of ‘Summertime’ amaryllis. In a large glass bowl, place some moss at the bottom to elevate the potted amaryllis bulb so the top of the pot is roughly the same level as the bowl’s rim. Cover the inside of the glass bowl with moss to hide the pot.

TIẾNG VIỆT

  • TÁC GIẢ: PENELOPE O’SULLIVAN
  • NHÀ XUẤT BẢN: KARIN LIDBECK-BRENT
  • ẢNH: ANDRE BARANOWSKI

CÁC CÁCH SẮP XẾP CÁC CỦ HOA MÙA ĐÔNG VÔ CÙNG ĐƠN GIẢN

Nếu bạn khao khát được ngắm nhìn những bông hoa trong suốt mùa đông, hãy nghĩ đến hoa Loa Kèn Đỏ thanh lịch (amaryllis, Hippeastrumspp). Đây là một loại hoa nở trong nhà phổ biến với các màu hồng, đỏ, xanh lá cây, trắng và nhiều màu khác, vẻ đẹp của chúng góp thêm phần rực rỡ cho bất kỳ phòng hoặc không gian bàn nào. Nhưng thay vì trồng hoa Loa Kèn Đỏ (amaryllis) trong một chậu nhựa trơn, hãy tăng vẻ đẹp của chúng bằng cách trồng cùng với các loại cây cỏ khác.

Thực hiện theo sự hướng dẫn của nhà thiết kế hoa Karin Lidbeck-Brent, sử dụng hướng dẫn từng bước để trưng bày hoa Loa Kèn Đỏ (amaryllis) theo cách sắp xếp lấy cảm hứng từ thiên nhiên bao gồm cả cây trồng trong chậu và hoa cắt cành. Bắt đầu với những củ rễ trần, đặt chúng đơn lẻ hoặc theo từng nhóm trong chậu nhựa. Sau đó đặt các chậu vào môi trường tự nhiên, sau đó chứng kiến cây phát triển và ra hoa trong vài tháng tới.

Lidbeck-Brent, người thu thập hầu hết các loại cây cho các thiết kế của mình từ chính sân vườn của anh ấy cho biết: “Bạn có thể mang lại cho hoa Loa Kèn Đỏ (amaryllis) một cảnh quan tự nhiên của mùa đông bằng cách trồng chúng trong chậu cùng với các loại cây mùa đông khác. “Đi bộ ra ngoài và tìm những loại cây bạn yêu thích trong rừng hoặc trong vườn nhà bạn.”

 Opposite: To make a whimsical bird-nest design, wrap the shoulders and sides of a ‘Merry Christmas’ amaryllis bulb in moss; secure with twine. Add potting mix to a terra-cotta pot until it is three-quarters full. Set the nest in the pot atop the potting mix and place a little potting soil inside the nest. Put the wrapped bulb in the nest with its roots gently tucked underneath the bulb; they will grow through the nest into the pot below. Set an artificial bird on the nest’s edge. Above: The large, pale blooms of amaryllis ‘Nymph’ lend themselves to striking displays, whether planted singly or in groups. Amaryllis makes a stunning cut flower that can last 10 to 14 days. Prolong the life of the flowers by recutting stem ends every few days and replacing the vase water.
Để tạo một thiết kế hình tổ chim, hãy bọc các vai và hai bên của củ hoa Loa Kèn Đỏ (amaryllis ‘Merry Christmas’) bằng rêu hoặc sợi xe. Thêm hỗn hợp bầu vào chậu đất nung cho đến khi đầy ba phần tư. Đặt củ hoa vào trên hỗn hợp bầu và cho một ít đất vào bên trong cũ đã phủ rêu. Đặt củ sao cho rễ của chúng được cắm nhẹ nhàng xuống bầu, củ hoa sẽ phát triển. Đặt một con chim giả trên rìa của tổ. Ảnh trên: Những bông hoa Loa Kèn lớn màu nhạt (amaryllis ‘Nymph’) có vẻ đẹp nổi bật cho dù được trồng đơn lẻ hay theo nhóm. Hoa Loa Kèn Đỏ (Amaryllis) cho bạn những bông hoa cắt cành tuyệt đẹp có thể tồn tại từ 10 đến 14 ngày. Kéo dài thời gian tươi của hoa bằng cách ngắt ngọn vài ngày một lần và thay nước trong bình.

Các tác phẩm hoa Loa Kèn Đỏ (amaryllis) của Lidbeck-Brent là sự kết hợp nổi bật giữa những bông hoa tươi nhiều màu sắc và thảm thực vật theo mùa. Cô ấy đào rêu dưới những cây Đỗ Quyên (rhododendron) của mình để phủ lên đất theo một số cách sắp xếp và kéo những mảng vỏ cây khỏi một cành cây rụng để tạo điểm nhấn gồ ghề.

Trước khi trồng củ, hãy chọn chiến lược nở hoa. Để có những tác phẩm lộng lẫy, hãy trồng tất cả các củ hoa cùng một lúc. Hoặc trồng cây hai tuần một lần, như Lidbeck-Brent đã làm, để hoa nở liên tục trong suốt mùa đông. Sau khi trồng trong chậu, hoa Loa Kèn Đỏ Hà Lan (Dutch amaryllis) thường ra hoa sau 8 đến 12 tuần, và các dòng hoa Loa Kèn Đỏ Nam Phi nở hoa sau 4 đến 6 tuần.

Lidbeck- Brent nói: “Thật đáng kinh ngạc khi hoa Loa Kèn Đỏ phát triển nhanh chóng. Đó là điều làm cho việc trồng cây rất thú vị.” Cô ấy cho biết thêm rằng mặc dù hoa Loa Kèn Đỏ (amaryllis) có thể được mua để trồng trước trong chậu nhựa, nhưng nếu bạn có thể tạo môi trường cho riêng mình, quan sát chúng phát triển thì càng thú vị hơn.

Nhóm một số loại hoa Loa Kèn Đỏ (amaryllis) làm sống động bất kỳ mặt bàn đầy nắng nào. Từ phía ngoài cùng bên trái, bức ảnh trên bao gồm: Cây cybister xanh lục ‘Emerald’; Cây ‘Picotee’, với những cánh hoa màu trắng có cạnh màu đỏ thẫm; Cây ‘Splash’ đỏ-trắng; ‘Purple Rain’ dưới lớp áo vải; spider-flower cybister ‘Evergreen’; hoa ‘Faro’ vừa chớm nở, mở ra với một đốm sáng hình sao màu trắng trên cánh hoa hình cá hồi và một con mắt màu xanh lá cây; và “Summertime”.

Tạo một cảnh quan nhỏ tuyệt đẹp trong một chiếc giỏ với lớp rêu phủ bề mặt, những cây trồng trong nhà là mô hình thu nhỏ từ trung tâm khu vườn địa phương và hoa Loa Kèn Đỏ (amaryllis) sọc ‘Splash’ có vẻ đẹp đầy ấn tượng. Để sắp xếp một giỏ cây như thế này, đầu tiên bạn hãy lót một chiếc rổ tròn nông bằng nhựa. Cắt một lỗ thoát nước trên nhựa ở vị trí giữa rổ. Trồng củ vào một cái chậu nhỏ và đặt nó ở giữa giỏ. Đổ đầy đất vào rổ xung quanh chậu. Tạo những lỗ nhỏ trên đất và trồng cây dương xỉ nhiệt đới nhỏ và các loại cây nhỏ trồng cho hồ cạn xung quanh cây hoa Loa Kèn Đỏ (amaryllis). Phủ rêu lên mép giỏ, để củ hoa Loa Kèn Đỏ (amaryllis) lộ ra ngoài.

 Above left: Use three bulbs of ‘Apple Blossom’ amaryllis in a plastic pot disguised for this earthy arrangement, which also includes bark, branches, and twine. Begin by collecting a few small branches and long, flat bark pieces from a fallen branch. Break the bark into strips taller than your pot. Piece by piece, hot-glue the strips vertically to the container, overlapping them slightly. Wrap twine several times around the container and tie it. Insert stark branches of cones into the soil for a wintry effect. Top right: Find a glass container with an opening wide enough at the top to fit a small or medium potted amaryllis inside. Set the pot in the container. To hold the pot in place as the flower stems grow and bloom, surround the pot with pinecones, twigs, moss, and other natural objects you’ve collected. Also use tall branches to support the stems of ‘Emerald’ amaryllis as they grow. Above right: Use a pot-in-bowl technique to create a balanced arrangement in scale with the tall stems and big blooms of ‘Summertime’ amaryllis. In a large glass bowl, place some moss at the bottom to elevate the potted amaryllis bulb so the top of the pot is roughly the same level as the bowl’s rim. Cover the inside of the glass bowl with moss to hide the pot.
Phía trên bên trái: Đặt ba củ hoa Loa Kèn Đỏ (amaryllis) ‘Apple Blossom’ trong một chậu nhựa ngụy trang bao gồm cả vỏ cây, cành và sợi xe. Bắt đầu bằng cách thu thập một vài cành nhỏ và những mảnh vỏ cây dài và phẳng từ một cành cây đã rụng. Bẻ vỏ cây thành các dải cao hơn chậu của bạn. Dán các dải vào hộp theo chiều dọc, chồng lên nhau một chút. Quấn dây xe nhiều lần xung quanh hộp đựng và buộc lại. Chèn các nhánh hình nón cứng cáp vào đất để tạo hiệu ứng mùa đông. Trên cùng bên phải: Tìm một hộp thủy tinh có lỗ mở đủ rộng ở phía trên để có thể đặt một chậu hoa Loa Kèn Đỏ (amaryllis) vừa hoặc nhỏ bên trong. Đặt chậu hoa vào hộp thủy tinh. Để cố định chậu ở một vị trí khi cành hoa phát triển và nở hoa, hãy bao quanh chậu bằng những quả tùng, cành cây, rêu và các loại cây khác mà bạn đã sưu tầm được. Cũng sử dụng các cành cây cao để hỗ trợ thân cây hoa Loa Kèn khi chúng phát triển. Ảnh dưới bên phải: Sử dụng kỹ thuật trồng trong chậu để tạo ra một sự sắp xếp cân đối về tỷ lệ với những thân cây cao và những bông hoa to của cây Loa Kèn Đỏ (amaryllis ‘Summertime’). Trong một bát thủy tinh lớn, đặt một ít rêu ở dưới cùng để nâng cao củ hoa trong chậu sao cho đỉnh của chậu gần bằng với vành bát. Phủ rêu bên trong bát thủy tinh để giấu chậu.

Xem thêm các mục khác của sách!

Trả lời

0988110300
chat-active-icon